Back

Guides

Community created guides, helpful strategies, and more.
TOPIC | a visual guide to making accents!
1 2
[img]https://file.garden/ZTcW6HlIhS-zrdHO/flightrising/tutorials/accenttutorialbanner.png[/img] [center][emoji=cloud size=1][size=5] a visual guide to making accents! [/size][emoji=cloud size=1] yo! you wanna make skins? accents? you wanna spend some gems? the answer is yes, of course, so welcome! this is gonna be a (hopefully!) easy to follow, step by step guide on how to design, draw, and order a custom skin or accent! i'll also touch on things like guidelines, festival entries, and all that fun stuff! if you'd prefer smth less detailed though, check out [url=https://www1.flightrising.com/forums/gde/1327735]JackalBones's text based guide[/url]! or equally the site's [url=https://www1.flightrising.com/wiki/skins/3]official tutorial[/url]! i'll be somewhat handholdy throughout this, and will definitely overexplain some areas, so if you already know your stuff feel free to skip to a specific section! [/center] [emoji=yellow gem size=1][size=5] contents:[/size] [url=https://www1.flightrising.com/forums/gde/2919067#post_44928246]Limits and Rules[/url] - what you can and cannot put in a design, a must read! [url=https://www1.flightrising.com/forums/gde/2919067#post_44928249]The PSD Files[/url] - downloading the base files, unzipping them, and taking a look at what's what! [url=https://www1.flightrising.com/forums/gde/2919067#post_44928251]Actually Drawing[/url] - the exciting part! sketching and lining and colouring your design! [url=https://www1.flightrising.com/forums/gde/2919067/1#post_44928252]Finishing Up[/url] - the less exciting part: moving your layers to the Accent Parts folder, resizing your canvas, and exporting as a transparent PNG. [url=https://www1.flightrising.com/forums/gde/2919067#post_44928255]Previewing an accent[/url] - seeing how your accent looks on random dragons, previewing an accent with apparel, previewing accents that cover a dragon's eye. [url=https://www1.flightrising.com/forums/gde/2919067#post_44928265]Printing your custom[/url] - from buying a blueprint, to ordering your custom, to being denied! (it's not scary, i promise!) [url=https://www1.flightrising.com/forums/gde/2919067#post_44928266]Festival Skin Competitions[/url] - how to enter! along with the fabulous prizes and less fabulous rules! also explains how to host an image on another site so you can get its URL!
accenttutorialbanner.png
a visual guide to making accents!

yo! you wanna make skins? accents? you wanna spend some gems? the answer is yes, of course, so welcome!

this is gonna be a (hopefully!) easy to follow, step by step guide on how to design, draw, and order a custom skin or accent! i'll also touch on things like guidelines, festival entries, and all that fun stuff!

if you'd prefer smth less detailed though, check out JackalBones's text based guide! or equally the site's official tutorial! i'll be somewhat handholdy throughout this, and will definitely overexplain some areas, so if you already know your stuff feel free to skip to a specific section!

contents:

Limits and Rules - what you can and cannot put in a design, a must read!

The PSD Files - downloading the base files, unzipping them, and taking a look at what's what!

Actually Drawing - the exciting part! sketching and lining and colouring your design!

Finishing Up - the less exciting part: moving your layers to the Accent Parts folder, resizing your canvas, and exporting as a transparent PNG.

Previewing an accent - seeing how your accent looks on random dragons, previewing an accent with apparel, previewing accents that cover a dragon's eye.

Printing your custom - from buying a blueprint, to ordering your custom, to being denied! (it's not scary, i promise!)

Festival Skin Competitions - how to enter! along with the fabulous prizes and less fabulous rules! also explains how to host an image on another site so you can get its URL!

angle%201.pngartbutton%20closed.pngartshop%20icon.pngstresssig.gif
angle%202.pngumabutton.pngumashop%20icon.pngradiation%20middle.png
angle%203.pngumatutorialbutton.pngumatutorial%20icon.pngstresssig2.gif
[center][emoji=cloud size=1][size=5] Limits and Rules: [/size][emoji=cloud size=1][/center] it's worth reading through the [url=https://www1.flightrising.com/wiki/skins/1]official page of rules[/url], but i'll recap the main points here! [size=5]Limits:[/size] [LIST] [*] skins/accents can't go outside the lines. [*] the dragon's original lineart must be visible through the skin/accent, and must be significantly darker than the colour underneath it. [*] pure black (or really really dark grey) isn't allowed, because you can't see the lines over it. [*] the shadow layer must be left be! you can recolour it though, more on that later! [*] an accent covers 0-30% of a dragon's base, a skin covers 30-100%. [/LIST] [size=5]Rules:[/size] [LIST] [*] if the skin/accent has writing in a non-English language (for example, an accent with Japanese characters on it), you'll be asked to provide a translation after submitting the skin in the [url=https://www1.flightrising.com/forums/skin/1199521]Skin And Accent Problems[/url] thread. [*] adding to the point above, skins/accents with non-English names will also need a translation! [*] photos or textures can't be used, because it disrupts the site's aesthetic. [*] copyrighted characters or logos can't be incorporated, which includes a dragon wearing a cosplay of a copyrighted character's outfit. [*] a skin/accent can't contain the Forbidden Subjects. [/LIST] [size=5]The Forbidden Subjects:[/size] (i'll just quote the staff for this!) [quote="staff"]Q: What content is inappropriate for a custom skin design? All Skins submitted to the queue are judged on a case by case basis, but certain design elements are more likely to result in a rejection for inappropriate material for the site than others: Guns - We do not allow the use of modern day guns. Weapons with a more fantastical or historical basis, such as a blunderbuss or sci-fi laser gun, are generally acceptable. Religion - To remain respectful and neutral to all faiths, we do not allow the usage of religious symbols in skins and accents. Gore - We do not allow skin designs that depict creatures that appear to be suffering from massive wounds and/or designs that contain excessive gore. Scars, light wounds, and blood splatter are generally okay. Political Propaganda - Flight Rising would prefer to avoid political discourse on the site as it can be a very divisive topic. Designs that contain political propaganda will be rejected for this reason. Adult Themes - We do not allow skin designs that contain underwear, lingerie, or items of an adult nature on the site.[/quote] as gore is a popular subject, here are the general limits of it: [LIST] [*] customs that depict the dragon suffering or in pain are not allowed. [*] customs that heavily resemble gore may also be denied, even if they're not actually bloody (although usually lowering the saturation, or just making it less red, will make the custom fine to submit again!) [*] imagery like arrows or daggers sticking into a dragon is sometimes allowed, but it's more likely to pass if there's both no blood and the weapon hasn't gone all the way through. [*] red flowers are a good way to get the edgy aesthetic without actual gore! [/LIST] the other forbidden subjects are pretty clear cut, so just avoid them!
Limits and Rules:

it's worth reading through the official page of rules, but i'll recap the main points here!

Limits:
  • skins/accents can't go outside the lines.
  • the dragon's original lineart must be visible through the skin/accent, and must be significantly darker than the colour underneath it.
  • pure black (or really really dark grey) isn't allowed, because you can't see the lines over it.
  • the shadow layer must be left be! you can recolour it though, more on that later!
  • an accent covers 0-30% of a dragon's base, a skin covers 30-100%.

Rules:
  • if the skin/accent has writing in a non-English language (for example, an accent with Japanese characters on it), you'll be asked to provide a translation after submitting the skin in the Skin And Accent Problems thread.
  • adding to the point above, skins/accents with non-English names will also need a translation!
  • photos or textures can't be used, because it disrupts the site's aesthetic.
  • copyrighted characters or logos can't be incorporated, which includes a dragon wearing a cosplay of a copyrighted character's outfit.
  • a skin/accent can't contain the Forbidden Subjects.

The Forbidden Subjects: (i'll just quote the staff for this!)
staff wrote:
Q: What content is inappropriate for a custom skin design?

All Skins submitted to the queue are judged on a case by case basis, but certain design elements are more likely to result in a rejection for inappropriate material for the site than others:

Guns - We do not allow the use of modern day guns. Weapons with a more fantastical or historical basis, such as a blunderbuss or sci-fi laser gun, are generally acceptable.

Religion - To remain respectful and neutral to all faiths, we do not allow the usage of religious symbols in skins and accents.

Gore - We do not allow skin designs that depict creatures that appear to be suffering from massive wounds and/or designs that contain excessive gore. Scars, light wounds, and blood splatter are generally okay.

Political Propaganda - Flight Rising would prefer to avoid political discourse on the site as it can be a very divisive topic. Designs that contain political propaganda will be rejected for this reason.

Adult Themes - We do not allow skin designs that contain underwear, lingerie, or items of an adult nature on the site.

as gore is a popular subject, here are the general limits of it:
  • customs that depict the dragon suffering or in pain are not allowed.
  • customs that heavily resemble gore may also be denied, even if they're not actually bloody (although usually lowering the saturation, or just making it less red, will make the custom fine to submit again!)
  • imagery like arrows or daggers sticking into a dragon is sometimes allowed, but it's more likely to pass if there's both no blood and the weapon hasn't gone all the way through.
  • red flowers are a good way to get the edgy aesthetic without actual gore!
the other forbidden subjects are pretty clear cut, so just avoid them!

angle%201.pngartbutton%20closed.pngartshop%20icon.pngstresssig.gif
angle%202.pngumabutton.pngumashop%20icon.pngradiation%20middle.png
angle%203.pngumatutorialbutton.pngumatutorial%20icon.pngstresssig2.gif
[center][emoji=cloud size=1][size=5] The PSD Files: [/size][emoji=cloud size=1][/center] first you'll need to download the PSD you want from [url=https://www1.flightrising.com/wiki/skins/2]here[/url]. it will download as a zip file, which you'll need to unzip before you can begin! if you're on PC, [url=https://www.wikihow.com/Unzip-a-File]here's how to do that[/url]! equally, if you're working on a phone, you'll either have to press and hold the file and select 'uncompress', or tap the file and find the option called 'extract'! each zip should contain two PSDs: the normal file (e.g. 'skin_coatl_f_dragon.psd') and the elements friendly file (e.g. 'skin_coatl_f_dragon_elements_friendly.psd'). if you use photoshop elements, which can't use layer folders, use the second one! most programs can use folders though, so let's open the first one up! (we'll need to open it in an art program that's compatible with the PSD format, i'll be using sai for this but other good options are: photoshop, krita, gimp, medibang, and more!) [img]https://file.garden/ZTcW6HlIhS-zrdHO/flightrising/tutorials/1%20opening%20screen.png[/img] here's what we first see when it's open, give or take whichever breed you chose to work with! on the far left here are all the folders and layers, this will be in a different place depending on your art program, but it should be pretty easy to spot. we'll look at the Skin Parts folder first, that's where we'll be working the most! (yes, even if you're making an accent, i'll explain why in a bit!) there's a few important bits here to focus on, so let's go through them one by one. [img]https://file.garden/ZTcW6HlIhS-zrdHO/flightrising/tutorials/2%20skin%20parts%20folder.png[/img] 1) [b]Layer Mode:[/b] this might be in a different place, depending on your art program. this changes how a layer interacts with the colours beneath it. the Shadows layer has to stay on multiply! 2) [b]Preserve / Lock Opacity:[/b] may also be called 'lock transparent pixels'. this lets you quickly recolour faded or semi-transparent layers without losing edge quality, [url=https://www.sitepoint.com/photoshop-tip-locking-transparent-pixels/]here's[/url] how to do this on photoshop. 3) [b]Set as Clipping Group:[/b] a clipped layer won't go outside the boundaries of the layer beneath it. here, the Shadows and Detail layers are clipping onto the base. 4) [b]The Skin Parts folder:[/b] just holds the other layers, you can toggle its visibility, but you won't need to just yet. 5) [b]Inks (Lineart) layer:[/b] the base lineart. you can change its colouring, but you can't erase or modify the lines' shape. the name of this layer is different on different breeds, the older ones name it 'Inks' whereas the newer ones name it 'Line Art'. 6) [b]Shadows layer:[/b] the base shadows. you can change its colouring, but you can't erase or modify the shadows themselves. 7) [b]Several colour layers (details):[/b] these aren't too important! you can do whatever you want with these, modify or delete them as you will. 8) [b]Base colour layer:[/b] your skin or accent can't go outside this! let's also take a quick look at the Accent Parts folder. [img]https://file.garden/ZTcW6HlIhS-zrdHO/flightrising/tutorials/3%20accent%20parts%20folder.png[/img] it's pretty empty! the lineart and shadow layers are clipped onto a blank layer. we're not ready to work with this folder yet, though, so we can close it back up for now.
The PSD Files:

first you'll need to download the PSD you want from here. it will download as a zip file, which you'll need to unzip before you can begin! if you're on PC, here's how to do that! equally, if you're working on a phone, you'll either have to press and hold the file and select 'uncompress', or tap the file and find the option called 'extract'!

each zip should contain two PSDs: the normal file (e.g. 'skin_coatl_f_dragon.psd') and the elements friendly file (e.g. 'skin_coatl_f_dragon_elements_friendly.psd'). if you use photoshop elements, which can't use layer folders, use the second one!

most programs can use folders though, so let's open the first one up!

(we'll need to open it in an art program that's compatible with the PSD format, i'll be using sai for this but other good options are: photoshop, krita, gimp, medibang, and more!)


1%20opening%20screen.png

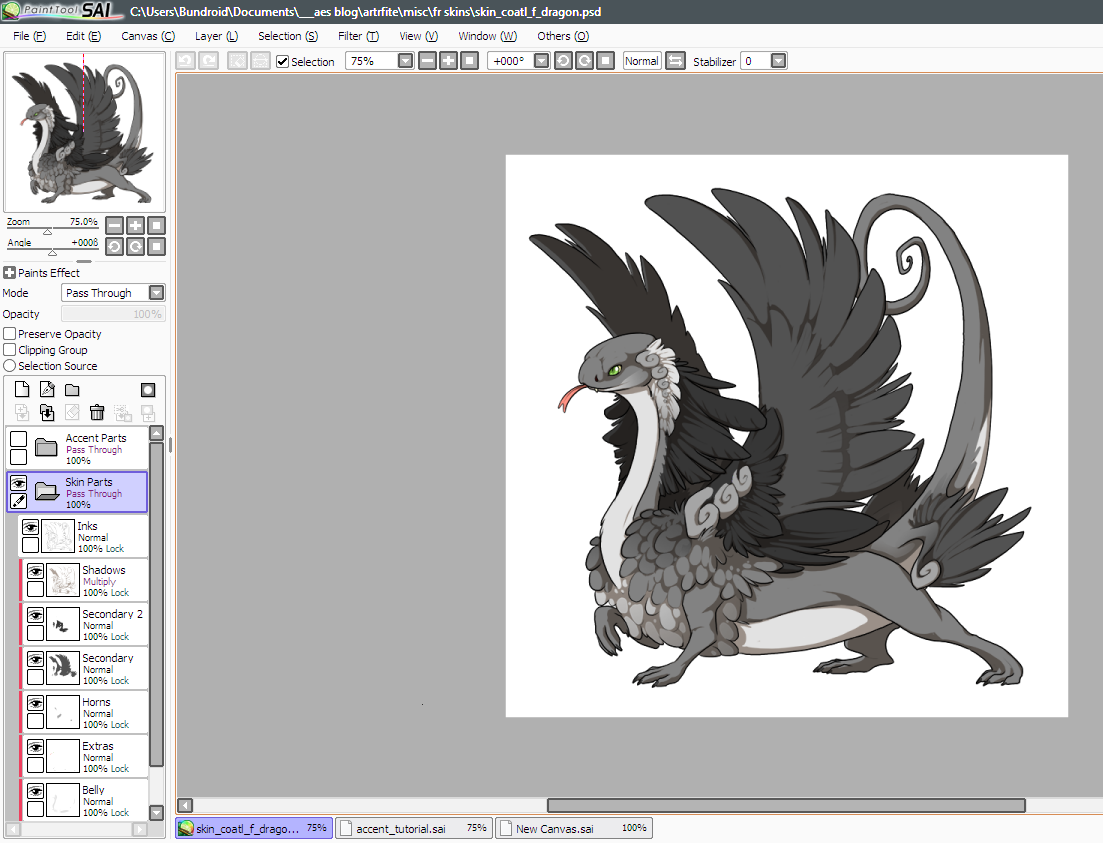
here's what we first see when it's open, give or take whichever breed you chose to work with! on the far left here are all the folders and layers, this will be in a different place depending on your art program, but it should be pretty easy to spot.

we'll look at the Skin Parts folder first, that's where we'll be working the most! (yes, even if you're making an accent, i'll explain why in a bit!)

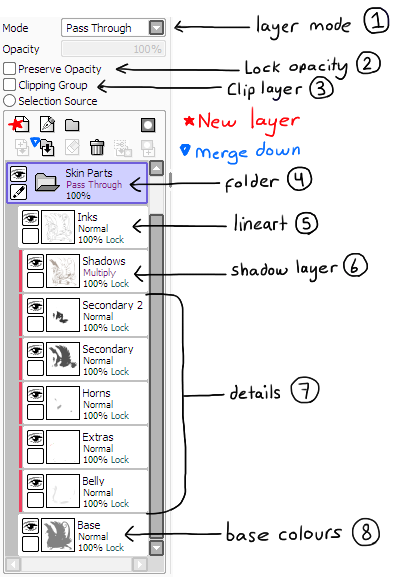
there's a few important bits here to focus on, so let's go through them one by one.

2%20skin%20parts%20folder.png

1) Layer Mode: this might be in a different place, depending on your art program. this changes how a layer interacts with the colours beneath it. the Shadows layer has to stay on multiply!

2) Preserve / Lock Opacity: may also be called 'lock transparent pixels'. this lets you quickly recolour faded or semi-transparent layers without losing edge quality, here's how to do this on photoshop.

3) Set as Clipping Group: a clipped layer won't go outside the boundaries of the layer beneath it. here, the Shadows and Detail layers are clipping onto the base.

4) The Skin Parts folder: just holds the other layers, you can toggle its visibility, but you won't need to just yet.

5) Inks (Lineart) layer: the base lineart. you can change its colouring, but you can't erase or modify the lines' shape. the name of this layer is different on different breeds, the older ones name it 'Inks' whereas the newer ones name it 'Line Art'.

6) Shadows layer: the base shadows. you can change its colouring, but you can't erase or modify the shadows themselves.

7) Several colour layers (details): these aren't too important! you can do whatever you want with these, modify or delete them as you will.

8) Base colour layer: your skin or accent can't go outside this!

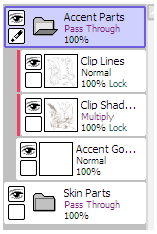
let's also take a quick look at the Accent Parts folder.

3%20accent%20parts%20folder.png

it's pretty empty! the lineart and shadow layers are clipped onto a blank layer.
we're not ready to work with this folder yet, though, so we can close it back up for now.

angle%201.pngartbutton%20closed.pngartshop%20icon.pngstresssig.gif
angle%202.pngumabutton.pngumashop%20icon.pngradiation%20middle.png
angle%203.pngumatutorialbutton.pngumatutorial%20icon.pngstresssig2.gif
[center][emoji=cloud size=1][size=5] Actually Drawing: [/size][emoji=cloud size=1][/center] enough setup! let's get to the fun part! so what i usually do first is a rough sketch, to test out a few different ideas before i settle on what i'm lining. we'll make two layers, above both folders: 1) a layer filled completely with white, set at 50% opacity. i've named mine White to stay organised, this just helps you see what you're doing! you can skip this if you prefer. 2) a layer above the white layer for you to sketch on. i've named it Sketch here for more organisation but it doesn't really matter. [img]https://file.garden/ZTcW6HlIhS-zrdHO/flightrising/tutorials/4%20white%20layer.png[/img] here's when you start flexing your creative muscles! if you already have an idea in mind: go for it! sketch until you're happy and move on to the next step. if you're unsure of what exactly you want to make, just draw until something clicks! here are a few things to think about when designing your custom: [LIST] [*] do you want to make a skin or an accent? skins cover more than 30% of the dragon, and are more expensive to produce. accents are cheaper and a good way to enter the market, if you're wanting to sell them. [*] will your idea fit within the lines? [*] do you want to appeal to a market, or are you making the custom for yourself? if you're aiming to sell it, don't feel too restricted by current trends, but definitely take a peek to see what's selling the most! [/LIST] but in the end, have fun and draw what you like! [img]https://file.garden/ZTcW6HlIhS-zrdHO/flightrising/tutorials/5%20sketch.png[/img] for this example, i've decided to give our coatl here a cute birthday ribbon and hat! i'm not entirely sure why, but the creative process works in mysterious ways. next let's move these layers around a bit! - move the White layer and your Sketch layer into the Skin Parts folder, above the Inks/lineart. - set your sketch to a lower opacity, so you can see what you're doing when you draw over it. you can also turn the opacity of the White layer up if you're struggling to see your lines. - create a new layer above the others for you to draw your clean lineart onto. i've called mine MyLines to differentiate it from the Inks/lineart layer! [img]https://file.garden/ZTcW6HlIhS-zrdHO/flightrising/tutorials/6%20move%20layers.png[/img] i personally prefer using a small, thin brush for lining, to try and match the style of the base, but how you line it is up to you! you want graceful wispy lineart? chunky cartoony lines? the world's your oyster! keep in mind, though, that teeny tiny details might get lost when you shrink the canvas down later, so make sure the important stuff isn't too small! [size=5]Colouring:[/size] once the clean lineart is done, it's time to colour it! we'll make a new layer underneath it, i'll refer to this as the BlockColour layer, we'll be using it to fill the base colours of our accent. (also at this point you can hide or delete your sketch layer, unless there's still details on it you want to add later.) [img]https://file.garden/ZTcW6HlIhS-zrdHO/flightrising/tutorials/7%20clean%20lines.png[/img] we'll start colouring on the BlockColour layer by hand. [img]https://file.garden/ZTcW6HlIhS-zrdHO/flightrising/tutorials/8%20block%20colours.png[/img] the base colour you use doesn't really matter, just anything that'll stand out from the dragon base beneath it! don't worry about accidentally colouring over the lineart for details that disappear behind wings or arms (like the hat here, going behind the coatl's headfeathers), we can clean that up in a few steps! and we'll also make sure the obscured lineart is visible by the end! next we'll want to start adding our actual colours in. make a new layer above your BlockColours layer, and set it as a clipping layer. (i've named this layer 'colouring', but honestly these names are just so my screenshots make more sense!) this should be your set up so far: [img]https://file.garden/ZTcW6HlIhS-zrdHO/flightrising/tutorials/9%20clipping.png[/img] you can make as many colouring layers as you want, and they'll all clip onto the BlockColour layer to stay nice and neat. it's good to keep different colours, or different sections, on different layers, as it's much easier to recolour the accent later! (which is especially useful if your skin gets turned down for being too dark / too gory.) [img]https://file.garden/ZTcW6HlIhS-zrdHO/flightrising/tutorials/10%20coloured.png[/img] i ended up using a few colouring layers so i could add some shading, but the colouring's done! we're halfway there! this is looking good so far, but my lineart is just black right now, which is a little plain for me. whether you want to colour your lineart is up to you (it can look nice either way!) but i'll be colouring mine for the aesthetics! to colour it in, you can either lock your lineart layer's transparency and colour directly onto it, or you can make a clipping layer above it. dark, saturated colours are usually a safe bet for the lineart, but art is subjective! go ham! [img]https://file.garden/ZTcW6HlIhS-zrdHO/flightrising/tutorials/11%20coloured%20lines.png[/img] looking snazzy! but as nice as this looks right now, it's not following the rules just yet! it's obscuring the lineart and shadows of the dragon underneath it, so let's fix that up real quick. [size=5]quickly tidying up:[/size] before we can fix the lineart we have a dilemma: we want to clip our layers to the main dragon base, but we already have layers clipping onto each other right now. (if you coloured your accent's block colours without using clipping layers, feel free to skip ahead!) layers can only clip onto one thing at a time, so moving them to the main base will probably end up looking something like this: [img]https://file.garden/ZTcW6HlIhS-zrdHO/flightrising/tutorials/12%20ugly%20mess.png[/img] not really the effect i was going for, the whole point of clipping my colouring layers in the first place was so you couldn't see how messy my colouring is! let's move them back out again, and clean them up a bit first. you have two options on how to do this: [b]option one:[/b] merge all your clipped colouring layers down onto the block colour layer they're clipped to. [LIST] [*] this is the easier, quicker option! if the other option seems a bit overwhelming, just stick to merging! [*] this will possibly make recolouring harder, if that's something you'd want to do later! [/LIST] [b]option two:[/b] erase all the parts of the colouring layer that are going outside the block colour layer [LIST] [*] unclip all of your colouring layers (and don't worry if it's super messy!) [img]https://file.garden/ZTcW6HlIhS-zrdHO/flightrising/tutorials/13%20unclip.png[/img] [*] select the contents of the BlockColours layer by ctrl+left clicking* the layer's thumbnail. [img]https://file.garden/ZTcW6HlIhS-zrdHO/flightrising/tutorials/14%20select.png[/img] * as of now, i'm not sure what the phone equivalent of this is. if anyone uses mobile and knows how to select the contents of a layer, please let me know! * if you're working on mac, you can use cmd+left click here! [*] hover over 'select' or 'selection' on the top of your screen (next to where you find File, Edit, etc) and click 'invert' or 'inverse selection'. [img]https://file.garden/ZTcW6HlIhS-zrdHO/flightrising/tutorials/15%20invert%20selection.png[/img] [*] make sure you're clicked onto one of your colouring layers, and erase everything you have selected. you can do this with an eraser pen, clearing the layer, or by pressing ctrl+X. [*] make sure to repeat this step if you made more than one colouring layer! it should be nice and neat by the end of it! [/LIST] i'm not fussed about recolouring it later, so i'll just merge all the layers together. onto the next step! [size=5]Unobscuring the Base Lineart:[/size] for a skin to be submitted, we need to be able to see the dragon's base lineart and shadows through it. we've been working on top of them so far, but let's move all our layers underneath the Shadows layer! [img]https://file.garden/ZTcW6HlIhS-zrdHO/flightrising/tutorials/16%20oops.png[/img] well that's not right, we need to set our Lines and BlockColour layers as clipping layers! they should clip onto the Base layer at the very bottom. [img]https://file.garden/ZTcW6HlIhS-zrdHO/flightrising/tutorials/17%20ugly%20shading.png[/img] much better! ...except, not really, the colours are all muddy now! the default lineart is black, and the default shadows are a lovely shade of off-beige - this can really damage the aesthetics of a pretty skin, so we're going to recolour them! the Inks/Lineart and Shadows layers are handily locked by default! so you can just colour onto the layers directly to spruce them up. (remember that the base shadows and lineart has to be visible through your accent! if you colour them to be too light your skin may not be accepted onto the site, but don't be too scared of using light colours! even experienced accent artists occasionally get turned down for their shadows, you just have to tweak it and try again!) [img]https://file.garden/ZTcW6HlIhS-zrdHO/flightrising/tutorials/18%20pretty%20shading.png[/img] it's looking much less muddy! there are probably areas where i could get away with making the shadows even lighter, but we'll leave it as it is here. good news though, we're nearly done! next step is shuffling the layers around one more time, resizing the canvas, and exporting it as a PNG!
Actually Drawing:

enough setup! let's get to the fun part!

so what i usually do first is a rough sketch, to test out a few different ideas before i settle on what i'm lining.

we'll make two layers, above both folders:

1) a layer filled completely with white, set at 50% opacity. i've named mine White to stay organised, this just helps you see what you're doing! you can skip this if you prefer.

2) a layer above the white layer for you to sketch on. i've named it Sketch here for more organisation but it doesn't really matter.
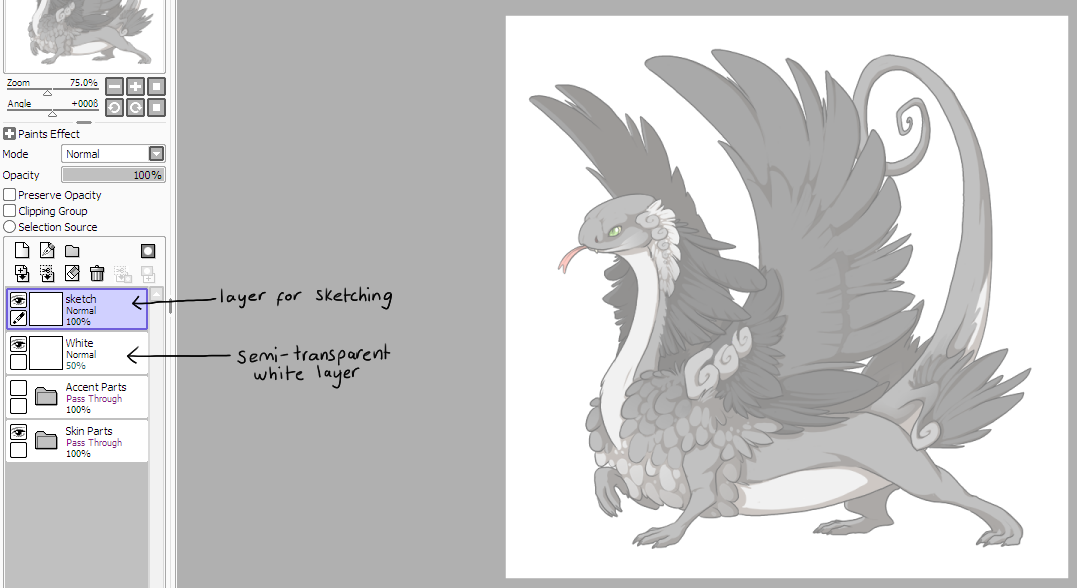
4%20white%20layer.png

here's when you start flexing your creative muscles! if you already have an idea in mind: go for it! sketch until you're happy and move on to the next step.

if you're unsure of what exactly you want to make, just draw until something clicks! here are a few things to think about when designing your custom:
  • do you want to make a skin or an accent? skins cover more than 30% of the dragon, and are more expensive to produce. accents are cheaper and a good way to enter the market, if you're wanting to sell them.
  • will your idea fit within the lines?
  • do you want to appeal to a market, or are you making the custom for yourself? if you're aiming to sell it, don't feel too restricted by current trends, but definitely take a peek to see what's selling the most!
but in the end, have fun and draw what you like!
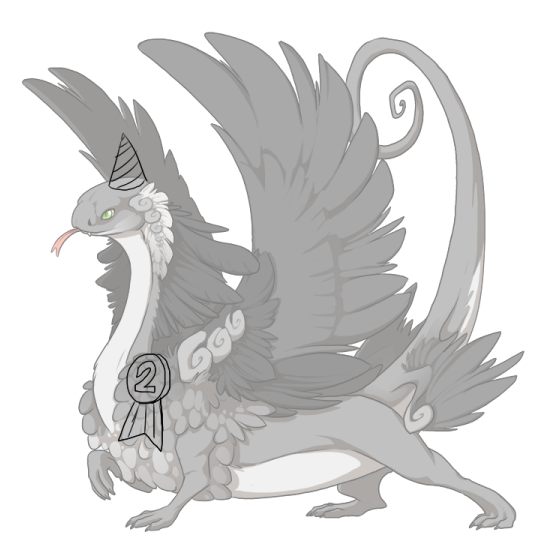
5%20sketch.png

for this example, i've decided to give our coatl here a cute birthday ribbon and hat! i'm not entirely sure why, but the creative process works in mysterious ways.

next let's move these layers around a bit!

- move the White layer and your Sketch layer into the Skin Parts folder, above the Inks/lineart.

- set your sketch to a lower opacity, so you can see what you're doing when you draw over it. you can also turn the opacity of the White layer up if you're struggling to see your lines.

- create a new layer above the others for you to draw your clean lineart onto. i've called mine MyLines to differentiate it from the Inks/lineart layer!
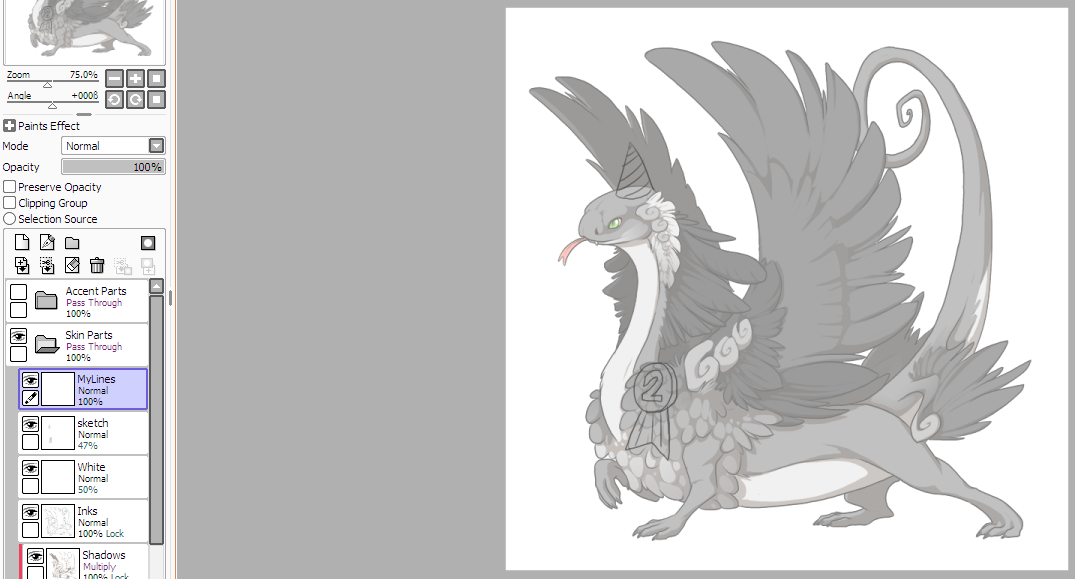
6%20move%20layers.png

i personally prefer using a small, thin brush for lining, to try and match the style of the base, but how you line it is up to you! you want graceful wispy lineart? chunky cartoony lines? the world's your oyster! keep in mind, though, that teeny tiny details might get lost when you shrink the canvas down later, so make sure the important stuff isn't too small!


Colouring:

once the clean lineart is done, it's time to colour it! we'll make a new layer underneath it, i'll refer to this as the BlockColour layer, we'll be using it to fill the base colours of our accent.

(also at this point you can hide or delete your sketch layer, unless there's still details on it you want to add later.)
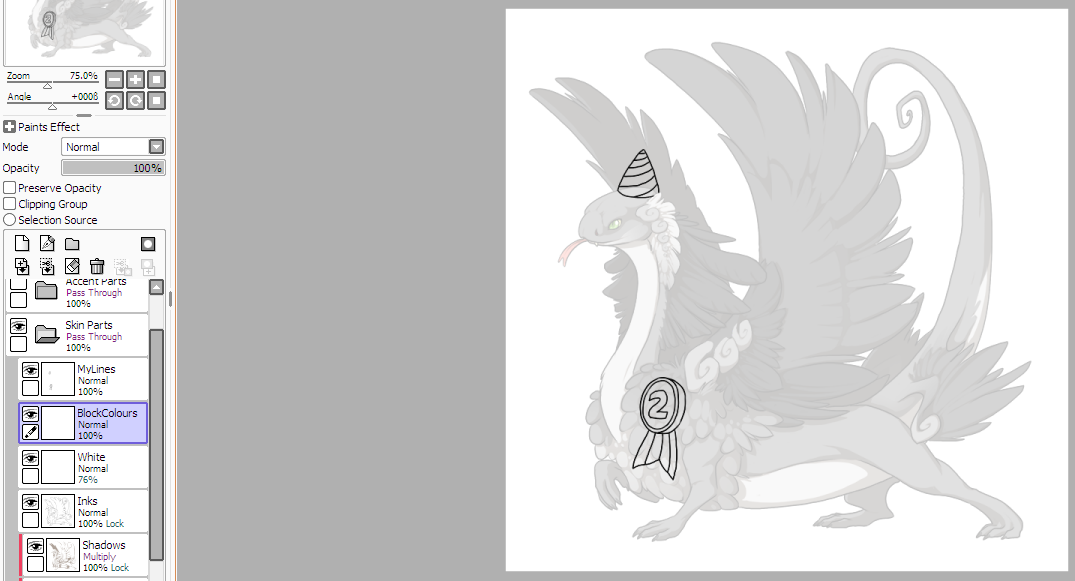
7%20clean%20lines.png

we'll start colouring on the BlockColour layer by hand.
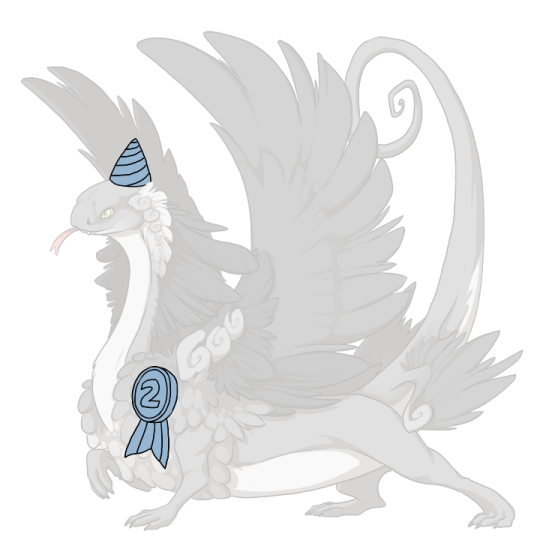
8%20block%20colours.png

the base colour you use doesn't really matter, just anything that'll stand out from the dragon base beneath it!

don't worry about accidentally colouring over the lineart for details that disappear behind wings or arms (like the hat here, going behind the coatl's headfeathers), we can clean that up in a few steps! and we'll also make sure the obscured lineart is visible by the end!

next we'll want to start adding our actual colours in. make a new layer above your BlockColours layer, and set it as a clipping layer. (i've named this layer 'colouring', but honestly these names are just so my screenshots make more sense!)

this should be your set up so far:
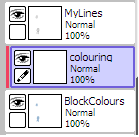
9%20clipping.png

you can make as many colouring layers as you want, and they'll all clip onto the BlockColour layer to stay nice and neat. it's good to keep different colours, or different sections, on different layers, as it's much easier to recolour the accent later! (which is especially useful if your skin gets turned down for being too dark / too gory.)

10%20coloured.png

i ended up using a few colouring layers so i could add some shading, but the colouring's done! we're halfway there!

this is looking good so far, but my lineart is just black right now, which is a little plain for me. whether you want to colour your lineart is up to you (it can look nice either way!) but i'll be colouring mine for the aesthetics!

to colour it in, you can either lock your lineart layer's transparency and colour directly onto it, or you can make a clipping layer above it. dark, saturated colours are usually a safe bet for the lineart, but art is subjective! go ham!
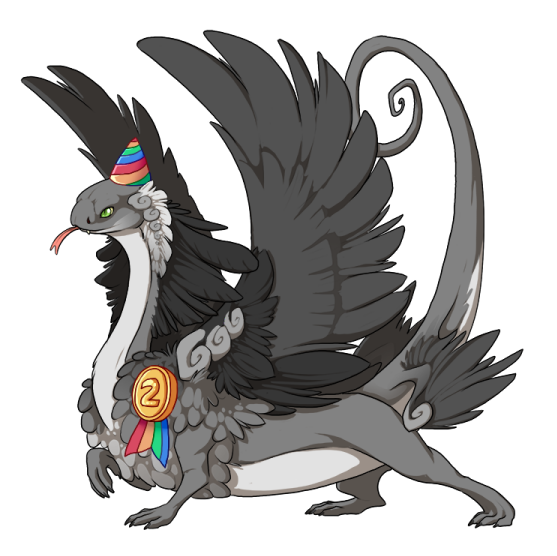
11%20coloured%20lines.png

looking snazzy! but as nice as this looks right now, it's not following the rules just yet! it's obscuring the lineart and shadows of the dragon underneath it, so let's fix that up real quick.


quickly tidying up:

before we can fix the lineart we have a dilemma: we want to clip our layers to the main dragon base, but we already have layers clipping onto each other right now. (if you coloured your accent's block colours without using clipping layers, feel free to skip ahead!)

layers can only clip onto one thing at a time, so moving them to the main base will probably end up looking something like this:
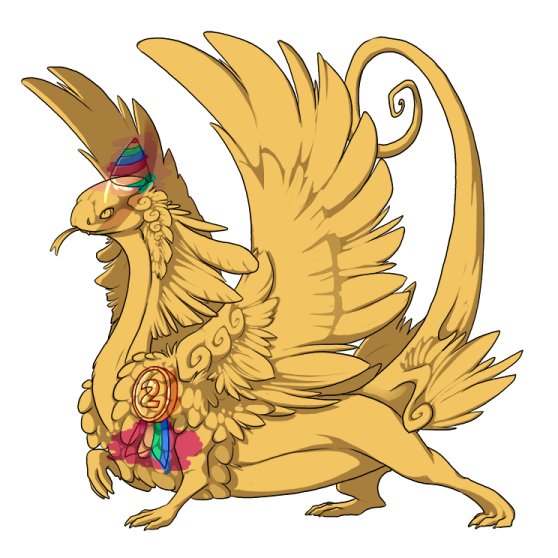
12%20ugly%20mess.png

not really the effect i was going for, the whole point of clipping my colouring layers in the first place was so you couldn't see how messy my colouring is! let's move them back out again, and clean them up a bit first.

you have two options on how to do this:

option one: merge all your clipped colouring layers down onto the block colour layer they're clipped to.
  • this is the easier, quicker option! if the other option seems a bit overwhelming, just stick to merging!
  • this will possibly make recolouring harder, if that's something you'd want to do later!

option two: erase all the parts of the colouring layer that are going outside the block colour layer
  • unclip all of your colouring layers (and don't worry if it's super messy!)
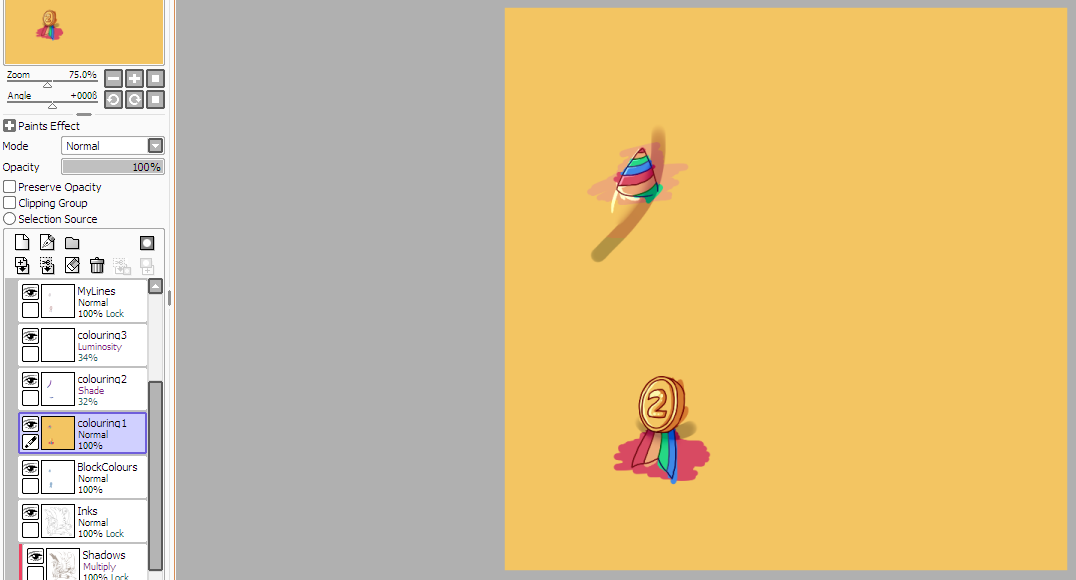
    13%20unclip.png
  • select the contents of the BlockColours layer by ctrl+left clicking* the layer's thumbnail.
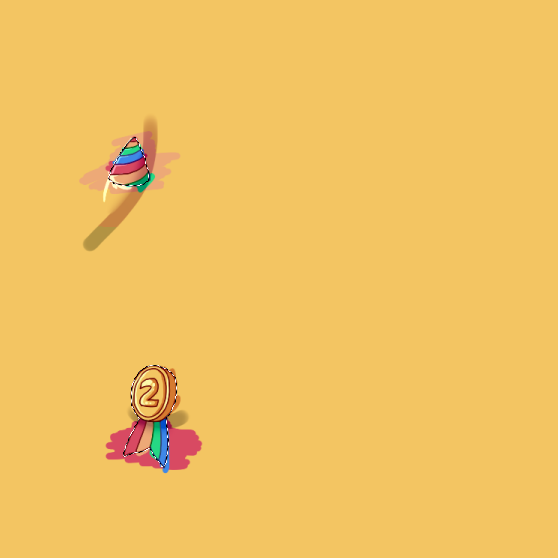
    14%20select.png
    * as of now, i'm not sure what the phone equivalent of this is. if anyone uses mobile and knows how to select the contents of a layer, please let me know!
    * if you're working on mac, you can use cmd+left click here!
  • hover over 'select' or 'selection' on the top of your screen (next to where you find File, Edit, etc) and click 'invert' or 'inverse selection'.
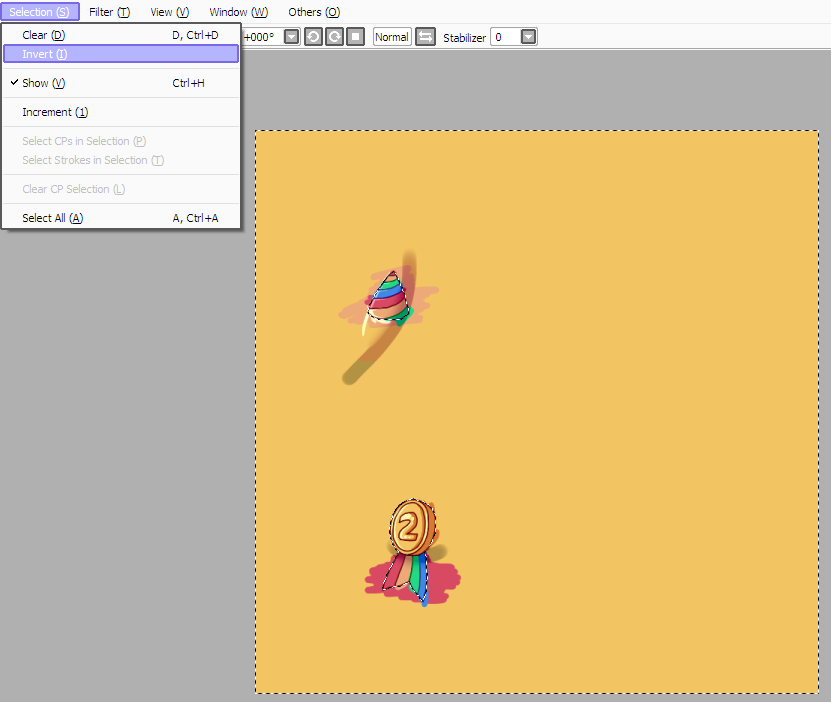
    15%20invert%20selection.png
  • make sure you're clicked onto one of your colouring layers, and erase everything you have selected. you can do this with an eraser pen, clearing the layer, or by pressing ctrl+X.
  • make sure to repeat this step if you made more than one colouring layer! it should be nice and neat by the end of it!
i'm not fussed about recolouring it later, so i'll just merge all the layers together.

onto the next step!


Unobscuring the Base Lineart:

for a skin to be submitted, we need to be able to see the dragon's base lineart and shadows through it.

we've been working on top of them so far, but let's move all our layers underneath the Shadows layer!
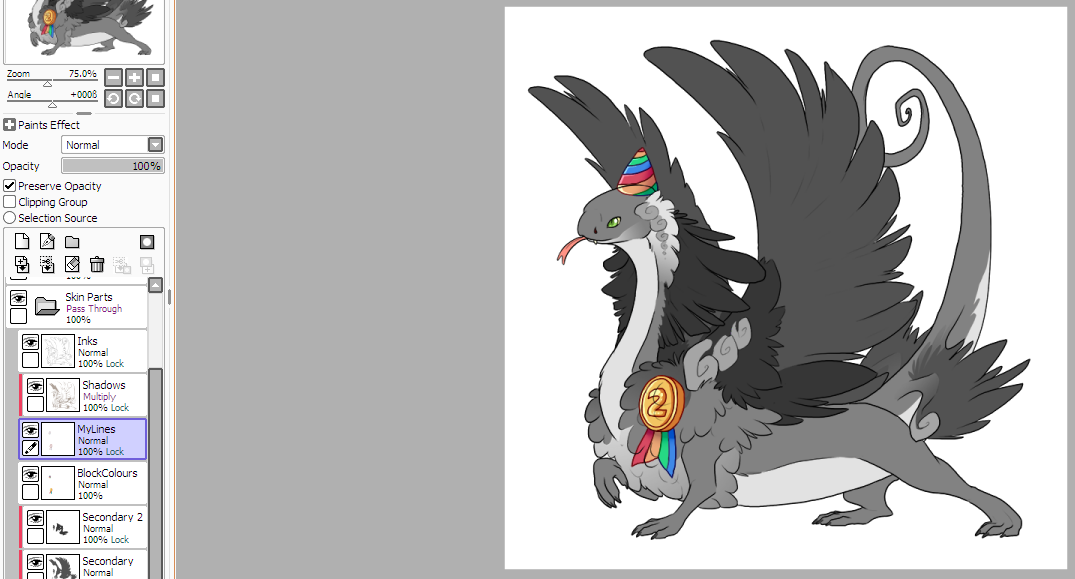
16%20oops.png

well that's not right, we need to set our Lines and BlockColour layers as clipping layers! they should clip onto the Base layer at the very bottom.
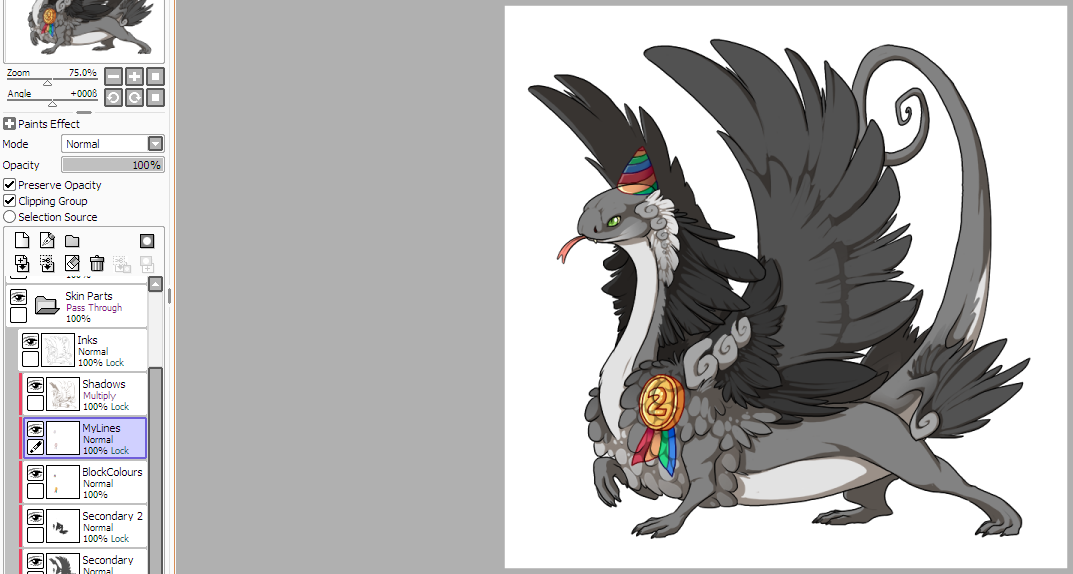
17%20ugly%20shading.png

much better! ...except, not really, the colours are all muddy now! the default lineart is black, and the default shadows are a lovely shade of off-beige - this can really damage the aesthetics of a pretty skin, so we're going to recolour them!

the Inks/Lineart and Shadows layers are handily locked by default! so you can just colour onto the layers directly to spruce them up.

(remember that the base shadows and lineart has to be visible through your accent! if you colour them to be too light your skin may not be accepted onto the site, but don't be too scared of using light colours! even experienced accent artists occasionally get turned down for their shadows, you just have to tweak it and try again!)
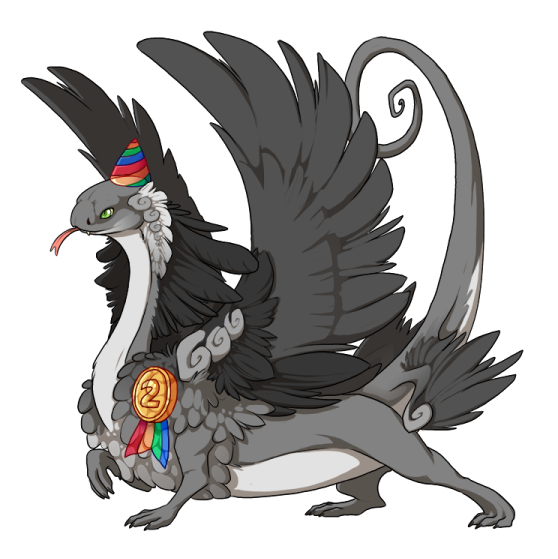
18%20pretty%20shading.png

it's looking much less muddy! there are probably areas where i could get away with making the shadows even lighter, but we'll leave it as it is here.

good news though, we're nearly done! next step is shuffling the layers around one more time, resizing the canvas, and exporting it as a PNG!

angle%201.pngartbutton%20closed.pngartshop%20icon.pngstresssig.gif
angle%202.pngumabutton.pngumashop%20icon.pngradiation%20middle.png
angle%203.pngumatutorialbutton.pngumatutorial%20icon.pngstresssig2.gif
[center][emoji=cloud size=1][size=5] Finishing up: [/size][emoji=cloud size=1][/center] if we want to make an accent or skincent, we'll need to move all the layers we've been working on to the Accent Parts folder! the reason we didn't just start in this folder to begin with is because it doesn't work properly with multiple layers, and we needed those to keep things tidy! [b]NOTE:[/b] if you're making a 100% coverage skin, that you can't see the dragon's colours through at all, skip to the resizing canvas step! you can just leave everything in the Skin Parts folder! but i'm making an accent, so let's do it! merge all of the layers you've made together and open the Accent Parts folder, if it's not already open. move this merged layer into the Accent Parts folder, above the layer called 'Accent Goes Here'. make sure your merged layer isn't clipped, or it'll just look invisible! (you can also [u]hide the Skin Parts folder[/u] for now, so you can see what you're doing.) [img]https://file.garden/ZTcW6HlIhS-zrdHO/flightrising/tutorials/19%20move%20to%20accent%20parts.png[/img] nearly done! except our colours are muddy again! yes, i know, we already coloured the shadows before, and if you want to recolour them again and try to make it lighter, go ahead! but equally you can just drag in the Inks/Lineart and Shadows layers from the Skin Parts folder! make sure you set the Inks/Lineart layer as clipping! [img]https://file.garden/ZTcW6HlIhS-zrdHO/flightrising/tutorials/20%20replace%20shading.png[/img] either way, our accent should be looking good! time to resize and export it! [size=5]Resizing the canvas:[/size] the canvas we've been working on so far is 750x750 pixels, but to submit it we'll need to get it down to 350x350! it's very important that we scale it down exactly, so our skin will perfectly line up with the dragon base - so no resizing by hand! you put that selection transformer away! we'll need to go up to our canvas settings, and pick 'change resolution'. on photoshop, this option is called 'change image size' instead. [img]https://file.garden/ZTcW6HlIhS-zrdHO/flightrising/tutorials/21%20change%20resolution.png[/img] a quick note on the difference between 'change resolution' and 'change size': [LIST] [*]change [u]resolution[/u] (or change [u]image[/u] size) scales the entire image up or down, so it still fills the canvas, this is what we'll be using! [*]change [u]size[/u] (or change [u]canvas[/u] size) just creates or removes white space around your workspace, which we don't need here. [/LIST] [img]https://file.garden/ZTcW6HlIhS-zrdHO/flightrising/tutorials/22%20resolution%20menu.png[/img] this menu will look different depending on your program, but you should be able to see two 750 values! if you can't see them, make sure the unit type is set to pixels! change both the width and height to exactly 350 pixels each, and hit ok! NOTE: some programs, such as krita, will let you change the image interpolation/filter before you resize. some of these filters can make your accent look weird and pixilated, so if you have any issues with this step try testing the other filter options! [img]https://file.garden/ZTcW6HlIhS-zrdHO/flightrising/tutorials/23%20scaled%20down.png[/img] there we go! it's now at the correct size to export, and no important details were lost. onto the next step, exporting! [size=5]Exporting as PNG:[/size] skins and accents need to be exported as a transparent PNG, or a 'PNG24' as the official tutorial calls it. go to file at the top of your screen, then choose 'export as' and then 'PNG'. equally you can just 'save as' and change the file type to PNG yourself, either works. [img]https://file.garden/ZTcW6HlIhS-zrdHO/flightrising/tutorials/24%20export.png[/img] NOTE: for photoshop (and probably any art program that isn't sai) there'll be a checkbox that says 'Transparent', make sure it's ticked! if you're using sai like me, it'll prompt you after you hit save with this: [img]https://file.garden/ZTcW6HlIhS-zrdHO/flightrising/tutorials/25%20opacity.png[/img] for transparent PNGs, we'll want to select the second option, that says 'each pixel have opacity'! and we're done! our custom is ready to print! i'll touch on how to preview your skin or accent on a few dragons first, but feel free to skip ahead if you want!
Finishing up:

if we want to make an accent or skincent, we'll need to move all the layers we've been working on to the Accent Parts folder!

the reason we didn't just start in this folder to begin with is because it doesn't work properly with multiple layers, and we needed those to keep things tidy!

NOTE: if you're making a 100% coverage skin, that you can't see the dragon's colours through at all, skip to the resizing canvas step! you can just leave everything in the Skin Parts folder!

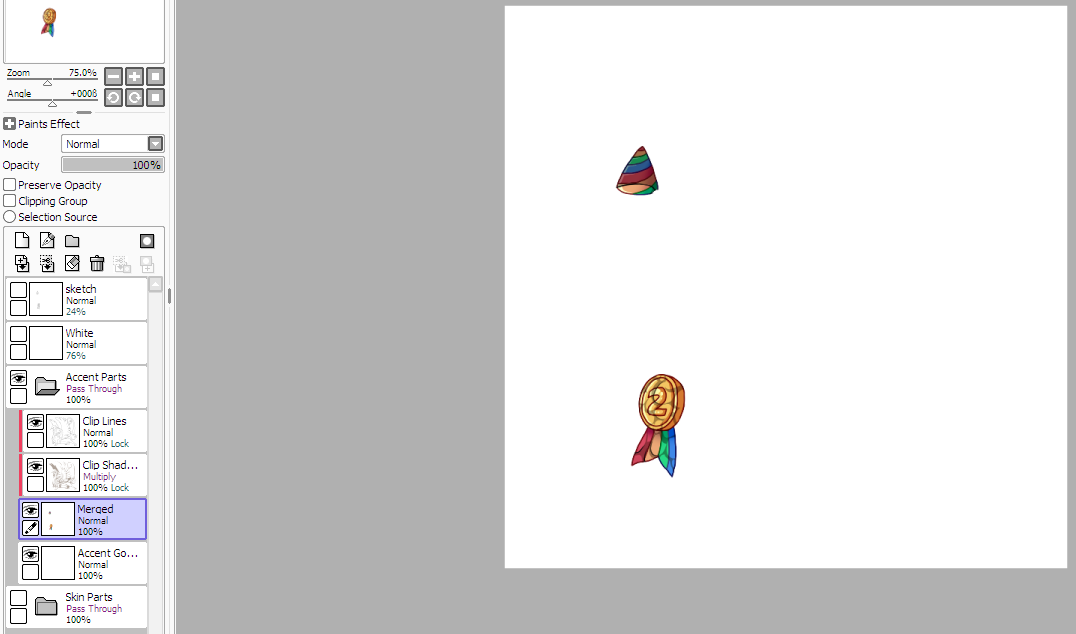
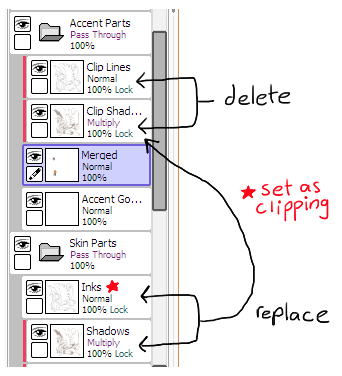
but i'm making an accent, so let's do it! merge all of the layers you've made together and open the Accent Parts folder, if it's not already open.

move this merged layer into the Accent Parts folder, above the layer called 'Accent Goes Here'. make sure your merged layer isn't clipped, or it'll just look invisible!

(you can also hide the Skin Parts folder for now, so you can see what you're doing.)

19%20move%20to%20accent%20parts.png

nearly done! except our colours are muddy again! yes, i know, we already coloured the shadows before, and if you want to recolour them again and try to make it lighter, go ahead!

but equally you can just drag in the Inks/Lineart and Shadows layers from the Skin Parts folder! make sure you set the Inks/Lineart layer as clipping!

20%20replace%20shading.png

either way, our accent should be looking good! time to resize and export it!

Resizing the canvas:

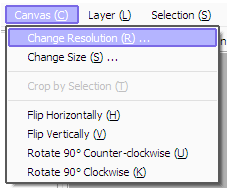
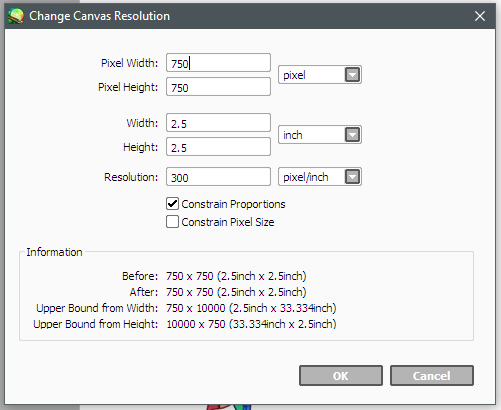
the canvas we've been working on so far is 750x750 pixels, but to submit it we'll need to get it down to 350x350! it's very important that we scale it down exactly, so our skin will perfectly line up with the dragon base - so no resizing by hand! you put that selection transformer away!

we'll need to go up to our canvas settings, and pick 'change resolution'. on photoshop, this option is called 'change image size' instead.

21%20change%20resolution.png

a quick note on the difference between 'change resolution' and 'change size':
  • change resolution (or change image size) scales the entire image up or down, so it still fills the canvas, this is what we'll be using!
  • change size (or change canvas size) just creates or removes white space around your workspace, which we don't need here.

22%20resolution%20menu.png

this menu will look different depending on your program, but you should be able to see two 750 values! if you can't see them, make sure the unit type is set to pixels!
change both the width and height to exactly 350 pixels each, and hit ok!

NOTE: some programs, such as krita, will let you change the image interpolation/filter before you resize. some of these filters can make your accent look weird and pixilated, so if you have any issues with this step try testing the other filter options!

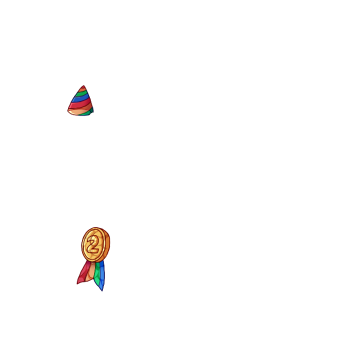
23%20scaled%20down.png

there we go! it's now at the correct size to export, and no important details were lost. onto the next step, exporting!


Exporting as PNG:

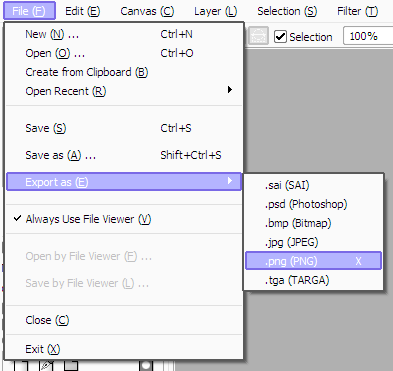
skins and accents need to be exported as a transparent PNG, or a 'PNG24' as the official tutorial calls it.

go to file at the top of your screen, then choose 'export as' and then 'PNG'. equally you can just 'save as' and change the file type to PNG yourself, either works.

24%20export.png

NOTE: for photoshop (and probably any art program that isn't sai) there'll be a checkbox that says 'Transparent', make sure it's ticked!

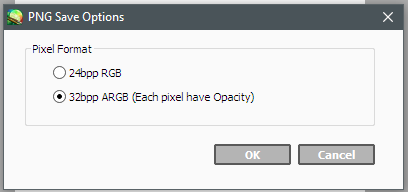
if you're using sai like me, it'll prompt you after you hit save with this:

25%20opacity.png

for transparent PNGs, we'll want to select the second option, that says 'each pixel have opacity'!

and we're done! our custom is ready to print! i'll touch on how to preview your skin or accent on a few dragons first, but feel free to skip ahead if you want!

angle%201.pngartbutton%20closed.pngartshop%20icon.pngstresssig.gif
angle%202.pngumabutton.pngumashop%20icon.pngradiation%20middle.png
angle%203.pngumatutorialbutton.pngumatutorial%20icon.pngstresssig2.gif
[center][emoji=cloud size=1][size=5] Previewing an accent: [/size][emoji=cloud size=1][/center] it's always a good idea to test your accent out on a few dragons before you print it. so let's go through how we do that! first, you'll need a transparent PNG of your accent, which hopefully by now you'll have! second we'll need to scry up a dragon and download the image. it's also a good idea to scry a variety of dragons to test your accent on, to see how it looks with different colours. next, we just copy our accent, and then paste it onto our scry! [img]https://file.garden/ZTcW6HlIhS-zrdHO/flightrising/tutorials/26%20preview.png[/img] perfect! at this point, if you're not satisfied with how it looks you can go back to your PSD file and tweak stuff. but i'm happy with how this turned out! so what if you want to preview your accent with some apparel? let's look at the easiest way to do that. [size=5]Previewing with apparel:[/size] this is super painless, i promise! so first you'll need your accent and a saved dragon scry ready, just like the last step, and paste them together. then we'll head over to the dressing room to get our apparel! [img]https://file.garden/ZTcW6HlIhS-zrdHO/flightrising/tutorials/27%20dressing%20room.png[/img] here's our beautiful outfit we want to preview, but there's a dragon base in the way! well fear not! invisibility cloaks are your new best friend. [img]https://file.garden/ZTcW6HlIhS-zrdHO/flightrising/tutorials/28%20invisibility%20cloak.png[/img] poifect! now just save the image and we can put them all together! apparel goes over a dragon's accent*, which goes over the dragon's base! *(the full order from lowest to highest is dragon > accent > eyes > apparel) let's see how it looks on a random scry! [img]https://file.garden/ZTcW6HlIhS-zrdHO/flightrising/tutorials/29%20paste%20apparel.png[/img] and there we have it! although the silks may not work perfectly with [i]this[/i] accent. if you run an accent shop, people might ask for previews to see if their apparel will cover anything important! last hurdle of previewing, what if your accent covers the dragon's eye? [size=5]Eye-covering accents:[/size] when drawing a skin or accent, it's ok to paint over the eyes! dragon eyes are a separate image that's overlaid onto a dragon over their accent and under their apparel. this isn't very useful when making the previews yourself though! although the solution isn't very high tech, just paste the accent over the scry like usual and erase some eye holes! as far as glowing or primal eyes go, you're on your own, pal! good luck! (equally, you can upload your accent to a third party previewing site, but linking to those is against ToS! you can find them pretty easily on google, if you want!) anyway, enough fluff! let's get printing!
Previewing an accent:

it's always a good idea to test your accent out on a few dragons before you print it. so let's go through how we do that!

first, you'll need a transparent PNG of your accent, which hopefully by now you'll have!

second we'll need to scry up a dragon and download the image. it's also a good idea to scry a variety of dragons to test your accent on, to see how it looks with different colours.

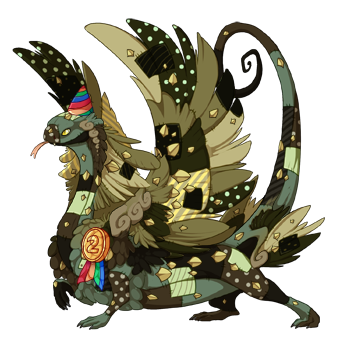
next, we just copy our accent, and then paste it onto our scry!

26%20preview.png

perfect! at this point, if you're not satisfied with how it looks you can go back to your PSD file and tweak stuff. but i'm happy with how this turned out!

so what if you want to preview your accent with some apparel? let's look at the easiest way to do that.


Previewing with apparel:

this is super painless, i promise!

so first you'll need your accent and a saved dragon scry ready, just like the last step, and paste them together.

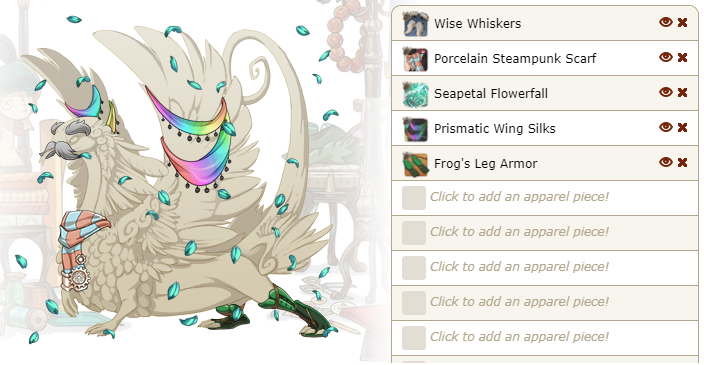
then we'll head over to the dressing room to get our apparel!

27%20dressing%20room.png

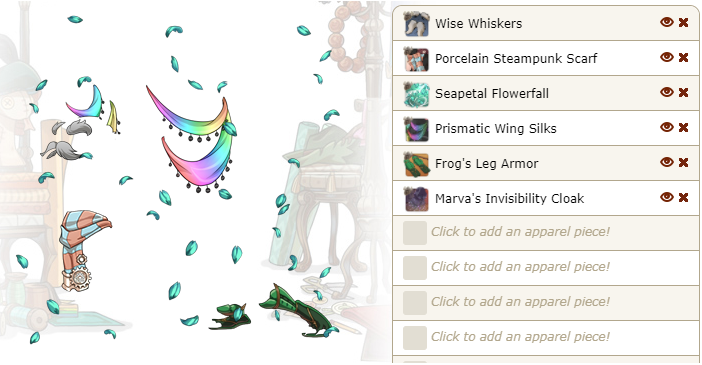
here's our beautiful outfit we want to preview, but there's a dragon base in the way! well fear not! invisibility cloaks are your new best friend.

28%20invisibility%20cloak.png

poifect! now just save the image and we can put them all together!

apparel goes over a dragon's accent*, which goes over the dragon's base!
*(the full order from lowest to highest is dragon > accent > eyes > apparel)

let's see how it looks on a random scry!

29%20paste%20apparel.png

and there we have it! although the silks may not work perfectly with this accent. if you run an accent shop, people might ask for previews to see if their apparel will cover anything important!

last hurdle of previewing, what if your accent covers the dragon's eye?


Eye-covering accents:

when drawing a skin or accent, it's ok to paint over the eyes! dragon eyes are a separate image that's overlaid onto a dragon over their accent and under their apparel.

this isn't very useful when making the previews yourself though! although the solution isn't very high tech, just paste the accent over the scry like usual and erase some eye holes!

as far as glowing or primal eyes go, you're on your own, pal! good luck!

(equally, you can upload your accent to a third party previewing site, but linking to those is against ToS! you can find them pretty easily on google, if you want!)

anyway, enough fluff! let's get printing!

angle%201.pngartbutton%20closed.pngartshop%20icon.pngstresssig.gif
angle%202.pngumabutton.pngumashop%20icon.pngradiation%20middle.png
angle%203.pngumatutorialbutton.pngumatutorial%20icon.pngstresssig2.gif
[center][emoji=cloud size=1][size=5] Printing your custom: [/size][emoji=cloud size=1][/center] either the most or least exciting part! hope you brought your gems! first, let's head over to the [url=https://www1.flightrising.com/wiki/skins/4]blueprint shop[/url]. we have quite a lot of choices here, so we'll go through each type together and their prices! (reminder that accents cover 0-30% of a dragon's base, and skins cover 30-100%!) [b]Single Blueprints:[/b] very pricey, but exactly what it says on the tin! [LIST] [*] Skin Blueprint - 2,000g (prints a single skin at 2,000g per copy) [*] Accent Blueprint - 1,000g (prints a single accent at 1,000g per copy) [/LIST] [b]Bundle Packs:[/b] a chest item you can open to get several Single Blueprints. these are useful for when you want to print a bunch of one-off customs, but you don't want to shell out 1,000-2,000g for each individual one. [LIST] [*] 2-Skin Bundle - 3,800g (contains 2 single skin blueprints at 1,900g per single skin) [*] 3-Skin Bundle - 5,200g (contains 3 single skin blueprints at 1,733g per single skin) [*] 5-Skin Bundle - 8,000g (contains 5 single skin blueprints at 1,600g per single skin) [*] 2-Accent Bundle - 1,900g (contains 2 single accent blueprints at 950g per single accent) [*] 3-Accent Bundle - 2,600g (contains 3 single accent blueprints at 866g per single accent) [*] 5-Accent Bundle - 4,000g (contains 5 single accent blueprints at 800g per single accent) [/LIST] [b]Multi-Copy Packs:[/b] prints several copies of the same custom. if you're planning to run a shop, this is the best option for you! [LIST] [*] Skin Blueprint (2) - 2,800g (prints 2 copies of a skin at 1,400g per copy) [*] Skin Blueprint (5) - 3,500g (prints 5 copies of a skin at 700g per copy) [*] Skin Blueprint (10) - 5,000g (prints 10 copies of a skin at 500g per copy) [*] Accent Blueprint (2) - 1,400g (prints 2 copies of an accent at 700g per copy) [*] Accent Blueprint (5) - 1,750g (prints 5 copies of an accent at 350g per copy) [*] Accent Blueprint (10) - 2,500g (prints 10 copies of an accent at 250g per copy) [/LIST] pick out a blueprint that works for you, and we can get started! [img]https://file.garden/ZTcW6HlIhS-zrdHO/flightrising/tutorials/30%20other%20tab.png[/img] purchased blueprints can be found in the other tab of your hoard! i always, without fail, look for it in the specialty tab first and then panic when i can't find it. but either way! to start the next step, you can either click the item or head straight to the [url=https://www1.flightrising.com/wiki/skins/5]submission screen[/url]! here's what you'll see: [img]https://file.garden/ZTcW6HlIhS-zrdHO/flightrising/tutorials/31%20submission%20screen.png[/img] it's pretty straightforward! let's see what we're dealing with. 1) your [b]blueprints[/b]! just click the one you want to print with. 2) [b]select skin:[/b] this is for reprinting skins/accents you've already submitted! clicking it will show a list of your other prints. if you're printing a brand new custom, just leave it as 'new skin'! 3) [b]skin name:[/b] the name of your skin/accent! the text will cut off after 32 characters, which includes the 'skin: ' (+6 characters) or 'accent: ' (+8 characters) that is automatically put before your custom's name! so your name can be actually only be 26 characters long for a skin, or 24 character for an accent! if you're unhappy with how the name turns out, you can ask a moderator to change the name for you [url=https://www1.flightrising.com/forums/skin/1199521]here![/url] 4) [b]breed and gender:[/b] exactly what it says on the tin! make sure it matches your skin/accent. 5) [b]choose file:[/b] the most important part! upload the PNG of your skin/accent, making sure it's both transparent and 350x350 pixels. 6) [b]submit order:[/b] click when you're done! make sure to double check the details first, just in case. and you're done! you should get an automated message that acts as a receipt! here's an old one i got a while back, just for curiosity's sake! [img]https://file.garden/ZTcW6HlIhS-zrdHO/flightrising/tutorials/32%20submission%20message.png[/img] your custom is now awaiting moderator approval, and will probably take around a week to come back. during busy parts of the year it may take slightly longer, but you can ask about your order [url=https://www1.flightrising.com/forums/skin/1199521]here[/url] if it's been much longer than a week! (make sure you mention your order number, it'll make the mods' lives a lot easier!) fingers crossed, and after a week or so your custom will be approved! yay! you'll get another message containing however many copies of the skin you ordered, like so: [img]https://file.garden/ZTcW6HlIhS-zrdHO/flightrising/tutorials/33%20approval%20message.png[/img] make sure you collect your items from the message! now go forth with your beautiful works of art and make me proud! but let's not get too ahead of ourselves here, what if your custom gets turned down? [size=5]Denied submissions:[/size] first, don't panic! it's all gonna be alright! if your custom doesn't get approved, you'll get the blueprint you used back, free of charge! there's also no penalty for making mistakes, so don't let it discourage you - make your edits and get back in there! a custom can be denied for several reasons, and you'll get a message detailing the main reasons why. (the moment i get one, i'll add a screenshot here for posterity!) common reasons for a custom not passing are: [LIST] [*] the dragon's base lineart and shadows aren't visible enough. the way to fix this is to either darken the lineart/shadows, or lighten your accent's colours! [*] the skin/accent is too gory. this also counts things that just [i]look[/i] too gory, so your amazing ketchup-themed accent might not make the cut! a good way to fix this is to lower the saturation of your custom, or hueshift the colours to a non-red shade. if you were turned down for extreme, very obvious gore then you might need to go back to the drawing board! (or tastefully cover the worst parts with flowers! life hack!) [*] your skin/accent contains copyrighted material. this includes company logos or dragons cosplaying as copyrighted characters. sometimes a moderator might mistake your design for a cosplay dragon when it isn't, so if you're confused on how to fix it just ask in the [url=https://www1.flightrising.com/forums/skin/1199521]help thread[/url]! [*] your skin/accent goes outside the lines. this one's pretty straightforward! [/LIST] if you're unsure on what you need to change for your custom to be approved, you can ask in the help thread for customs: [url=https://www1.flightrising.com/forums/skin/1199521]Skin and Accent Problems[/url]! the mods won't bite, i promise! other important things you can ask about in that thread are: [LIST] [*] renaming your printed customs (useful if you made a typo!) [*] issues with the item itself (if it's either not displaying on the dragon properly, or it says it's for the wrong breed) [*] changing the username that displays in your customs' descriptions (when you change your site's username, the descriptions don't update automatically!) [*] changing a custom's image (useful if you realised too late that there's a [i]tiny[/i] dot outside the dragon's boundaries, or a bit you forgot to colour, that's just too annoying to ignore) [*] asking how many copies of a custom you've printed so far. (if you're just starting out, it's worth keeping count yourself!) [*] this one isn't a question, but you may be asked to provide a translation there if your custom contains a non-english language in its name or design! just to make sure it's nothing secretly rude! you also don't have to wait to be asked, putting your order number and the translation there right off the bat is encouraged! [/LIST] and you can ask about anything else you're having technical problems with! general art advice, however, is better suited to the discussion forums instead. (or here! it's all good!) next, we'll talk about festivals! fun!
Printing your custom:

either the most or least exciting part! hope you brought your gems!

first, let's head over to the blueprint shop.

we have quite a lot of choices here, so we'll go through each type together and their prices!
(reminder that accents cover 0-30% of a dragon's base, and skins cover 30-100%!)

Single Blueprints: very pricey, but exactly what it says on the tin!
  • Skin Blueprint - 2,000g (prints a single skin at 2,000g per copy)
  • Accent Blueprint - 1,000g (prints a single accent at 1,000g per copy)

Bundle Packs: a chest item you can open to get several Single Blueprints. these are useful for when you want to print a bunch of one-off customs, but you don't want to shell out 1,000-2,000g for each individual one.
  • 2-Skin Bundle - 3,800g (contains 2 single skin blueprints at 1,900g per single skin)
  • 3-Skin Bundle - 5,200g (contains 3 single skin blueprints at 1,733g per single skin)
  • 5-Skin Bundle - 8,000g (contains 5 single skin blueprints at 1,600g per single skin)
  • 2-Accent Bundle - 1,900g (contains 2 single accent blueprints at 950g per single accent)
  • 3-Accent Bundle - 2,600g (contains 3 single accent blueprints at 866g per single accent)
  • 5-Accent Bundle - 4,000g (contains 5 single accent blueprints at 800g per single accent)

Multi-Copy Packs: prints several copies of the same custom. if you're planning to run a shop, this is the best option for you!
  • Skin Blueprint (2) - 2,800g (prints 2 copies of a skin at 1,400g per copy)
  • Skin Blueprint (5) - 3,500g (prints 5 copies of a skin at 700g per copy)
  • Skin Blueprint (10) - 5,000g (prints 10 copies of a skin at 500g per copy)
  • Accent Blueprint (2) - 1,400g (prints 2 copies of an accent at 700g per copy)
  • Accent Blueprint (5) - 1,750g (prints 5 copies of an accent at 350g per copy)
  • Accent Blueprint (10) - 2,500g (prints 10 copies of an accent at 250g per copy)

pick out a blueprint that works for you, and we can get started!

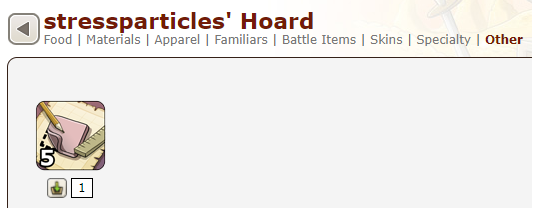
30%20other%20tab.png

purchased blueprints can be found in the other tab of your hoard! i always, without fail, look for it in the specialty tab first and then panic when i can't find it. but either way! to start the next step, you can either click the item or head straight to the submission screen!

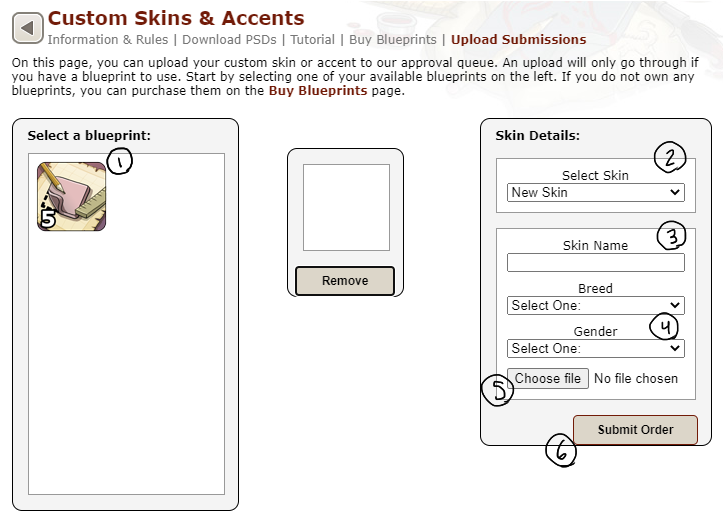
here's what you'll see:

31%20submission%20screen.png

it's pretty straightforward! let's see what we're dealing with.

1) your blueprints! just click the one you want to print with.

2) select skin: this is for reprinting skins/accents you've already submitted! clicking it will show a list of your other prints. if you're printing a brand new custom, just leave it as 'new skin'!

3) skin name: the name of your skin/accent! the text will cut off after 32 characters, which includes the 'skin: ' (+6 characters) or 'accent: ' (+8 characters) that is automatically put before your custom's name! so your name can be actually only be 26 characters long for a skin, or 24 character for an accent! if you're unhappy with how the name turns out, you can ask a moderator to change the name for you here!

4) breed and gender: exactly what it says on the tin! make sure it matches your skin/accent.

5) choose file: the most important part! upload the PNG of your skin/accent, making sure it's both transparent and 350x350 pixels.

6) submit order: click when you're done! make sure to double check the details first, just in case.

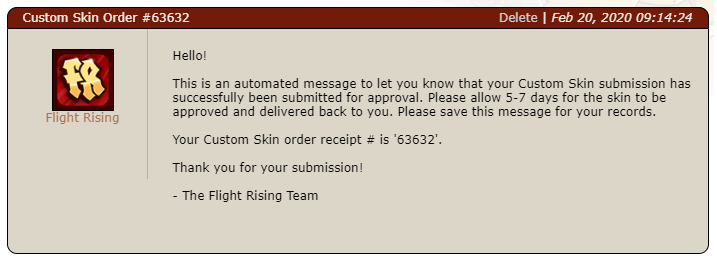
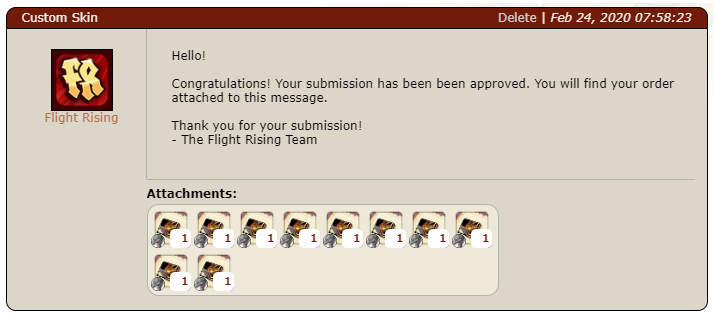
and you're done! you should get an automated message that acts as a receipt! here's an old one i got a while back, just for curiosity's sake!

32%20submission%20message.png

your custom is now awaiting moderator approval, and will probably take around a week to come back. during busy parts of the year it may take slightly longer, but you can ask about your order here if it's been much longer than a week! (make sure you mention your order number, it'll make the mods' lives a lot easier!)

fingers crossed, and after a week or so your custom will be approved! yay! you'll get another message containing however many copies of the skin you ordered, like so:

33%20approval%20message.png

make sure you collect your items from the message! now go forth with your beautiful works of art and make me proud!

but let's not get too ahead of ourselves here, what if your custom gets turned down?


Denied submissions:

first, don't panic! it's all gonna be alright!

if your custom doesn't get approved, you'll get the blueprint you used back, free of charge! there's also no penalty for making mistakes, so don't let it discourage you - make your edits and get back in there!

a custom can be denied for several reasons, and you'll get a message detailing the main reasons why. (the moment i get one, i'll add a screenshot here for posterity!)

common reasons for a custom not passing are:
  • the dragon's base lineart and shadows aren't visible enough. the way to fix this is to either darken the lineart/shadows, or lighten your accent's colours!
  • the skin/accent is too gory. this also counts things that just look too gory, so your amazing ketchup-themed accent might not make the cut! a good way to fix this is to lower the saturation of your custom, or hueshift the colours to a non-red shade. if you were turned down for extreme, very obvious gore then you might need to go back to the drawing board! (or tastefully cover the worst parts with flowers! life hack!)
  • your skin/accent contains copyrighted material. this includes company logos or dragons cosplaying as copyrighted characters. sometimes a moderator might mistake your design for a cosplay dragon when it isn't, so if you're confused on how to fix it just ask in the help thread!
  • your skin/accent goes outside the lines. this one's pretty straightforward!

if you're unsure on what you need to change for your custom to be approved, you can ask in the help thread for customs: Skin and Accent Problems! the mods won't bite, i promise!


other important things you can ask about in that thread are:
  • renaming your printed customs (useful if you made a typo!)
  • issues with the item itself (if it's either not displaying on the dragon properly, or it says it's for the wrong breed)
  • changing the username that displays in your customs' descriptions (when you change your site's username, the descriptions don't update automatically!)
  • changing a custom's image (useful if you realised too late that there's a tiny dot outside the dragon's boundaries, or a bit you forgot to colour, that's just too annoying to ignore)
  • asking how many copies of a custom you've printed so far. (if you're just starting out, it's worth keeping count yourself!)
  • this one isn't a question, but you may be asked to provide a translation there if your custom contains a non-english language in its name or design! just to make sure it's nothing secretly rude! you also don't have to wait to be asked, putting your order number and the translation there right off the bat is encouraged!

and you can ask about anything else you're having technical problems with! general art advice, however, is better suited to the discussion forums instead. (or here! it's all good!)

next, we'll talk about festivals! fun!

angle%201.pngartbutton%20closed.pngartshop%20icon.pngstresssig.gif
angle%202.pngumabutton.pngumashop%20icon.pngradiation%20middle.png
angle%203.pngumatutorialbutton.pngumatutorial%20icon.pngstresssig2.gif
[center][emoji=cloud size=1][size=5] Festival Skin Competitions: [/size][emoji=cloud size=1][/center] out of context that sounds mildly threatening, but either way! every month (minus december) there's a skin competition held for the next [url=https://flightrising.com/main.php?p=wiki&article=13]upcoming elemental holiday[/url]! there'll be a small notice in the Site Status part of the front page when a competition begins, so keep an eye out! so what's in it for you if you enter? there are 14 winners picked from all the month's entries, and those winners will get the following spoils: [LIST] [*] their username credited in the festival skin/accent's description [*] a copy of their winning skin/accent [*] this vista (which is locked to your account!) [img]https://www1.flightrising.com/static/cms/fvista/10.png[/img] [*] 2,000g [*] a 5-skin multi-copy-pack (which prints 5 copies of a custom skin) so you can make more amazing skins to share with the world! [/LIST] altogether, very tempting! especially as you don't need a blueprint to enter, so it's completely free! so how do we enter? [size=5]Entering a competition:[/size] first step is waiting for one to start! you'll see a message on the front page when one begins. next step is deciding if you want to wait for a specific flight's festival, or if you're fine with whichever one's next. [url=https://flightrising.com/main.php?p=wiki&article=13]here's a list of each flight's month[/url]! nothing's stopping you from making a skin or accent in advance, either! just make sure to keep it under wraps until the competition starts. let's say a competition has started now, and it's a flight you're fine with drawing for, it's time for you to go make a skin or accent for it! if you're not sure on how to do that, take a look over the other sections of this guide, i promise it's not too complicated! first, though, there are a couple [u]important rules[/u]! [LIST] [*] skins and accents are measured differently for festival entries! an accent must cover a minimum of 5% of the dragon's base, and can cover up to 50%. a skin covers 50-100% of a dragon. this doesn't really affect you much, you don't have to measure whether it's a skin or an accent - just make sure it covers more than 5%! [*] entries cannot be a skin/accent you've printed before, this includes recolours. [*] entries that win now belong to the site, and you can't print further copies yourself. (this also includes recolours!) [*] special note for plague's festival, Riot of Rot: remember the rules on gore! [*] you can enter a maximum of two designs per competition! if you make a second entry after you've posted your first, just edit your original post with your second one to keep things tidy! [*] reserving posts isn't allowed! if you haven't completely finished your skin yet, you don't need to make an entry just yet. the competition's not going anywhere! (and one year an unfinished skin was accidentally chosen, whoops! to be fair, it was a very pretty work in progress! if you want to share a WIP, you can post it in the discussions thread instead.) [/LIST] now, with that out the way, all you need to do to enter is: [LIST] [*] have a transparent 350x350 pixel PNG of your skin or accent [*] upload your PNG to a hosting site somewhere and get a link (if you're not sure how to do that, i'll explain how afterwards!) [*] go to the festival contest submission thread (linked on the front page, or pinned in the skin and accents forum! make sure you're on the [u]submission[/u] thread, and not the discussion thread!) [*] scroll down to where you can type your own comment [*] making sure you have your entry's image address/URL copied, click insert image and paste the URL in. [img]https://file.garden/ZTcW6HlIhS-zrdHO/flightrising/tutorials/35%20insert%20image%20into%20comment.png[/img] [*] give your skin/accent a name*! putting it in quotes above your image usually looks the nicest. you can also say what breed and gender your accent is for, if it's not really clear by looking. you don't have to, but it'll make the mod's lives a lot easier when they're judging all the entries! * an important thing to consider when naming your entry is the character limit! a skin's name can be 26 characters max, whereas an accent can only have 24 characters! if you have a name that's 26 characters long, but you're not sure if your design counts as a skin or an accent, you can provide a shorter alternate name underneath it! [/LIST] and that's all you need! you can hit submit now and cross your fingers, if you want! but your entry might be looking a bit plain, which is ok! it's just sometimes it's nice to add some extra pizzazz! a few things people can include as an optional bonus: [LIST] [*] a preview or two (or three! or 34953!) of the accent on a scry. (it's a lot easier to admire an accent when it's on a dragon!) [*] a bigger version of the skin/accent, usually the 750x750 version, before it was scaled down. keep in mind this doesn't count as the entry itself, you'll still need the proper 350x350 version alongside it! (people sometimes like to show off any tiny details that were lost during scaling!) [*] an alternate version of the skin/accent, that the mods can pick between if they like your design. (i'm fairly sure this counts as a second entry, however, so use them wisely!) [/LIST] to rewind for a second, let's talk about image URLs. [size=5]Uploading your skin and getting a URL:[/size] you'll need to host your image somewhere in order to enter a competition, i personally recommend File Garden (it's free!) [b]NOTE:[/b] an image will only display if the URL ends in .png! (or .jpeg / .gif) - if you're having trouble making your images display, try using a different image hosting site. [b]note 2:[/b] many image hosting sites aren't actually CDNs (content delivery networks), so they don't like you embedding images off-site, which is why Imgur isn't a great choice for hosting - try searching around for a good reliable CDN! now you can go back and finish making your entry! once you've posted your entry, all you can do now is wait! the winners will be announced on the first day of the elemental holiday, along with a dozen or so honourable mentions (who will be sent a single skin blueprint through DMs some time afterwards!) if you won, congrats! rake in that prize money! if not, you can always just print the skin yourself. (or save it to resubmit next year! make sure you say it's a repost, if you choose to do so. there's been a few cases in the past where a resubmission has won, so there's at least a teeny chance!) most importantly, though, have fun making your entry! and good luck! [center][emoji=cloud size=1][/center]
Festival Skin Competitions:

out of context that sounds mildly threatening, but either way! every month (minus december) there's a skin competition held for the next upcoming elemental holiday! there'll be a small notice in the Site Status part of the front page when a competition begins, so keep an eye out!

so what's in it for you if you enter? there are 14 winners picked from all the month's entries, and those winners will get the following spoils:
  • their username credited in the festival skin/accent's description
  • a copy of their winning skin/accent
  • this vista (which is locked to your account!)

    10.png
  • 2,000g
  • a 5-skin multi-copy-pack (which prints 5 copies of a custom skin) so you can make more amazing skins to share with the world!

altogether, very tempting! especially as you don't need a blueprint to enter, so it's completely free!

so how do we enter?


Entering a competition:

first step is waiting for one to start! you'll see a message on the front page when one begins.

next step is deciding if you want to wait for a specific flight's festival, or if you're fine with whichever one's next. here's a list of each flight's month! nothing's stopping you from making a skin or accent in advance, either! just make sure to keep it under wraps until the competition starts.

let's say a competition has started now, and it's a flight you're fine with drawing for, it's time for you to go make a skin or accent for it! if you're not sure on how to do that, take a look over the other sections of this guide, i promise it's not too complicated!

first, though, there are a couple important rules!
  • skins and accents are measured differently for festival entries! an accent must cover a minimum of 5% of the dragon's base, and can cover up to 50%. a skin covers 50-100% of a dragon. this doesn't really affect you much, you don't have to measure whether it's a skin or an accent - just make sure it covers more than 5%!
  • entries cannot be a skin/accent you've printed before, this includes recolours.
  • entries that win now belong to the site, and you can't print further copies yourself. (this also includes recolours!)
  • special note for plague's festival, Riot of Rot: remember the rules on gore!
  • you can enter a maximum of two designs per competition! if you make a second entry after you've posted your first, just edit your original post with your second one to keep things tidy!
  • reserving posts isn't allowed! if you haven't completely finished your skin yet, you don't need to make an entry just yet. the competition's not going anywhere! (and one year an unfinished skin was accidentally chosen, whoops! to be fair, it was a very pretty work in progress! if you want to share a WIP, you can post it in the discussions thread instead.)

now, with that out the way, all you need to do to enter is:
  • have a transparent 350x350 pixel PNG of your skin or accent
  • upload your PNG to a hosting site somewhere and get a link (if you're not sure how to do that, i'll explain how afterwards!)
  • go to the festival contest submission thread (linked on the front page, or pinned in the skin and accents forum! make sure you're on the submission thread, and not the discussion thread!)
  • scroll down to where you can type your own comment
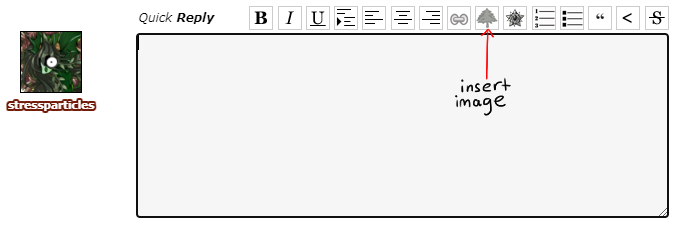
  • making sure you have your entry's image address/URL copied, click insert image and paste the URL in.

    35%20insert%20image%20into%20comment.png
  • give your skin/accent a name*! putting it in quotes above your image usually looks the nicest. you can also say what breed and gender your accent is for, if it's not really clear by looking. you don't have to, but it'll make the mod's lives a lot easier when they're judging all the entries!

    * an important thing to consider when naming your entry is the character limit! a skin's name can be 26 characters max, whereas an accent can only have 24 characters! if you have a name that's 26 characters long, but you're not sure if your design counts as a skin or an accent, you can provide a shorter alternate name underneath it!

and that's all you need! you can hit submit now and cross your fingers, if you want! but your entry might be looking a bit plain, which is ok! it's just sometimes it's nice to add some extra pizzazz!

a few things people can include as an optional bonus:
  • a preview or two (or three! or 34953!) of the accent on a scry. (it's a lot easier to admire an accent when it's on a dragon!)
  • a bigger version of the skin/accent, usually the 750x750 version, before it was scaled down. keep in mind this doesn't count as the entry itself, you'll still need the proper 350x350 version alongside it! (people sometimes like to show off any tiny details that were lost during scaling!)
  • an alternate version of the skin/accent, that the mods can pick between if they like your design. (i'm fairly sure this counts as a second entry, however, so use them wisely!)

to rewind for a second, let's talk about image URLs.


Uploading your skin and getting a URL:

you'll need to host your image somewhere in order to enter a competition, i personally recommend File Garden (it's free!)

NOTE: an image will only display if the URL ends in .png! (or .jpeg / .gif) - if you're having trouble making your images display, try using a different image hosting site.

note 2: many image hosting sites aren't actually CDNs (content delivery networks), so they don't like you embedding images off-site, which is why Imgur isn't a great choice for hosting - try searching around for a good reliable CDN!

now you can go back and finish making your entry!


once you've posted your entry, all you can do now is wait! the winners will be announced on the first day of the elemental holiday, along with a dozen or so honourable mentions (who will be sent a single skin blueprint through DMs some time afterwards!)

if you won, congrats! rake in that prize money! if not, you can always just print the skin yourself. (or save it to resubmit next year! make sure you say it's a repost, if you choose to do so. there's been a few cases in the past where a resubmission has won, so there's at least a teeny chance!)

most importantly, though, have fun making your entry! and good luck!

angle%201.pngartbutton%20closed.pngartshop%20icon.pngstresssig.gif
angle%202.pngumabutton.pngumashop%20icon.pngradiation%20middle.png
angle%203.pngumatutorialbutton.pngumatutorial%20icon.pngstresssig2.gif
[center][emoji=cloud size=1] reserved! [emoji=cloud size=1][/center]


reserved!

angle%201.pngartbutton%20closed.pngartshop%20icon.pngstresssig.gif
angle%202.pngumabutton.pngumashop%20icon.pngradiation%20middle.png
angle%203.pngumatutorialbutton.pngumatutorial%20icon.pngstresssig2.gif
and that's all she wrote! [emoji=cloud size=1] i hope this is helpful to all you wonderful artists out there! if you're still unsure about any part, or there's something you'd like me to make another section on, i'll happily answer any questions you have! [emoji=music note size=1]
and that's all she wrote! i hope this is helpful to all you wonderful artists out there!

if you're still unsure about any part, or there's something you'd like me to make another section on, i'll happily answer any questions you have!
angle%201.pngartbutton%20closed.pngartshop%20icon.pngstresssig.gif
angle%202.pngumabutton.pngumashop%20icon.pngradiation%20middle.png
angle%203.pngumatutorialbutton.pngumatutorial%20icon.pngstresssig2.gif
1 2