


Tutorial
Follow our official tutorial if you need help getting started!
Creating a Skin
Step 1: Save & Open the File
Save the File:
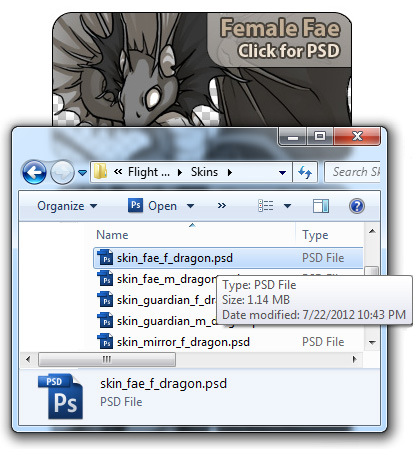
Click Download PSDs and select the appropriate breed/gender you desire to skin. Save the file in a location where you can easily find it.
The dragon you plan to skin must be the same breed/gender as the skin you create. Ex: You cannot apply a Guardian Dragon skin to a Fae Dragon.
Open the File:
Open the file in your favorite art program. The art program will need to support both the .psd format and layers. Examples of some programs you can use:
- Photoshop
- Firealpaca
- Paint Shop Pro
- GIMP
- Paint Tool Sai
- Painter
Step 2: Examine the Layers
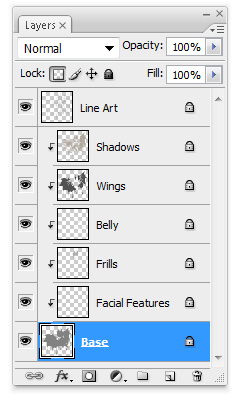
When you open the .psd file, you will see a series of layers.
Important Layers:
The Line Art layer contains the dragon's line art. This layer may not be changed.
The Shadows layer contains the shading for your dragon. This is what makes it appear to be 3-dimensional. You may tint or adjust the colors of the shadows, but ensure that the shadows are always noticibly darker than the colors that they are laid against. The shadow layer is always set to "multiply" mode, meaning that it will darken the colors beneath it. Do not erase or alter the shadow layer behind the tinting.
The Base layer is a color fill layer there for your convenience, as are any other layers sandwiched between Base and Shadows.
Layer Locks:
The lock symbol on a layer indicates that the transparent areas of the image are being preserved. This means that you cannot paint outside of the currently existing painted pixels. You may unlock layers if you desire to paint beyond them, but please try to stay inside the lines! If you have pixels that go beyond the edges of the dragon base, there's a chance that your skin submission may be rejected. Your blueprint will be refunded in the case of a rejected submission.
Step 3: Brush Selection
Different paint programs will have different brush options and ways to customize them. This tutorial shows Photoshop’s brush options.
Different brushes can achieve different effects. Some artists will color with only one or two brush types, while others will use a vast collection of brushes to paint with. In either case, having a drawing tablet can be helpful when coloring because it will allow you to press harder or softer to achieve varying pen widths and opacities without having to change your brush size each time.

Step 4: Paint
Paint the dragon with the colors, patterns, and textures you desire. If you keep your colors below the shadow and line art layer, the shadow and line art will appear as they should.
Layers that are locked prevent you from going outside of their bounds. This can make painting with pre-cut layers quite speedy! If the pre-cut layers are not to your liking, you can make a layer of your own and paint on that.

Step 5: Resize & Save Completed Skin
After you finish painting your masterpiece, you’ll need to save your file to be a 350x350 PNG24 file with transparency preserved. This can be achieved in most art programs. This tutorial will show how to accomplish a good save in Photoshop.

Merge all your existing layers using the “Merge Visible” command.
Do not flatten your image. Doing so will negate the transparent areas of the image. Skins that do not have transparent backgrounds will not be accepted. The transparency allows us to use the skins in Coliseum in such a way that they do not appear to live inside a white square.

Under the Image menu, navigate to to Image--> Image Size and the following dialogue box will open.
Ensure that “Constrain Proportions” is checked, then change the image height and width to 350 x 350 pixels.
Hit “OK.”
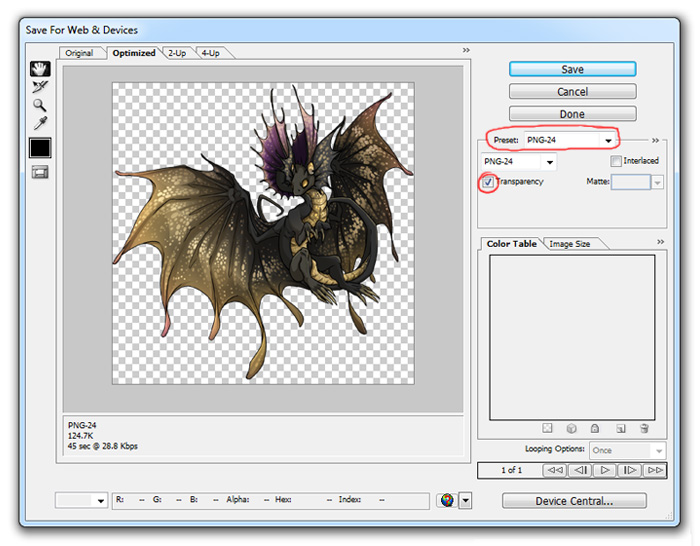
Once your image is resized it is time to save as a .png image. Under the File menu in Photoshop, select the File ---> Save for Web & Devices option. The following box will pop up. Select “PNG-24” from the preset dropdown and ensure that Transparency is checked. Then click “Save” to save the file.
Step 6: Upload
Activate your blueprint by left clicking it, then follow the instructions on-screen to upload your skin. Don’t have a blueprint? You can purchase one here.
Skins must be approved by an administrator, then turned into an item. This process can take anywhere from 5-7 days from after you submit the skin. Your skin will arrive in your message center.
The copies that you receive will depend upon the skin bundle that you selected. If you selected a (10) skin blueprint, you will receive 10 copies of your skin. You can save the extras, give them to a friend, auction them, or sell them on the forums!
Creating an Accent
While a skin will cover every inch of your dragon, an accent is something that applies “paint” to 30% or less of your dragon's body. This means that your dragon's natural colors will peek through, and accents will look different on every dragon that they are applied to. Creating an accent is very similar to creating a skin.
Step 1: Save & Open the File
Save the File:
Click Download PSDs and select the appropriate breed/gender you desire to create an accent for. Save the file in a location where you can easily find it.
The dragon you plan to create an accent for must be the same breed/gender as the accent you create. Ex: You cannot apply a Guardian Dragon accent to a Fae Dragon.
Open the File:
Open the file in your favorite art program. The art program will need to support both the .psd format and layers. Programs that support clipping masks will make accent creation much easier. Examples of some programs you can use:
- Photoshop
- Firealpaca
- Paint Shop Pro
- GIMP
- Paint Tool Sai
- Painter
Step 2: Examine the layers.
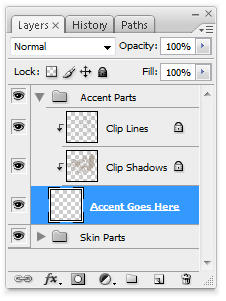
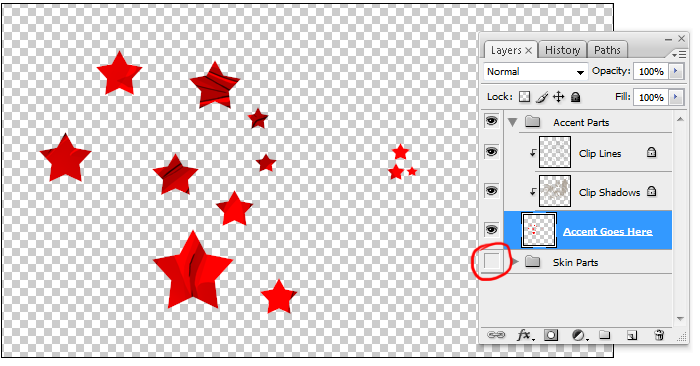
When you open the .psd file, you will see two folders. Collapse the “Skin Parts” folder but leave it visible. The Skin Parts folder is useful for ensuring you paint inside the lines. Toggle the layer visibilty of the accents folder on.
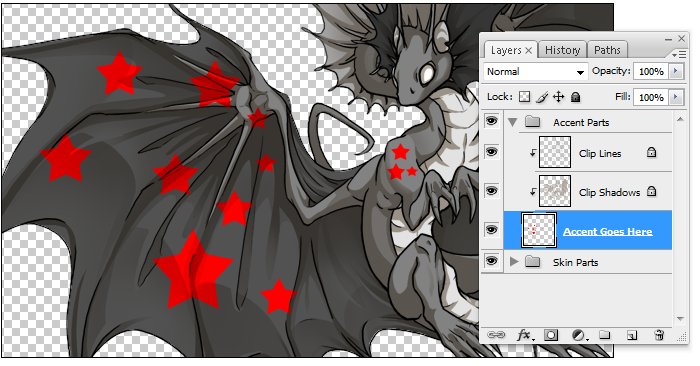
You should see three layers:
- Accent Goes Here: This is where you will be painting.
- Clip Lines: A copy of the lineart of the dragon. Clipping mask applied to link with Accent Goes Here.
- Clip Shadows: A copy of the shadows of the dragon. Clipping mask applied to link with Accent Goes Here.
Step 3: Paint Your Accent
Start painting on the Accent Goes Here layer. Go nuts! Use the skin parts layers below it as a guide so that you do not paint outside the bounds of your dragon. If your program supports the clipping mask, you'll notice that shadows and linework appear above your accent, making it appear to have the same lines and light source as the dragon below it: Fancy!
Toggle the visibility of the Skin Parts folder and you'll notice that the shadows and linework remain above your accent, but nowhere else on the image. This perfectly sets up your accent to have transparency where there's no accent; your dragon's natural coloration will show through in these transparent areas.
Step 4: Resize & Save Completed Accent
After you finish painting your masterpiece, you’ll need to save your file to be a 350x350 PNG24 file with transparency preserved. This can be achieved in most art programs. This tutorial will show how to accomplish a good save in Photoshop.
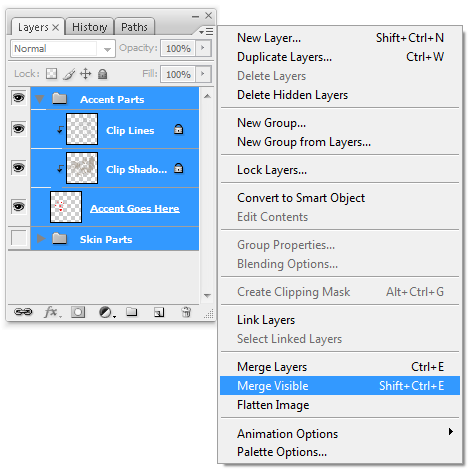
Turn off the visibility of the skin parts folder and select all existing layers by clicking the top layer, holding shift, then clicking the bottom layer. Select the “Merge Visible” command.
Do not flatten your image. Doing so will negate the transparent areas of the image. Accents that do not have transparent backgrounds will not be accepted. If you have transparency turned off your dragon will be covered by a giant square of white paint with some accents thrown on top.
Under the Image menu, navigate to to Image--> Image Size and the following dialogue box will open.
Ensure that “Constrain Proportions” is checked, then change the image height and width to 350 x 350 pixels.
Hit “OK.”
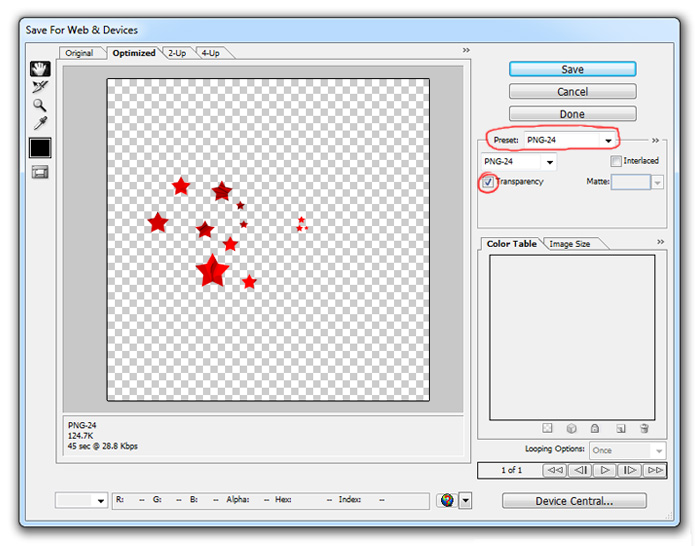
Once your image is resized it is time to save as a .png image. Under the File menu in Photoshop, select the File ---> Save for Web & Devices option. The following box will pop up. Select “PNG-24” from the preset dropdown and ensure that Transparency is checked. Then click “Save” to save the file.
Step 5: Upload
Activate your blueprint by left clicking it, then follow the instructions on-screen to upload your accent. Don’t have a blueprint? You can purchase one here.
Accents must be approved by an administrator, then turned into an item. This process can take anywhere from 5-7 days after you submit the accent. Your accent will arrive in your message center.
The copies that you receive will depend upon the accent bundle that you selected. If you selected a (10) accent blueprint, you will receive 10 copies of your accent. You can save the extras, give them to a friend, auction them, or sell them on the forums!