Back

Guides

Community created guides, helpful strategies, and more.
TOPIC | Reliable Forbidden Portal Farming!
1 2 3
[center]This setup's worked for me flawlessly in Golem Workshop, and after some testing against every set of mobs in Forbidden Portal, it's working perfectly too! It requires three dragons: two melee and one healer! ================== You'll want these specific stats + stones: [b]i. melee #1[/b] 126STR / 59QCK / 8AGI / 6VIT / everything else @ 1 [img]https://i.gyazo.com/d5c79ee2211b55b47e2c4f6f7576110f.png[/img] [u]Any element is fine[/u]; Water is particularly good against the bosses. The last attack stone is up to you, I recommend either Shred or Sap. The elemental slash is optional, but I like them against bosses for extra damage. [b]This dragon MUST have Rally.[/b] [b]ii. melee #2[/b] 126STR / 59QCK / 8AGI / 6VIT / everything else @ 1 [img]https://i.gyazo.com/feaebd59335d988a028d38653538c0fd.png[/img] Again, [u]any element is fine[/u], Water is great vs bosses. If your first melee dragon doesn't have Shred, make sure this one has it for bosses. You can put Rally on this dragon instead of Haste -- this dragon of mine just happens to have Haste instead. [b]iii. mage/healer[/b] 125+INT / 50+QCK / 30+VIT / 8AGI / everything else @ 1 [img]https://i.gyazo.com/fae5f3fd80dc05530f8e10262dc19f8e.png[/img] Any element is fine (might want to avoid things weak to Fire and Wind though) and the fourth attack isn't necessary. (Neither is the Prismatic Meditate, any Meditate is fine!) The build is pretty general. You want at least 125 INT for damage and at least 50 QCK to keep up with everything else. The extra VIT is nice too. ================== [/center][center] [b]So what now?[/b] [/center] 1. You want to arrange your dragons so that your dragon with Rally always goes first in Ambush turns. Your healer will always be last, which I recommend. 2. For your first couple fights, build up breath so that your two melee dragons can use Eliminate freely and that your healer has 60-90 breath for various uses. Don't be afraid to heal, but stick to Scratch for the melee users. 3. Once your two melee dragons are around 40+ breath each, follow this pattern for all non-boss encounters! Keyboard shortcuts are in parenthesis. -> Dragon #1 rallies Dragon #2 (A > D > S) -> Dragon #1 scratches Mob #1 (A > E > Q) -> Dragon #2 Eliminates Mob #1 (A > A > Q) -> Dragon #2 scratches Mob #2 (A > E > W) -> Dragon #3 casts Elemental Bolt at Mob #3 (A > S > E) -> Dragon #3 either Contuses mobs, Heals as needed, or meditates* -> Dragon #1 Eliminates Mob #2 (A > A > W) -> Dragon #2 Eliminates Mob #3 (A > A > E) * Some mobs, such as the Void Wyvern, are faster than your team's QCK. That's okay, because the meditating ones won't immediately hurt you, and your healer will have an extra turn at some point to heal damage from scratchers. You can use your healer turns however you need to, depending on if you miss something or need to heal a dragon. [center]==================[/center] Because of the Rally effect on the second dragon, you can easily tear through everything because of how you're using damage here. But this [u]also[/u] means that you have to pay attention to which dragon is attacking what, because the damage adds up in a specific way based on this pattern. If you use the wrong dragon to attack the wrong monster, you might mess up and lose 35 breath for your failed Eliminate! (And yes, misses happen, especially with higher AGI monsters! If you miss your Rallied scratch or eliminate, 2 Scratches/Contuse + 1 Eliminate can kill any mob without any Rally needed. And never be afraid to use Heal.) [b]For groups of 4 monsters,[/b] just put your priority on anything that scratches to attack. Meditators can be killed afterwards, because they don't do anything their first turn. [b]For bosses, this strategy is moot, and you can just do whatever. [/b] Just use your healer to keep your melee dragons alive. Keep the Contuse and Shred status effects going so the boss is less dangerous and takes extra damage over time. Elemental slashes do a nice chunk of damage if they're effective against the boss, which is nice because they're much cheaper on breath than Eliminate is. [center]==================[/center] If anyone has questions, ping me and I'll answer! There shouldn't be any other specifics needed for this strategy besides the stats, the required stones, and that you stick to the pattern. Let me know how it works for you!
This setup's worked for me flawlessly in Golem Workshop, and after some testing against every set of mobs in Forbidden Portal, it's working perfectly too!

It requires three dragons: two melee and one healer!

==================

You'll want these specific stats + stones:


i. melee #1
126STR / 59QCK / 8AGI / 6VIT / everything else @ 1
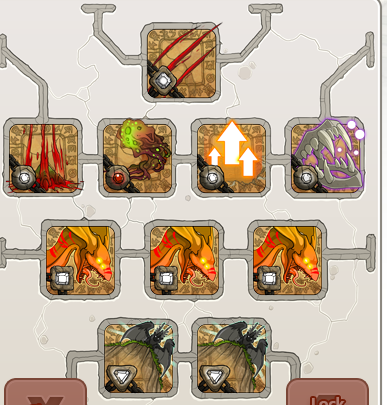
d5c79ee2211b55b47e2c4f6f7576110f.png

Any element is fine; Water is particularly good against the bosses. The last attack stone is up to you, I recommend either Shred or Sap.
The elemental slash is optional, but I like them against bosses for extra damage.
This dragon MUST have Rally.


ii. melee #2
126STR / 59QCK / 8AGI / 6VIT / everything else @ 1
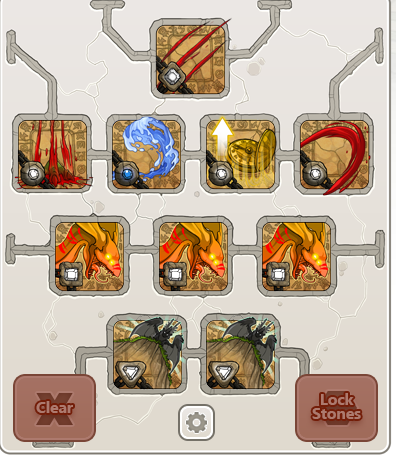
feaebd59335d988a028d38653538c0fd.png

Again, any element is fine, Water is great vs bosses. If your first melee dragon doesn't have Shred, make sure this one has it for bosses. You can put Rally on this dragon instead of Haste -- this dragon of mine just happens to have Haste instead.


iii. mage/healer
125+INT / 50+QCK / 30+VIT / 8AGI / everything else @ 1
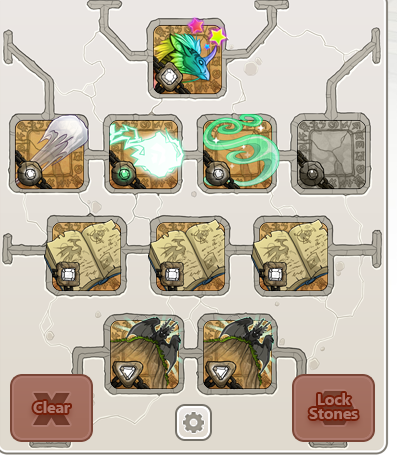
fae5f3fd80dc05530f8e10262dc19f8e.png

Any element is fine (might want to avoid things weak to Fire and Wind though) and the fourth attack isn't necessary.
(Neither is the Prismatic Meditate, any Meditate is fine!)

The build is pretty general. You want at least 125 INT for damage and at least 50 QCK to keep up with everything else. The extra VIT is nice too.

==================
So what now?
1. You want to arrange your dragons so that your dragon with Rally always goes first in Ambush turns. Your healer will always be last, which I recommend.

2. For your first couple fights, build up breath so that your two melee dragons can use Eliminate freely and that your healer has 60-90 breath for various uses. Don't be afraid to heal, but stick to Scratch for the melee users.

3. Once your two melee dragons are around 40+ breath each, follow this pattern for all non-boss encounters! Keyboard shortcuts are in parenthesis.

-> Dragon #1 rallies Dragon #2 (A > D > S)
-> Dragon #1 scratches Mob #1 (A > E > Q)
-> Dragon #2 Eliminates Mob #1 (A > A > Q)
-> Dragon #2 scratches Mob #2 (A > E > W)
-> Dragon #3 casts Elemental Bolt at Mob #3 (A > S > E)
-> Dragon #3 either Contuses mobs, Heals as needed, or meditates*
-> Dragon #1 Eliminates Mob #2 (A > A > W)
-> Dragon #2 Eliminates Mob #3 (A > A > E)

* Some mobs, such as the Void Wyvern, are faster than your team's QCK.
That's okay, because the meditating ones won't immediately hurt you, and your healer will have an extra turn at some point to heal damage from scratchers.

You can use your healer turns however you need to, depending on if you miss something or need to heal a dragon.
==================

Because of the Rally effect on the second dragon, you can easily tear through everything because of how you're using damage here.

But this also means that you have to pay attention to which dragon is attacking what, because the damage adds up in a specific way based on this pattern. If you use the wrong dragon to attack the wrong monster, you might mess up and lose 35 breath for your failed Eliminate!

(And yes, misses happen, especially with higher AGI monsters!
If you miss your Rallied scratch or eliminate, 2 Scratches/Contuse + 1 Eliminate can kill any mob without any Rally needed. And never be afraid to use Heal.)


For groups of 4 monsters, just put your priority on anything that scratches to attack. Meditators can be killed afterwards, because they don't do anything their first turn.


For bosses, this strategy is moot, and you can just do whatever.
Just use your healer to keep your melee dragons alive. Keep the Contuse and Shred status effects going so the boss is less dangerous and takes extra damage over time. Elemental slashes do a nice chunk of damage if they're effective against the boss, which is nice because they're much cheaper on breath than Eliminate is.
==================

If anyone has questions, ping me and I'll answer!
There shouldn't be any other specifics needed for this strategy besides the stats, the required stones, and that you stick to the pattern. Let me know how it works for you!
4Gh3xRo.png
MUYNhfy.png
sD0LDRK.png
bYt72YT.png

PRICTGJ.png
plague_1.png - gathering turns & coli grinding shop
- plaguedom shop

- item sales
- g1 sales
@Marine So we just tweak a Golem team and go from there? I've already seen one or two threads that say Water/Earth/Arcane might be the best mix element-wise. You say it's negligible but I'm not so sure.

Thoughts?
@Marine So we just tweak a Golem team and go from there? I've already seen one or two threads that say Water/Earth/Arcane might be the best mix element-wise. You say it's negligible but I'm not so sure.

Thoughts?
shadebanner_by_myserpentine-d9llwgu.png
@Rionach

I think this is the exact same team as what I used for Golem Workshop; I haven't messed with the stats on these three dragons at all, and they're doing what they need to.

I feel that it's negligible enough-- if everything goes to plan, the only times you'll be taking elemental damage would be during your setup battles, and from bosses.
Meditators don't usually get the chance to attack before you kill them, and scratchers need to hit at least twice before attacking with their element.

The bosses are Wind and Fire respectively, so anything that can hit them both effectively and/or resists them would be your best bet.
4Gh3xRo.png
MUYNhfy.png
sD0LDRK.png
bYt72YT.png

PRICTGJ.png
plague_1.png - gathering turns & coli grinding shop
- plaguedom shop

- item sales
- g1 sales
I've been using my Workshop team, too.
Top left:
Mage - Light Skydancer
Str: 5
Int: 104
Agi: 9
Vit: 11
Qck: 91
Def: 5
Mnd: 5
________________ Top Right: DPS - Wind Imperial
Middle Bottom: DPS - Light Imperial
Str: 125
Int: 5
Agi: 10
Vit: 14
Qck: 59
Def: 5
Mnd: 5

I sat in the coli for 100 odd battles, and only had to restart I think once or twice, because I messed up in the opening battle :)
135783.png
92556387.png
_____________________
ThistleProse
Aussie | she/her

Activity | Projects | UMAs
Farming Notes
Pretty Fodder

72964495.png
86867754.png
@Marine

Eldritch Exorcists -nod-
@Marine

Eldritch Exorcists -nod-
YLpz8d9K_o.gif
@ZaHee Pinging myself so I can find this
@Tsukistar

Pinging self for future reference
@Tsukistar

Pinging self for future reference
@Marine

this is an excellent guide, thank you!! tried w/ my GW team and it's very sustainable for long-term grinding compared to other methods i've seen. an hour or so in and all 3 are at full breath/health, even after a boss fight. it's always been too much of a hassle to grind in the forbidden portal, but setting up my team the way you recommended is much smoother & easier to get a good rhythm with.

stats & details for reference if anyone wants 'em:

melee #1: light element
STR 126 / AGI 8 / DEF 5 / QCK 56 / INT 5 / VIT 17 / MND 5
ability stones are rally, eliminate, sap, and shred

melee #2: earth element
STR 127 / AGI 8 / DEF 5 / QCK 57 INT 5 / VIT 5 / MND 5
ability stones are rally, eliminate, sap, and shred

mage: light element
STR 5 / AGI 8 / DEF 5 / QCK 50 / INT 129 / VIT 13 / MND 5
ability stones are rally, enamor, contuse, and aid

turns usually go like:
melee 1 rallies melee 2, scratches mob 1
melee 2 eliminates mob 1, scratches mob 2
mage contuses mob 3 (works in place of a non-rallied scratch), meditates or heals
melee 2 eliminates mob 3
melee 1 eliminates mob 2

i only ever take damage from bosses or all-scratch mobs, and can heal back to full easily within the next 2 mobs.


dreamlogic |
they/he |
FR+1 |
sales tab |
wishlist |
HBn6uXZ.gif
@Spriggan

Giving a ping to myself for reference! :)
@Spriggan

Giving a ping to myself for reference! :)
dc83750d5f8736efdb2eab1c761c9f4c8394135c.png

booS p r i g g a n

booooThe results of hard work always seem like luck, but know you've earned every bit of your success.
hatchery coli services goals
@doomspire self-ping for reference [emoji=amber mosquito size=1]
@doomspire
self-ping for reference
33309.png
+3 fr time
1 2 3