Back

Guides

Community created guides, helpful strategies, and more.
TOPIC | Kelp Beds - Keelhauler - 2 Fodder
1 2
I was asked about KB Scratch builds and saw was told about a new one that was made, and decided to make one as well. This one takes a different approach from the others trading Str for Qck to maximize Vit.


Post Index:

What Stats and Why

Which Element to Pick

Enemies You'll Face

What to do on Your Turn

What to do Against Each Group


I would like to thank:
Sylvandyr - Their stat tools (found HERE)

Need a fodder trainer build? Try one of these:
Kelp Beds - Leviathan Leveler - 2 Fodder Trainer
GLR + Mire - Ghire Gorer - 2 Fodder
Mire - Mire Mauler - 2 Fodder
GLR - Ruin Wrecker - 2 Fodder Trainer
Boreal Wood- Boreal Banisher - 2 Fodder Trainer
Harpy's Roost - Roost Rustler - 2 Fodder Trainer
Launch_Plans_-_Small.png
(Don't ping the staff)
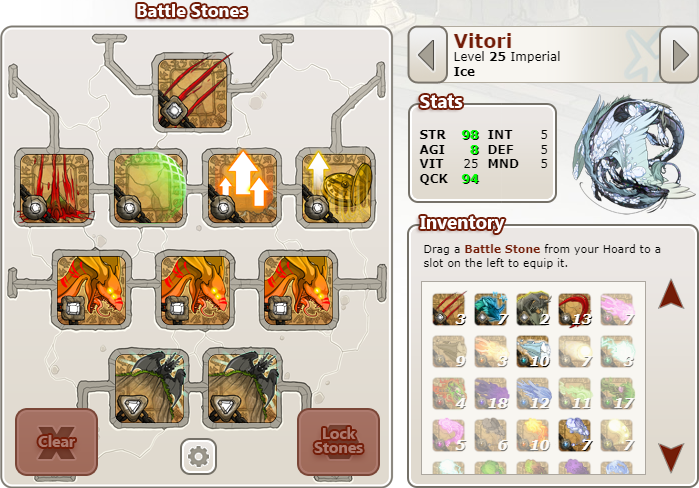
[columns] [b]Stats:[/b] STR AGI DEF QCK [nextcol] 98 8 5 94 [nextcol] | | | | [nextcol] INT VIT MND [nextcol] 5 25 5 [nextcol] | | | | [nextcol] [b]Stones:[/b] Scratch Eliminate Berserker Ambush [nextcol] Reflect Berserker Ambush [nextcol] Rally Berserker [nextcol] Haste [/columns] [img]https://i.postimg.cc/hg1j65sY/Stats.png[/img] The reasoning for the stats is as follows: Str 98 allows the Keelhauler to (Rally + Scratch) + (Rally + Elim) as well as Rally + Scratch x4 everything in the venue (other than bosses). Qck 94 plus 30 from haste allows the Keelhauler to take 2 extra turns before the enemy (This is because it has 2x the Qck of the fastest enemy). Vit 25 allows the Keelhauler to take quite a few hits before you have to refresh. While 96 Str allows you to Rally Scratch + Rally Elim everything, you won't be able to Rally + Scratch x4 the stronger enemies which means you will take an additional hit. So we sacrifice 5 Vit (70 HP) to prevent those extra attacks.
Stats:
STR
AGI
DEF
QCK

98
8
5
94

|
|
|
|

INT
VIT
MND


5
25
5


|
|
|
|
Stones:
Scratch
Eliminate
Berserker
Ambush


Reflect
Berserker
Ambush


Rally
Berserker


Haste


Stats.png

The reasoning for the stats is as follows:
Str 98 allows the Keelhauler to (Rally + Scratch) + (Rally + Elim) as well as Rally + Scratch x4 everything in the venue (other than bosses).

Qck 94 plus 30 from haste allows the Keelhauler to take 2 extra turns before the enemy (This is because it has 2x the Qck of the fastest enemy).

Vit 25 allows the Keelhauler to take quite a few hits before you have to refresh.

While 96 Str allows you to Rally Scratch + Rally Elim everything, you won't be able to Rally + Scratch x4 the stronger enemies which means you will take an additional hit. So we sacrifice 5 Vit (70 HP) to prevent those extra attacks.
Need a fodder trainer build? Try one of these:
Kelp Beds - Leviathan Leveler - 2 Fodder Trainer
GLR + Mire - Ghire Gorer - 2 Fodder
Mire - Mire Mauler - 2 Fodder
GLR - Ruin Wrecker - 2 Fodder Trainer
Boreal Wood- Boreal Banisher - 2 Fodder Trainer
Harpy's Roost - Roost Rustler - 2 Fodder Trainer
Launch_Plans_-_Small.png
(Don't ping the staff)
I'll now go through the various dragon elements and say which I think are best, and which are worst. This is based on which elements are super effective against your dragon's element. (I'm only counting the elements for spell-casting enemies since the melee enemies don't usually use their element attack before you kill them). My scale will be Great, Good, Doable, Bad, and Terrible. Your trainer's element only matters when you're hit by elemental attacks, and this build can beat melee enemies before they get a chance to use their elemental attacks. After the first battle, you have enough breath the cast eliminate and bet mages before they can cast elemental attacks as well, so element matters even less after the first battle. [b]Resistant to[/b] is how many enemies deal less damage to your dragon (higher # = good) [b]Weak to[/b] is how many enemies deal more damage to your dragon (higher # = bad) [columns] [b]Element[/b] Arcane Earth Fire Ice Light Lightning Nature Plague Shadow Water Wind [nextcol] | | | | | | | | | | | | [nextcol] [b]Rank[/b] Terrible Terrible Bad Great Bad Doable Good Doable Bad Good Terrible [nextcol] | | | | | | | | | | | | [nextcol] [b]Resistant to[/b] 1 0 2 3 2 1 3 2 2 3 1 [nextcol] | | | | | | | | | | | | [nextcol] [b]Weak to[/b] 5 5 4 1 4 3 2 3 4 2 5 [/columns] ----- If you don't want to read the chart, here's the ranking from best to worst [b]1st Best:[/b] Ice [b]2nd Good:[/b] Nature Water [b]3rd Doable:[/b] Lightning Plague [b]4th Bad:[/b] Fire Light Shadow [b]5th Worst:[/b] Arcane Earth Wind ----- Here's a chart to show what elements are strong/weak to what [img]http://i.imgur.com/lLliwWS.png[/img]
I'll now go through the various dragon elements and say which I think are best, and which are worst. This is based on which elements are super effective against your dragon's element. (I'm only counting the elements for spell-casting enemies since the melee enemies don't usually use their element attack before you kill them).

My scale will be Great, Good, Doable, Bad, and Terrible.

Your trainer's element only matters when you're hit by elemental attacks, and this build can beat melee enemies before they get a chance to use their elemental attacks. After the first battle, you have enough breath the cast eliminate and bet mages before they can cast elemental attacks as well, so element matters even less after the first battle.

Resistant to is how many enemies deal less damage to your dragon (higher # = good)
Weak to is how many enemies deal more damage to your dragon (higher # = bad)

Element
Arcane
Earth
Fire
Ice
Light
Lightning
Nature
Plague
Shadow
Water
Wind
|
|
|
|
|
|
|
|
|
|
|
|
Rank
Terrible
Terrible
Bad
Great
Bad
Doable
Good
Doable
Bad
Good
Terrible
|
|
|
|
|
|
|
|
|
|
|
|
Resistant to
1
0
2
3
2
1
3
2
2
3
1
|
|
|
|
|
|
|
|
|
|
|
|
Weak to
5
5
4
1
4
3
2
3
4
2
5


If you don't want to read the chart, here's the ranking from best to worst

1st Best:
Ice

2nd Good:
Nature
Water

3rd Doable:
Lightning
Plague

4th Bad:
Fire
Light
Shadow

5th Worst:
Arcane
Earth
Wind


Here's a chart to show what elements are strong/weak to what
lLliwWS.png
Need a fodder trainer build? Try one of these:
Kelp Beds - Leviathan Leveler - 2 Fodder Trainer
GLR + Mire - Ghire Gorer - 2 Fodder
Mire - Mire Mauler - 2 Fodder
GLR - Ruin Wrecker - 2 Fodder Trainer
Boreal Wood- Boreal Banisher - 2 Fodder Trainer
Harpy's Roost - Roost Rustler - 2 Fodder Trainer
Launch_Plans_-_Small.png
(Don't ping the staff)
Even with this build working the best, you still will take hits from the enemy. This is due to the nature of the coliseum.

An all melee group will get at least 3-4 hits on your dragons.

Mages:
Abyss Striker
Cloud Chaser
Jeweled Octoflyer
Octoflyer
Maren Wavesinger
Maren Ambusher

Kelp Caretaker
Maren Harvester
Ruche Slug
Ruched Sojourner


Shadow
Wind
Arcane
Water
Water
Nature

Nature
Ice
Light
Plague


Melee:
Kelp Tender
Mammertee
Relic Eel
Golden Porpoise
Corrosive Depin
Depin
Maren Scout
Maren Warrior

Blue-Footed Eggull
Eggull
Maren Fisher
Maren Seahunter

Water
Neutral
Earth
Light
Shadow
Neutral
Fire
Lightning

Neutral
Earth
Wind
Water
Need a fodder trainer build? Try one of these:
Kelp Beds - Leviathan Leveler - 2 Fodder Trainer
GLR + Mire - Ghire Gorer - 2 Fodder
Mire - Mire Mauler - 2 Fodder
GLR - Ruin Wrecker - 2 Fodder Trainer
Boreal Wood- Boreal Banisher - 2 Fodder Trainer
Harpy's Roost - Roost Rustler - 2 Fodder Trainer
Launch_Plans_-_Small.png
(Don't ping the staff)
First Battle:
1) Haste (targeting Keelhauler)
2) Rally (targeting Keelhauler)
3) Scratch
4) Scratch
Enemy Turn
5) Scratch
6) Scratch
Enemy Turn
7) Haste (targeting Keelhauler)
8) Rally (targeting Keelhauler)
Enemy Turn
9) Scratch
10) Eliminate
Enemy Turn
11) Scratch
12) Eliminate

Haste and Rally will provide 10 breath, then you need to Scratch 5 more times for enough breath to Eliminate. However, since Haste and Rally run out, we'll use them again which will provide enough breath as well, and Rally is needed to finish the last two enemies anyways, so we'll get the last needed bit of breath from that.

With the speed of the build, you will be able get 2 turns between the enemies with Haste up, and alternate between 1 and 2 turns when Haste runs out.

Second Battle (2+ Melee):
1) Haste (targeting Keelhauler)
2) Rally (targeting Keelhauler)
3) Scratch
4) Eliminate
Enemy Turn
5) Scratch
6) Eliminate
Enemy Turn
7) Haste (targeting Keelhauler)
8) Rally (targeting Keelhauler)
Enemy Turn
9) Scratch
10) Eliminate


Second Battle (2+ Mages):
1) Haste (targeting Keelhauler)
2) Rally (targeting Keelhauler)
3) Scratch
4) Eliminate
Enemy Turn
5) Scratch
6) Reflect (targeting Keelhauler)
Enemy Turn
7) Eliminate
8) Scratch
Enemy Turn
9) Scratch
10) Scratch
Enemy Turn
11) Eliminate


Enemy Focus Order:
Hit the melee enemies first, and the mages last. The mage has a chance at charging instead of attacking so you won't take more damage.


Reflect Usage:
Reflect is extremely important to this build since it makes mages unable to damage you. This includes the bosses. If you are facing 2 or 3 mages, make sure you get Reflect up after they Meditate, before their attacking turn.

Using Reflect will net you -10 breath because it costs 40 breath, and Scratching each turn it's up will provide 30 breath meaning you lose 10. This is a small downside, and is why I recommend not always killing the last enemy as quickly as possible: You may need that breath later.


Bosses:
You also need to remember that lose of 10 breath when facing bosses because it will be a longer battle requiring you to use Reflect multiple times. This isn't a big problem if you have nearly full breath, but can be when you have less.
Just be sure you keep Reflect up as much as possible, and use Scratch to keep your breath built up. You can also Reflect Haste onto the boss if you want more help damaging it, but it will do half damage to itself. I recommend using mostly Scratch to deal damage since Eliminmate will make you run out of breath faster.


Refresh:
If you're training past 7, I recommend putting your fod's points into Vit whenever you refresh. It will let them tank more hits allowing you to train for longer.

Dodge:
If you miss an Eliminate and can't cast another with 2+ melee enemies still up, you should probably refresh. You can try to win, but they'll likely hit you too many times.


Defend:
Against 3 packs of melee enemies, Defend can be handy for taking half a hit less damage. For the last enemy, instead of Rally, Scratch, enemy turn, Eliminate; you should use Scratch (or Rally), Defend, enemy turn, Scratch, Eliminate. This will let you gain more breath and take half a hit worth of damage less due to Defend.

Defend with this build can take some getting used to, but it can definitely help.
Need a fodder trainer build? Try one of these:
Kelp Beds - Leviathan Leveler - 2 Fodder Trainer
GLR + Mire - Ghire Gorer - 2 Fodder
Mire - Mire Mauler - 2 Fodder
GLR - Ruin Wrecker - 2 Fodder Trainer
Boreal Wood- Boreal Banisher - 2 Fodder Trainer
Harpy's Roost - Roost Rustler - 2 Fodder Trainer
Launch_Plans_-_Small.png
(Don't ping the staff)
*NOTE:* All of these numbers are assuming you don't miss an attack. You might want to refresh if you miss an eliminate before your breath is at 70 (70 breath is the point where missing with eliminate still leaves you with enough breath to try again).
Enemy Groups

3 Mages
2 Mages + 1 Melee
1 Mage + 2 Melee
2 Mages + 2 Melee
3 Melee
Max Hits Turn 1

3
4
6
8
8
Max Hits Later

0
0
2
3
4
Refresh Turn 1

No
No
No
Yes
Maybe

3 Mages
First Battle: These are very good to start with.
Later Battles: These are very easy later on.

2 Mages + 1 Melee
First Battle: These are very good to start with.
Later Battles: These are very easy later on.

1 Mages + 2 Melee
First Battle: These are very good to start with.
Later Battle: These are very easy later on.

2 Mages + 2 Melee
First Battle: These aren't the best to start with, but you can.
Later Battles: These are very easy later on.

3 Melee
First Battle: These aren't the best to start with, but you can.
Later Battles: These are very easy later on.

2 Packs:
First Battle: These are very good to start with.
Later Battle: These are very easy later on.

Bosses:
First battle: These shouldn't be bad to start on, you just have to get enough breath for Reflect and you'll be fine.
Later battles: These are easy, and as long so you have nearly full breath at the start, you shouldn't even be hit since you can keep casting Reflect.
Need a fodder trainer build? Try one of these:
Kelp Beds - Leviathan Leveler - 2 Fodder Trainer
GLR + Mire - Ghire Gorer - 2 Fodder
Mire - Mire Mauler - 2 Fodder
GLR - Ruin Wrecker - 2 Fodder Trainer
Boreal Wood- Boreal Banisher - 2 Fodder Trainer
Harpy's Roost - Roost Rustler - 2 Fodder Trainer
Launch_Plans_-_Small.png
(Don't ping the staff)
-- Reserved --
-- Reserved --
Need a fodder trainer build? Try one of these:
Kelp Beds - Leviathan Leveler - 2 Fodder Trainer
GLR + Mire - Ghire Gorer - 2 Fodder
Mire - Mire Mauler - 2 Fodder
GLR - Ruin Wrecker - 2 Fodder Trainer
Boreal Wood- Boreal Banisher - 2 Fodder Trainer
Harpy's Roost - Roost Rustler - 2 Fodder Trainer
Launch_Plans_-_Small.png
(Don't ping the staff)
(your second post says Mediate instead of Scratch)

Looks interesting; I need to train up a couple more Ice kids so I can stat them. I currently have a pair that work together and I don't want to mess with them XD
(your second post says Mediate instead of Scratch)

Looks interesting; I need to train up a couple more Ice kids so I can stat them. I currently have a pair that work together and I don't want to mess with them XD
135783.png
92556387.png
_____________________
ThistleProse
Aussie | she/her

Activity | Projects | UMAs
Farming Notes
Pretty Fodder

72964495.png
86867754.png
Ah, typo fixed, thanks!
Need a fodder trainer build? Try one of these:
Kelp Beds - Leviathan Leveler - 2 Fodder Trainer
GLR + Mire - Ghire Gorer - 2 Fodder
Mire - Mire Mauler - 2 Fodder
GLR - Ruin Wrecker - 2 Fodder Trainer
Boreal Wood- Boreal Banisher - 2 Fodder Trainer
Harpy's Roost - Roost Rustler - 2 Fodder Trainer
Launch_Plans_-_Small.png
(Don't ping the staff)
[columns][url=https://www1.flightrising.com/dragon/4519290][img]https://www1.flightrising.com/rendern/350/45193/4519290_350.png[/img][/url] [nextcol]This is my girl that I'm working with. So far, going pretty well. It is mostly a matter of keeping an eye on her buffs and not trying to Eliminate after they fall off... which I did several times lmao. I spend most of my time in the Mire with [url=https://www1.flightrising.com/forums/gde/2584493]this lady[/url], which seems to be one of your builds, too #MireWin -- I love the mire, but I need to grind elsewhere, too. I only moved to the Mire after the Kelp Beds got their update, and the original Kraken stopped working /sob. I'm hoping my useless brains won't take too long to learn the sequence XD[/columns]
4519290_350.png This is my girl that I'm working with. So far, going pretty well. It is mostly a matter of keeping an eye on her buffs and not trying to Eliminate after they fall off... which I did several times lmao. I spend most of my time in the Mire with this lady, which seems to be one of your builds, too #MireWin -- I love the mire, but I need to grind elsewhere, too. I only moved to the Mire after the Kelp Beds got their update, and the original Kraken stopped working /sob.

I'm hoping my useless brains won't take too long to learn the sequence XD
135783.png
92556387.png
_____________________
ThistleProse
Aussie | she/her

Activity | Projects | UMAs
Farming Notes
Pretty Fodder

72964495.png
86867754.png
1 2