Introduction and Contents
Ask ten people on here how to make money and you’ll get twenty answers. What’s more, most of the answers regarding the fairgrounds will be different. It seems like every person swears on a different game as being the best for making money. And in the most spectacularly stereotypically-Light thing I’ve ever done, I’ve combined unnecessarily rigorous research, spreadsheets, and profit, to find out once and for all which fairground game really pays the best.
I’ve also gone ahead and also compiled some advice on how to make money in general, and my strategies for playing these games effectively. I am by no means an expert, so I’ve tried to stick mainly to methods that are more objective, so I won’t be covering things like running a hatchery. There are far more experienced players out there than I to instruct you in these arts; I’m just here to share my numbers, and to throw out my observations on what has worked for me while I’m at it.
Contents
- Save Your Money!
- Fairground Games
- The Daily Treasure Cap
- Glimmer & Gloom
- Artifracture
- Mistral Mahjong
- Runestones of the Arcanist
- Tidal Trouble
- Shock Switch
- Jigsaw
- Higher or Lower
- The Trading Post
- Tomo's Trivia Tablet
- Pinkerton's Plundered Pile
- Swipp's Swap Stand
- Baldwin's Bubbling Brew
- Roundsey's Raffle Roulette
- Crim's Collection Cart
- Gathering and Fighting for Profit
- Food
- Gathering and Scavenging
- Festivals
- Other Means of Making Money
- Auction House Flipping
- Familiars
- Exaltation for Profit
- Services to Players
- Appendix: Testimonials
- Appendix: Glimmer & Gloom Troubleshooting
Save Your Money!
The most important part of making money is saving it! Profit = Earnings – Expenses, so keeping your expenses low is just as important as keeping your earnings high. In fact, it may be even more important, as you can earn very little and still net a tidy profit if your expenses are low. Now I realize a lot of people have a hard time with this, so I’d like to draw your attention to the fact that you can actually put money in your vault!
If you have a problem with impulse buying, set yourself a limit of how much treasure you can have out after a set period of time (such as one week). Over the course of a set amount of time, you’re free to spend money you have out, but at the end of that period, if you have more than your limit, everything above it goes into the vault, and doesn’t come out until you have enough to buy whatever you were saving for. Just keep repeating this. If you find you’re still having problems, make the time period shorter and/or the money cap lower until it starts working.
Some other advice I have for saving money:
- Wait until your flight has dom before you buy expensive things like gene scrolls from the marketplace. If your flight rarely gets dom, consider using the services of a dom shop instead of buying from the marketplace yourself.
- Don’t buy stuff in the marketplace if you can get it cheaper on the auction house.
- When buying fodder, prevent yourself from finding new impulse buys by saving a specialized fodder search containing only breeds, colors, and/or genes you dislike, to prevent you from seeing dragons you’d be tempted to buy, or mitigate the effects of impulse buying by setting the search with a price cap – that new impulse buy won’t hurt so much if it only cost you 5000t.
[color=#2b62b3][font=Century Gothic][size=5][size=5][b]Fairgrounds Games[/b][/size][/size][/font][/color]
[color=#2b62b3][font=Century Gothic][size=5]The Daily Treasure Cap (75000t/day)[/size][/font][/color]
[font=Palatino Linotype][size=4]This is what this guide is mostly about. But the most important lesson here, and one I learned the hard way, is that you don’t need to cap out every day. You will likely burn yourself out if you force yourself to max out every day. Set yourself a smaller goal, or only play on some days. Whatever you need to keep yourself actually earning treasure and not hating it. Remember, this is pixel dragons, and you’re playing it for fun!
On a related note, for all I’m going to talk about efficiency, don’t limit yourself to the fastest way of earning treasure, because it’ll get old fast. Variety is the spice of life. If you need to take a break from efficient earning to do some slower earning to keep yourself entertained, by all means, do that!
But I think it’s time I got to what you all really came here for: [/size][/font]
[center][img]https://i.imgur.com/3u3iYA0.png[/img][/center]
[font=Palatino Linotype][size=4]I’ll go into detail on where I got these numbers in each game’s respective section, but this should give you a pretty good overview of how the games compare. According to the numbers, the most efficient fairgrounds game by a large margin is [b]Glimmer & Gloom[/b], then [b]Artifracture[/b], followed by [b]Mistral Mahjong[/b], [b]Runestones of the Arcanist[/b], then [b]Shock Switch and Tidal Trouble[/b], and finally [b]Jigsaw[/b] as the least efficient. That said, these numbers may assume you’re playing in a particular way – again, see the individual games’ sections for details.[/size][/font]
Fairgrounds Games
The Daily Treasure Cap (75000t/day)
This is what this guide is mostly about. But the most important lesson here, and one I learned the hard way, is that you don’t need to cap out every day. You will likely burn yourself out if you force yourself to max out every day. Set yourself a smaller goal, or only play on some days. Whatever you need to keep yourself actually earning treasure and not hating it. Remember, this is pixel dragons, and you’re playing it for fun!
On a related note, for all I’m going to talk about efficiency, don’t limit yourself to the fastest way of earning treasure, because it’ll get old fast. Variety is the spice of life. If you need to take a break from efficient earning to do some slower earning to keep yourself entertained, by all means, do that!
But I think it’s time I got to what you all really came here for:

I’ll go into detail on where I got these numbers in each game’s respective section, but this should give you a pretty good overview of how the games compare. According to the numbers, the most efficient fairgrounds game by a large margin is Glimmer & Gloom, then Artifracture, followed by Mistral Mahjong, Runestones of the Arcanist, then Shock Switch and Tidal Trouble, and finally Jigsaw as the least efficient. That said, these numbers may assume you’re playing in a particular way – again, see the individual games’ sections for details.
[img]https://orig00.deviantart.net/88e1/f/2018/215/5/a/glimmer_and_gloom_logo_by_littlefiredragon-dcj4uo5.png[/img]
[font=Palatino Linotype][size=4]Yeah, okay, I know what you're thinking. How can this game possibly be the most profitable? It takes an hour to solve a puzzle on the easiest difficulty mode, and the payout is terrible!
That's because you, my friend, have not yet discovered the Magic Algorithms. It turns out that Glimmer & Gloom, like Tic-Tac-Toe, is a [url=https://en.wikipedia.org/wiki/Solved_game][i]solved game[/I][/url]. This means that someone has produced an algorithm that always wins. Despite the scary-sounding computer-y word, this is [I]not[/I] cheating or hacking in any way; an algorithm is just a formalized strategy - like how you can always win (or at least tie) Tic-Tac-Toe by marking the corners first.
[/size][/font]
[color=#2b62b3][font=Century Gothic][size=4][i][u]The Data[/u][/i][/size][/font][/color]
[font=Palatino Linotype][size=4]It may take a few playthroughs to get the hang of the algorithm, but once you do, your times will be blazing fast.[/size][/font]
[columns]
[color=transparent]xxxxxxxxxxxxxxx[/color]
[font=Palatino Linotype][size=4][b]VERY HARD:
HARD:[/b][/size][/font]
[nextcol]
[color=transparent]xxxxx[/color]
[font=Palatino Linotype][size=4]0:41
0:21[/size][/font]
[nextcol]
[color=transparent]xxxxx[/color]
[font=Palatino Linotype][size=4]0:44
0:30[/size][/font]
[nextcol]
[color=transparent]xxxxx[/color]
[font=Palatino Linotype][size=4]0:47
0:18[/size][/font]
[nextcol]
[color=transparent]xxxxx[/color]
[font=Palatino Linotype][size=4]0:45
0:25[/size][/font]
[nextcol]
[color=transparent]xxxxx[/color]
[font=Palatino Linotype][size=4]0:44
0:18[/size][/font]
[nextcol]
[color=transparent]xxxxx[/color]
[font=Palatino Linotype][size=4]0:47
0:23[/size][/font]
[nextcol]
[color=transparent]xxxxx[/color]
[font=Palatino Linotype][size=4]0:38
0:27[/size][/font]
[nextcol]
[color=transparent]xxxxx[/color]
[font=Palatino Linotype][size=4]0:47
0:27[/size][/font]
[nextcol]
[color=transparent]xxxxx[/color]
[font=Palatino Linotype][size=4]0:41
0:23[/size][/font]
[nextcol]
[color=transparent]xxxxx[/color]
[font=Palatino Linotype][size=4]0:34
0:16[/size][/font]
[/columns]
[font=Palatino Linotype][size=4]This averages to a win every 42.8 seconds for Very Hard and every 22.8 seconds for Hard. These award 4000t or 1600t per win respectively, so that comes out to 28035t per five minutes for Very Hard and 21051t per five minutes for Hard. Which is honestly [I]ridiculous[/I] and I would not be at all surprised if they nerfed the payout on this game.[/size][/font]
[center][img]https://i.imgur.com/XD2uAOx.png[/img][/center]
[color=#2b62b3][font=Century Gothic][size=4][i][u]The Strategy[/u][/i][/size][/font][/color]
[font=Palatino Linotype][size=4]There are actually multiple Magic Algorithms, and I can't claim credit for any of them. I call them magic because, while I know there must be a mathematical reason why they work, they still look like witchcraft to me. Thankfully, understanding why they work is not prerequisite to making use of them.[/size][/font]
[color=#2b62b3][font=Century Gothic][size=4]Very Hard[/size][/font][/color]
[font=Palatino Linotype][size=4]The algorithm for [b]Very Hard mode[/b] was invented by youtuber Andycivil, and converted into a [url=http://www1.flightrising.com/forums/gde/2486926]forum guide[/url] by @Catradora. It's faster, but requires a [url=https://docs.google.com/spreadsheets/d/1sugEgmULqhzzedpo62t92Gdab7gaVMnFmUJGY_1wqLE/edit]lookup table[/url].
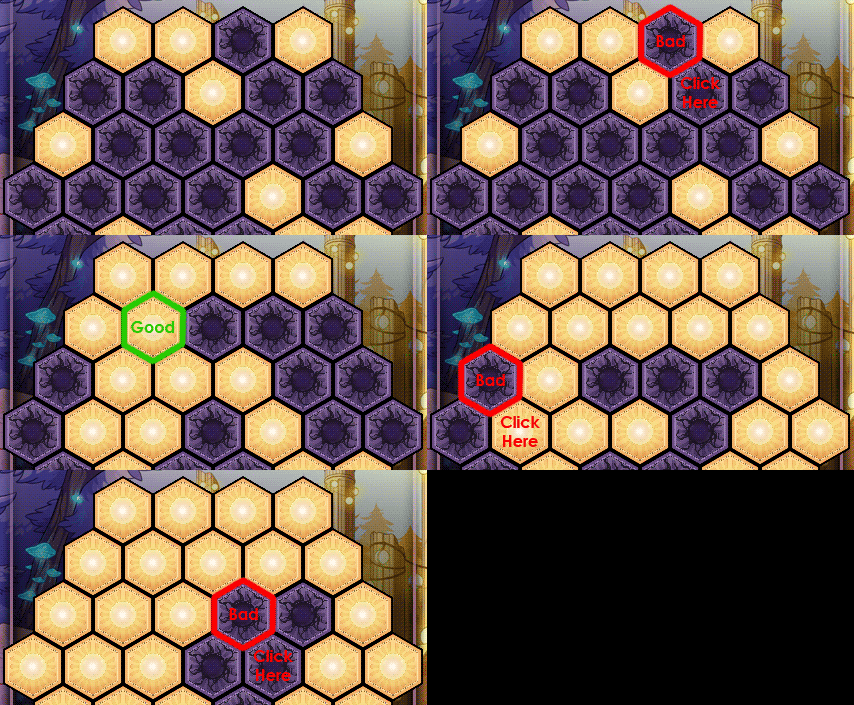
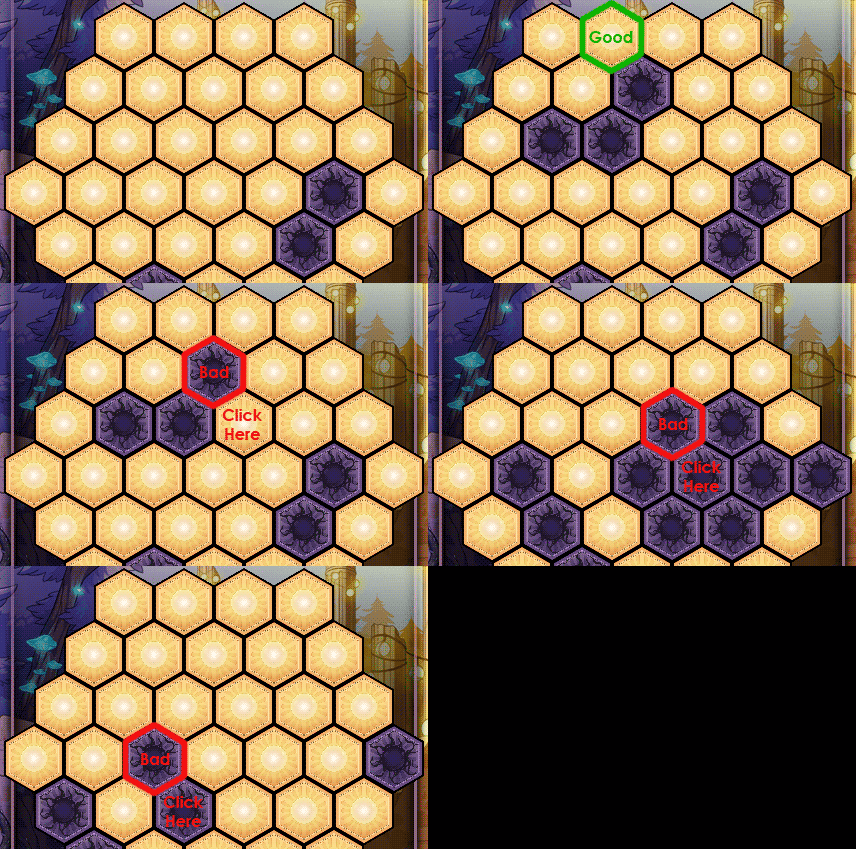
While it is effective, it may not necessarily be clear or understandable to everyone. I've taken the liberty of trying to explain the algorithm in my own words (and gifs) to hopefully clarify things a little more. Make sure you perform [b][u]all four[/u][/b] steps![/size][/font]
[LIST=1]
[*][font=Palatino Linotype][size=4]Go through the board like you're reading a book (left to right, row by row) flipping the "bad" color by clicking to its bottom right.[/size][/font]
[img]https://i.imgur.com/GYZfb5r.gif[/img]
[*][font=Palatino Linotype][size=4]When you're done, only the bottom and/or bottom right edges will have bad tiles. Reading the good tiles as 0 and bad tiles as 1, Ctrl-F to find your "code" in the [url=https://docs.google.com/spreadsheets/d/1sugEgmULqhzzedpo62t92Gdab7gaVMnFmUJGY_1wqLE/edit]lookup table[/url]. Remember that if you're aiming for Shadow victory, your numbers will be the opposite of what I've shown here.[/size][/font]
[img]https://i.imgur.com/0391DEy.png[/img]
[*][font=Palatino Linotype][size=4]Click [b][u]all[/u][/b] the tiles in the rows and diagonals listed in the lookup table, in order. Go left to right for rows and top-right to bottom-left for diagonals.[/size][/font]
[img]https://i.imgur.com/ABUboRx.gif[/img]
[*][font=Palatino Linotype][size=4][b]Repeat step 1 and you will automagically win![/b][/size][/font]
[quote name=Paladingineer][font=Palatino Linotype][size=4][I][b][url=https://www1.flightrising.com/forums/gde/2497014/2#post_34604096][color=#874430][u]Didn't work? Please see the Glimmer & Gloom Troubleshooting Guide.[/u][/color][/url][/b][/I][/size][/font][/quote]
[/LIST]
[color=#2b62b3][font=Century Gothic][size=4]Hard[/size][/font][/color]
[font=Palatino Linotype][size=4]There are several algorithms for [b]Hard mode[/b], but the one that was recommended to me as the fastest, and the one I tested, was @Chatoyant's [url=http://www1.flightrising.com/forums/gde/2477115/1#post_34094312]Hard Method 3[/url]. It has the advantage of not requiring a lookup table, but my data suggest it's not quite as efficient as playing Very Hard mode.
As with other methods, it can be a bit challenging to wrap your brain around at first, so I've reworded this one as well. [/size][/font]
[LIST=1]
[*] [font=Palatino Linotype][size=4]Clear rows 1 through 3 as normal.[/size][/font]
[LIST]
[*][font=Palatino Linotype][size=4]To clear a row, go through it from left to right. If you see a "bad" tile, click to its bottom right.[/size][/font]
[img]https://orig00.deviantart.net/9d1d/f/2018/246/8/9/rows1to3_by_littlefiredragon-dcly1ss.gif[/img]
[/LIST]
[*] [font=Palatino Linotype][size=4]For each row after that, count the number of "bad" tiles in that row.[/size][/font]
[LIST]
[*] [font=Palatino Linotype][size=4]If it's [b]EVEN[/b], clear that row as normal.[/size][/font]
[*] [font=Palatino Linotype][size=4]If it's [b]ODD[/b], click the appropriate Magic Tile, then go back and clear all the rows up to and including this one again.[/size][/font]
[columns]
[color=transparent]xxx[/color]
[nextcol]
[font=Palatino Linotype][size=4]The Magic Tiles for each row are:[/size][/font]
[LIST]
[*] [font=Palatino Linotype][size=4][color=#cd3d3d][b]Row 4:[/b] First tile on Row 1.[/color][/size][/font]
[*] [font=Palatino Linotype][size=4][color=#48a43c][b]Row 5:[/b] Second tile on Row 1.[/color][/size][/font]
[*] [font=Palatino Linotype][size=4][color=#3a71c2][b]Row 6:[/b] Third tile on Row 1.[/color][/size][/font]
[/LIST]
[nextcol]
[color=transparent]xxxx[/color][img]https://orig00.deviantart.net/eed3/f/2018/301/b/5/magic_tiles_by_littlefiredragon-dcqlr7u.png[/img]
[/columns]
[img]https://orig00.deviantart.net/39cf/f/2018/246/c/1/magictile_by_littlefiredragon-dcly1sm.gif[/img]
[/LIST]
[quote name=Paladingineer][font=Palatino Linotype][size=4][I][b][url=https://www1.flightrising.com/forums/gde/2497014/2#post_34604096][color=#874430][u]Didn't work? Please see the Glimmer & Gloom Troubleshooting Guide.[/u][/color][/url][/b][/I][/size][/font][/quote]
[/LIST]
 Yeah, okay, I know what you're thinking. How can this game possibly be the most profitable? It takes an hour to solve a puzzle on the easiest difficulty mode, and the payout is terrible!
That's because you, my friend, have not yet discovered the Magic Algorithms. It turns out that Glimmer & Gloom, like Tic-Tac-Toe, is a solved game. This means that someone has produced an algorithm that always wins. Despite the scary-sounding computer-y word, this is not cheating or hacking in any way; an algorithm is just a formalized strategy - like how you can always win (or at least tie) Tic-Tac-Toe by marking the corners first.
The Data
It may take a few playthroughs to get the hang of the algorithm, but once you do, your times will be blazing fast.
xxxxxxxxxxxxxxx
VERY HARD:
HARD:
|
xxxxx
0:41
0:21
|
xxxxx
0:44
0:30
|
xxxxx
0:47
0:18
|
xxxxx
0:45
0:25
|
xxxxx
0:44
0:18
|
xxxxx
0:47
0:23
|
xxxxx
0:38
0:27
|
xxxxx
0:47
0:27
|
xxxxx
0:41
0:23
|
xxxxx
0:34
0:16
|
This averages to a win every 42.8 seconds for Very Hard and every 22.8 seconds for Hard. These award 4000t or 1600t per win respectively, so that comes out to 28035t per five minutes for Very Hard and 21051t per five minutes for Hard. Which is honestly ridiculous and I would not be at all surprised if they nerfed the payout on this game.
The Strategy
There are actually multiple Magic Algorithms, and I can't claim credit for any of them. I call them magic because, while I know there must be a mathematical reason why they work, they still look like witchcraft to me. Thankfully, understanding why they work is not prerequisite to making use of them.
Very Hard
The algorithm for Very Hard mode was invented by youtuber Andycivil, and converted into a forum guide by @Catradora. It's faster, but requires a lookup table.
While it is effective, it may not necessarily be clear or understandable to everyone. I've taken the liberty of trying to explain the algorithm in my own words (and gifs) to hopefully clarify things a little more. Make sure you perform all four steps!
- Go through the board like you're reading a book (left to right, row by row) flipping the "bad" color by clicking to its bottom right.

- When you're done, only the bottom and/or bottom right edges will have bad tiles. Reading the good tiles as 0 and bad tiles as 1, Ctrl-F to find your "code" in the lookup table. Remember that if you're aiming for Shadow victory, your numbers will be the opposite of what I've shown here.

- Click all the tiles in the rows and diagonals listed in the lookup table, in order. Go left to right for rows and top-right to bottom-left for diagonals.

- Repeat step 1 and you will automagically win!
Hard
There are several algorithms for Hard mode, but the one that was recommended to me as the fastest, and the one I tested, was @Chatoyant's Hard Method 3. It has the advantage of not requiring a lookup table, but my data suggest it's not quite as efficient as playing Very Hard mode.
As with other methods, it can be a bit challenging to wrap your brain around at first, so I've reworded this one as well.
- Clear rows 1 through 3 as normal.
- To clear a row, go through it from left to right. If you see a "bad" tile, click to its bottom right.

- For each row after that, count the number of "bad" tiles in that row.
- If it's EVEN, clear that row as normal.
- If it's ODD, click the appropriate Magic Tile, then go back and clear all the rows up to and including this one again.
|
xxx
|
The Magic Tiles for each row are:
- Row 4: First tile on Row 1.
- Row 5: Second tile on Row 1.
- Row 6: Third tile on Row 1.
|
xxxx
|

[img]https://orig00.deviantart.net/a8fb/f/2018/146/0/9/artifracture_by_littlefiredragon-dccml5a.png[/img]
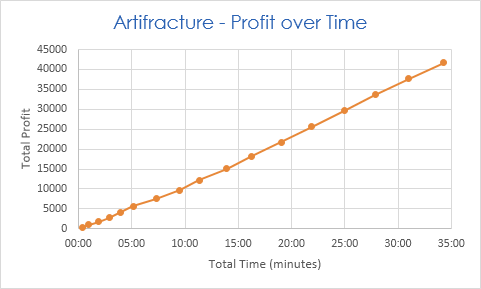
[font=Palatino Linotype][size=4]This was by far the most efficient game in terms of treasure per minute, up until the release of Glimmer & Gloom. It was also probably my favorite, but boy, did I welcome a replacement. I warn you against relying too heavily on this game or you’ll get sick of it. Believe me, I know this from experience, and had to take a considerable break from it.[/size][/font]
[color=#2b62b3][font=Century Gothic][size=4][i][u]The Data[/u][/i][/size][/font][/color]
[columns]
[center][font=Palatino Linotype][size=4][color=transparent]xx[/color][b][u]Level[/u][/b][color=transparent]xx[/color]
1
2
3
4
5
6
7
8
9
10
11
12
13
14
15
16
17
[/size][/font]
[/center][nextcol]
[center][font=Palatino Linotype][size=4][color=transparent]xx[/color][b][u]Payout[/u][/b][color=transparent]xx[/color]
400
575
800
1050
1300
1550
1850
2150
2500
2850
3200
3550
3900
4000
4000
4000
4000
[/size][/font]
[/center][nextcol]
[center][font=Palatino Linotype][size=4][color=transparent]xx[/color][b][u]Time[/u][/b][color=transparent]xx[/color]
0:20
0:38
0:56
1:00
1:04
1:10
2:09
2:13
1:51
2:33
2:22
2:44
2:54
3:01
2:55
3:08
3:18
[/size][/font]
[/center][nextcol]
[center][font=Palatino Linotype][size=4][color=transparent]xx[/color][b][u]Total Profit[/u][/b][color=transparent]xx[/color]
400
975
1775
2825
4125
5675
7525
9675
12175
15025
18225
21775
25675
29675
33675
37675
41675
[/size][/font]
[/center][nextcol]
[center][font=Palatino Linotype][size=4][color=transparent]xx[/color][b][u]Total Time[/u][/b][color=transparent]xx[/color]
0:20
0:58
1:54
2:54
3:58
5:08
7:17
9:30
11:21
13:54
16:16
19:00
21:54
24:55
27:50
30:58
34:16
[/size][/font]
[/center][/columns]
[center][img]https://orig00.deviantart.net/2a9e/f/2018/146/e/5/profit_artifracture_by_littlefiredragon-dccml9o.png[/img][/center]
[color=#2b62b3][font=Century Gothic][size=4][i][u]The Strategy[/u][/i][/size][/font][/color]
[font=Palatino Linotype][size=4]The number one rule of Artifracture is to never let the tiles stop moving, ever. Let me elaborate. Every level has three items you should focus on matching. Because the payout is based on beating levels, and not on any other factor, your focus should be to clear the level as quickly as possible, and only those three items will help you do that. Once you’ve gotten as many as you need of an item, you can treat it the same as other unhelpful items and focus on matching the others.[/size][/font]
[columns]
[img]https://orig00.deviantart.net/2950/f/2018/146/b/d/arti_1_by_littlefiredragon-dccmlbd.png[/img][color=transparent]xxx[/color]
[nextcol]
[size=4][font=Palatino Linotype]But sometimes, you just won’t see any potential matches for items you’re looking for. In these cases, it’s important to not stop moving tiles – if you don’t see your desired items, just start matching anything else you see. Every tile you remove generates a new tile at the top of the screen, and those might be more helpful.
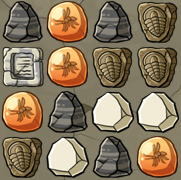
The number two rule of Artifracture is to search and match from the top down, because items fall. If there are two potential matches, one on top the other, solving the top one first won’t affect the bottom one, but if you solve the bottom one first, you might move the top tiles so that they can’t be matched anymore. Take this situation for instance.[/font][/size]
[/columns]
[font=Palatino Linotype][size=4]If you match the white stones first, the amber will fall down.[/size][/font]
[columns]
[img]http://flightrising.com/artifracture/assets/img/dust_cloud.png[/img]
[img]http://flightrising.com/artifracture/assets/img/dust_cloud.png[/img]
[img]http://flightrising.com/artifracture/assets/img/rock_02.png[/img]
[img]http://flightrising.com/artifracture/assets/img/dust_cloud.png[/img]
[nextcol]
[img]http://flightrising.com/artifracture/assets/img/rock_02.png[/img]
[img]http://flightrising.com/artifracture/assets/img/rock_02.png[/img]
[img]http://flightrising.com/artifracture/assets/img/rock_01_death.png[/img]
[img]http://flightrising.com/artifracture/assets/img/dust_cloud.png[/img]
[nextcol]
[img]http://flightrising.com/artifracture/assets/img/dust_cloud.png[/img]
[img]http://flightrising.com/artifracture/assets/img/dust_cloud.png[/img]
[img]http://flightrising.com/artifracture/assets/img/rock_01_death.png[/img]
[img]http://flightrising.com/artifracture/assets/img/dust_cloud.png[/img]
[nextcol]
[center][img]https://orig15.deviantart.net/0123/f/2017/225/f/5/frlight_gem_by_littlefiredragon-dbjxz40.png[/img]
[img]https://orig05.deviantart.net/9547/f/2017/225/a/6/frlight_div_vertical_by_littlefiredragon-dbjy4xn.png[/img]
[img]https://orig05.deviantart.net/9547/f/2017/225/a/6/frlight_div_vertical_by_littlefiredragon-dbjy4xn.png[/img]
[img]https://orig05.deviantart.net/9547/f/2017/225/a/6/frlight_div_vertical_by_littlefiredragon-dbjy4xn.png[/img]
[color=transparent]xxxxx[/color][img]https://orig15.deviantart.net/0123/f/2017/225/f/5/frlight_gem_by_littlefiredragon-dbjxz40.png[/img][color=transparent]xxxxx[/color]
[/center]
[nextcol]
[img]http://flightrising.com/artifracture/assets/img/dust_cloud.png[/img]
[img]http://flightrising.com/artifracture/assets/img/dust_cloud.png[/img]
[img]http://flightrising.com/artifracture/assets/img/rock_02.png[/img]
[img]http://flightrising.com/artifracture/assets/img/dust_cloud.png[/img]
[nextcol]
[img]http://flightrising.com/artifracture/assets/img/dust_cloud.png[/img]
[img]http://flightrising.com/artifracture/assets/img/rock_02.png[/img]
[img]http://flightrising.com/artifracture/assets/img/rock_02.png[/img]
[img]http://flightrising.com/artifracture/assets/img/dust_cloud.png[/img]
[nextcol]
[img]http://flightrising.com/artifracture/assets/img/dust_cloud.png[/img]
[img]http://flightrising.com/artifracture/assets/img/dust_cloud.png[/img]
[img]http://flightrising.com/artifracture/assets/img/dust_cloud.png[/img]
[img]http://flightrising.com/artifracture/assets/img/dust_cloud.png[/img]
[/columns]
[font=Palatino Linotype][size=4]But if you match the amber first, the stones are fine.[/size][/font]
[columns]
[img]http://flightrising.com/artifracture/assets/img/dust_cloud.png[/img]
[img]http://flightrising.com/artifracture/assets/img/dust_cloud.png[/img]
[img]http://flightrising.com/artifracture/assets/img/dust_cloud.png[/img]
[img]http://flightrising.com/artifracture/assets/img/dust_cloud.png[/img]
[nextcol]
[img]http://flightrising.com/artifracture/assets/img/rock_02_death.png[/img]
[img]http://flightrising.com/artifracture/assets/img/rock_02_death.png[/img]
[img]http://flightrising.com/artifracture/assets/img/rock_02_death.png[/img]
[img]http://flightrising.com/artifracture/assets/img/rock_01.png[/img]
[nextcol]
[img]http://flightrising.com/artifracture/assets/img/dust_cloud.png[/img]
[img]http://flightrising.com/artifracture/assets/img/dust_cloud.png[/img]
[img]http://flightrising.com/artifracture/assets/img/rock_01.png[/img]
[img]http://flightrising.com/artifracture/assets/img/dust_cloud.png[/img]
[nextcol]
[center][img]https://orig15.deviantart.net/0123/f/2017/225/f/5/frlight_gem_by_littlefiredragon-dbjxz40.png[/img]
[img]https://orig05.deviantart.net/9547/f/2017/225/a/6/frlight_div_vertical_by_littlefiredragon-dbjy4xn.png[/img]
[img]https://orig05.deviantart.net/9547/f/2017/225/a/6/frlight_div_vertical_by_littlefiredragon-dbjy4xn.png[/img]
[img]https://orig05.deviantart.net/9547/f/2017/225/a/6/frlight_div_vertical_by_littlefiredragon-dbjy4xn.png[/img]
[color=transparent]xxxxx[/color][img]https://orig15.deviantart.net/0123/f/2017/225/f/5/frlight_gem_by_littlefiredragon-dbjxz40.png[/img][color=transparent]xxxxx[/color]
[/center]
[nextcol]
[img]http://flightrising.com/artifracture/assets/img/dust_cloud.png[/img]
[img]http://flightrising.com/artifracture/assets/img/dust_cloud.png[/img]
[img]http://flightrising.com/artifracture/assets/img/dust_cloud.png[/img]
[img]http://flightrising.com/artifracture/assets/img/dust_cloud.png[/img]
[nextcol]
[img]http://flightrising.com/artifracture/assets/img/dust_cloud.png[/img]
[img]http://flightrising.com/artifracture/assets/img/dust_cloud.png[/img]
[img]http://flightrising.com/artifracture/assets/img/dust_cloud.png[/img]
[img]http://flightrising.com/artifracture/assets/img/rock_01.png[/img]
[nextcol]
[img]http://flightrising.com/artifracture/assets/img/dust_cloud.png[/img]
[img]http://flightrising.com/artifracture/assets/img/dust_cloud.png[/img]
[img]http://flightrising.com/artifracture/assets/img/rock_01.png[/img]
[img]http://flightrising.com/artifracture/assets/img/dust_cloud.png[/img]
[/columns]
[font=Palatino Linotype][size=4]Finally, a note on dynamite and dice – hang onto them until you need them. Remember the rule about keeping tiles moving – if you’re at a loss, and can’t find anything to match, use a dynamite or die. They’re also good to have around as your timer starts to run out. If you need just one more crystal, and can’t get three of them lined up, maybe you can get a dynamite to drop down next to an isolated one. Or if matching random stuff isn’t bringing the items you need onto the screen and your time’s almost up, use the die and pray to your deity that you’ll get the items you need.[/size][/font]
 This was by far the most efficient game in terms of treasure per minute, up until the release of Glimmer & Gloom. It was also probably my favorite, but boy, did I welcome a replacement. I warn you against relying too heavily on this game or you’ll get sick of it. Believe me, I know this from experience, and had to take a considerable break from it.
The Data
|
xxLevelxx
1
2
3
4
5
6
7
8
9
10
11
12
13
14
15
16
17
|
xxPayoutxx
400
575
800
1050
1300
1550
1850
2150
2500
2850
3200
3550
3900
4000
4000
4000
4000
|
xxTimexx
0:20
0:38
0:56
1:00
1:04
1:10
2:09
2:13
1:51
2:33
2:22
2:44
2:54
3:01
2:55
3:08
3:18
|
xxTotal Profitxx
400
975
1775
2825
4125
5675
7525
9675
12175
15025
18225
21775
25675
29675
33675
37675
41675
|
xxTotal Timexx
0:20
0:58
1:54
2:54
3:58
5:08
7:17
9:30
11:21
13:54
16:16
19:00
21:54
24:55
27:50
30:58
34:16
|
The Strategy
The number one rule of Artifracture is to never let the tiles stop moving, ever. Let me elaborate. Every level has three items you should focus on matching. Because the payout is based on beating levels, and not on any other factor, your focus should be to clear the level as quickly as possible, and only those three items will help you do that. Once you’ve gotten as many as you need of an item, you can treat it the same as other unhelpful items and focus on matching the others.
 xxx xxx
|
But sometimes, you just won’t see any potential matches for items you’re looking for. In these cases, it’s important to not stop moving tiles – if you don’t see your desired items, just start matching anything else you see. Every tile you remove generates a new tile at the top of the screen, and those might be more helpful.
The number two rule of Artifracture is to search and match from the top down, because items fall. If there are two potential matches, one on top the other, solving the top one first won’t affect the bottom one, but if you solve the bottom one first, you might move the top tiles so that they can’t be matched anymore. Take this situation for instance.
|
If you match the white stones first, the amber will fall down.
But if you match the amber first, the stones are fine.
Finally, a note on dynamite and dice – hang onto them until you need them. Remember the rule about keeping tiles moving – if you’re at a loss, and can’t find anything to match, use a dynamite or die. They’re also good to have around as your timer starts to run out. If you need just one more crystal, and can’t get three of them lined up, maybe you can get a dynamite to drop down next to an isolated one. Or if matching random stuff isn’t bringing the items you need onto the screen and your time’s almost up, use the die and pray to your deity that you’ll get the items you need.
[img]https://i.imgur.com/WWvRp7W.png[/img]
[font=Palatino Linotype][size=4]This game follows the trend of the more modern additions to the fairgrounds paying better than the older ones, although it doesn't quite keep pace with Artifracture or Glimmer & Gloom. On the other hand, it can be quite relaxing and zen, making playing it less of a chore.[/size][/font]
[color=#2b62b3][font=Century Gothic][size=4][i][u]The Data[/u][/i][/size][/font][/color]
[font=Palatino Linotype][size=4]Despite having a score mechanic, Mistral Mahjong has a fixed payout of 2500t, meaning that the only factor in profitability is time.[/size][/font]
[columns]
[font=Palatino Linotype][size=4][color=transparent]xxxxxxxxx[/color]
[color=transparent]xxx[/color][b]Puzzle:[/b]
[color=transparent]xxx[/color][b]Times:[/b]
[color=transparent]xxx[/color][b]Average:[/b][/size][/font]
[nextcol]
[center][font=Palatino Linotype][size=4][color=transparent]xxxxxxxxxx[/color]
[u][b]Turtle[/b][/u]
3:59
4:12
3:41
3:45
3:22
3:52
3:52
3:06
3:28
3:24
3:40[/size][/font][/center]
[nextcol]
[center][font=Palatino Linotype][size=4][color=transparent]xxxxxxxxxx[/color]
[u][b]Butterfly[/b][/u]
2:31
2:48
2:50
3:14
2:33
2:46
2:03
2:14
2:29
2:36
2:36[/size][/font][/center]
[nextcol]
[center][font=Palatino Linotype][size=4][color=transparent]xxxxxxxxxx[/color]
[u][b]Rune[/b][/u]
2:51
2:25
2:41
3:23
3:03
2:45
2:49
3:01
2:52
3:14
2:54[/size][/font][/center]
[nextcol]
[center][font=Palatino Linotype][size=4][color=transparent]xxxxxxxxxx[/color]
[u][b]Balloon[/b][/u]
3:03
3:07
2:56
3:44
3:44
3:29
3:27
2:58
3:48
3:47
3:24[/size][/font][/center]
[nextcol]
[center][font=Palatino Linotype][size=4][color=transparent]xxxxxxxxxx[/color]
[u][b]Crescendo[/b][/u]
2:49
2:49
2:39
3:06
2:48
2:53
2:54
2:56
2:53
2:45
2:51[/size][/font][/center]
[nextcol]
[center][font=Palatino Linotype][size=4][color=transparent]xxxxxxxxxx[/color]
[u][b]Bamboo[/b][/u]
2:37
2:54
2:29
3:06
2:28
2:49
2:55
3:16
3:16
3:09
2:53[/size][/font][/center]
[/columns]
[center][img]https://i.imgur.com/twUj3q0.png[/img][/center]
[font=Palatino Linotype][size=4]As you can see, there is significant overlap in time taken for each puzzle type, but they do still form fairly distinct clusters. Also, please note that I played for a few days before I started collecting data, and that the relative ranking of types does not correspond to the order in which I tested them, so it's not simply a trend of me getting better at Mahjong.
As such, I've concluded that the puzzle type does have a slight effect on time per puzzle and therefore on payout efficiency, which does add up over time. Of course, this effect is small enough on a per-round basis that I believe it could be easily overcome by a player's individual preference/familiarity with a given puzzle type. So if you're just really used to Turtle, by all means, use that. But if you're new, I would recommend Butterfly, and that's the data set I'll use for the overall profit chart.[/size][/font]
[center][img]https://i.imgur.com/jAHu860.png[/img][/center]
[color=#2b62b3][font=Century Gothic][size=4][i][u]The Strategy[/u][/i][/size][/font][/color]
[font=Palatino Linotype][size=4]As I said above, score has no effect on payout, so the strategy is very simple: [i]go fast.[/i] Pay no mind to the number at the bottom of your screen, just try to be constantly matching tiles.
If you find yourself stalled for more than a couple seconds, unable to see any matches, hit that shuffle button. Your score doesn't matter, so the shuffle penalty is meaningless. You're better off shuffling and continuing to make a constant stream of matching than staring at the board wasting time looking for that one remaining potential match.
Speaking of the shuffle button, always pay some small degree of attention to it in the corner of your vision. If the little arrow pops up, there are no more matches on the screen, so don't waste time looking, just shuffle and keep going.
One more tip that helped me keep the matches coming. There's only so many things the human mind can look for at once, so it may help to quickly scan the board looking for matches in one particular category at a time - coins, scratches, flights, moons, and of course the seasons. Remember that while other tiles require exact matches, the seasons can match with any other season tiles. Think of them as four designs for the same tile.[/size][/font]
[center][img]https://i.imgur.com/jem33vL.png[/img][img]https://i.imgur.com/C4C7XZi.png[/img][img]https://i.imgur.com/jcnpMEu.png[/img][img]https://i.imgur.com/6UY07xE.png[/img][/center]
 This game follows the trend of the more modern additions to the fairgrounds paying better than the older ones, although it doesn't quite keep pace with Artifracture or Glimmer & Gloom. On the other hand, it can be quite relaxing and zen, making playing it less of a chore.
The Data
Despite having a score mechanic, Mistral Mahjong has a fixed payout of 2500t, meaning that the only factor in profitability is time.
xxxxxxxxx
xxxPuzzle:
xxxTimes:
xxxAverage:
|
xxxxxxxxxx
Turtle
3:59
4:12
3:41
3:45
3:22
3:52
3:52
3:06
3:28
3:24
3:40
|
xxxxxxxxxx
Butterfly
2:31
2:48
2:50
3:14
2:33
2:46
2:03
2:14
2:29
2:36
2:36
|
xxxxxxxxxx
Rune
2:51
2:25
2:41
3:23
3:03
2:45
2:49
3:01
2:52
3:14
2:54
|
xxxxxxxxxx
Balloon
3:03
3:07
2:56
3:44
3:44
3:29
3:27
2:58
3:48
3:47
3:24
|
xxxxxxxxxx
Crescendo
2:49
2:49
2:39
3:06
2:48
2:53
2:54
2:56
2:53
2:45
2:51
|
xxxxxxxxxx
Bamboo
2:37
2:54
2:29
3:06
2:28
2:49
2:55
3:16
3:16
3:09
2:53
|

As you can see, there is significant overlap in time taken for each puzzle type, but they do still form fairly distinct clusters. Also, please note that I played for a few days before I started collecting data, and that the relative ranking of types does not correspond to the order in which I tested them, so it's not simply a trend of me getting better at Mahjong.
As such, I've concluded that the puzzle type does have a slight effect on time per puzzle and therefore on payout efficiency, which does add up over time. Of course, this effect is small enough on a per-round basis that I believe it could be easily overcome by a player's individual preference/familiarity with a given puzzle type. So if you're just really used to Turtle, by all means, use that. But if you're new, I would recommend Butterfly, and that's the data set I'll use for the overall profit chart.
The Strategy
As I said above, score has no effect on payout, so the strategy is very simple: go fast. Pay no mind to the number at the bottom of your screen, just try to be constantly matching tiles.
If you find yourself stalled for more than a couple seconds, unable to see any matches, hit that shuffle button. Your score doesn't matter, so the shuffle penalty is meaningless. You're better off shuffling and continuing to make a constant stream of matching than staring at the board wasting time looking for that one remaining potential match.
Speaking of the shuffle button, always pay some small degree of attention to it in the corner of your vision. If the little arrow pops up, there are no more matches on the screen, so don't waste time looking, just shuffle and keep going.
One more tip that helped me keep the matches coming. There's only so many things the human mind can look for at once, so it may help to quickly scan the board looking for matches in one particular category at a time - coins, scratches, flights, moons, and of course the seasons. Remember that while other tiles require exact matches, the seasons can match with any other season tiles. Think of them as four designs for the same tile.
[img]https://orig00.deviantart.net/a780/f/2018/146/0/0/runestones_arcanist_by_littlefiredragon-dccml4t.png[/img]
[font=Palatino Linotype][size=4]A lot of people swear by this one, and that makes a lot of sense, because before the release of Artifracture, Runestones of the Arcanist really was the most efficient game, if you played it right. The key here is that as the board gets bigger, your ability to remember where any given tile is diminishes, so your ability to play effectively will taper off, and therefore so will your treasure per minute. There does exist a point where you could keep going but would be better off starting over, so it’s important you find the balance point.[/size][/font]
[color=#2b62b3][font=Century Gothic][size=4][i][u]The Data[/u][/i][/size][/font][/color]
[font=Palatino Linotype][size=4]I’m not sure exactly how the payout works, beyond being linked to both the number of tiles you matched and how quickly you did it, but here’s my data. I collected it in two runs (one for writing down payout, one for collecting time) so the ratio of time to payout may not correlate for any particular level, but what we’re interested in is the trend overall. And yes, one set of data from two runs is hardly a scientifically sound sample size, but this is pixel dragons, not a thesis paper. It’s good enough to get the gist of it.[/size][/font]
[columns]
[center][font=Palatino Linotype][size=4][color=transparent]xx[/color][b][u]Level[/u][/b][color=transparent]xx[/color]
1
2
3
4
5
6
7
8
9
10
11
12
[/size][/font]
[/center][nextcol]
[center][font=Palatino Linotype][size=4][color=transparent]xx[/color][b][u]Payout[/u][/b][color=transparent]xx[/color]
86
127
163
234
238
351
418
452
539
740
757
859
[/size][/font]
[/center][nextcol]
[center][font=Palatino Linotype][size=4][color=transparent]xx[/color][b][u]Time[/u][/b][color=transparent]xx[/color]
0:06
0:07
0:12
0:14
0:18
0:25
0:9
0:38
0:54
1:23
1:30
1:52
[/size][/font]
[/center][nextcol]
[center][font=Palatino Linotype][size=4][color=transparent]xx[/color][b][u]Total Profit[/u][/b][color=transparent]xx[/color]
86
213
376
610
848
1199
1617
2069
2608
3348
4105
4964
[/size][/font]
[/center][nextcol]
[center][font=Palatino Linotype][size=4][color=transparent]xx[/color][b][u]Total Time[/u][/b][color=transparent]xx[/color]
0:06
0:13
0:25
0:39
0:57
1:22
1:51
2:29
3:23
4:46
6:16
8:08
[/size][/font]
[/center][/columns]
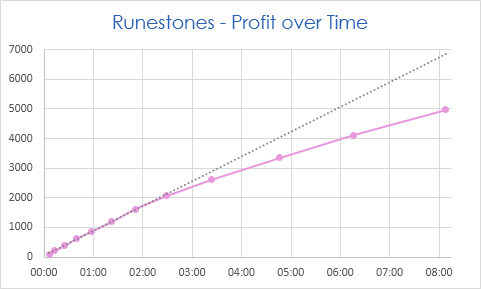
[center][img]https://orig00.deviantart.net/8eb9/f/2018/146/8/f/profit_runestones_by_littlefiredragon-dccml9h.png[/img][/center]
[font=Palatino Linotype][size=4]As you can see, my data suggests the best strategy is to play levels 1 through 8, then start over. That said, the point at which your curve starts to drop off depends on how good you are at memory games – if you can handle larger boards than I can without getting frazzled and spending most of the time trying to figure out where that life tile was, your curve will be different. I suggest you collect your own data for this game to determine the ideal strategy for your particular skill level.
The final profit comparison chart uses an average line for this game, based on the assumption that you’re playing levels 1 through 8 repeatedly (or whatever strategy keeps you on a mostly linear path). When I converted the time into a straight count of number of seconds so that Excel would give me sensible output numbers, it told me that the equation for that dotted trend line is:[/size][/font]
[indent][b]Treasure=13.932s + 37.85[/b] [color=transparent]xx[/color] [font=Palatino Linotype][size=4][i]where s is the number of seconds.[/i][/size][/font][/indent]
[color=#2b62b3][font=Century Gothic][size=4][i][u]The Strategy[/u][/i][/size][/font][/color]
[font=Palatino Linotype][size=4]As I’ve said, you want to find the point at which your productivity starts to drop off, and just restart the game at that point rather than trying to push forward. I find that it helps to break the board up a little bit, and focus on finding matches for a particular chunk rather than trying to remember the entire board. I usually use the first row or the first couple columns – go through these and try to remember what they are.
Keep repeating something to the effect of “earth, pillar, ice, clan, shadow, fire” to keep it fresh in your memory. To reduce the number of things you need to remember, try smashing pairs together. It’s easier, at least for me, to remember “Earth-Pillar, Ice-Clan, Shadow-Fire” because instead of six words, I’m trying to remember three concepts – a pillar of earth, an ice flight clan, and shadowy black fire.
As awesome as the game’s music is, it can interfere with this memorization process, so if it helps, you may want to mute the game. Go through the board looking for matches for your memorized chunk, and don’t try to remember where anything else is (though if you do happen to find something you remember the match to, by all means go ahead and get it out of the way). Once you’ve cleared the chunk, move on to another row/column and do the same thing.[/size][/font]
 A lot of people swear by this one, and that makes a lot of sense, because before the release of Artifracture, Runestones of the Arcanist really was the most efficient game, if you played it right. The key here is that as the board gets bigger, your ability to remember where any given tile is diminishes, so your ability to play effectively will taper off, and therefore so will your treasure per minute. There does exist a point where you could keep going but would be better off starting over, so it’s important you find the balance point.
The Data
I’m not sure exactly how the payout works, beyond being linked to both the number of tiles you matched and how quickly you did it, but here’s my data. I collected it in two runs (one for writing down payout, one for collecting time) so the ratio of time to payout may not correlate for any particular level, but what we’re interested in is the trend overall. And yes, one set of data from two runs is hardly a scientifically sound sample size, but this is pixel dragons, not a thesis paper. It’s good enough to get the gist of it.
|
xxLevelxx
1
2
3
4
5
6
7
8
9
10
11
12
|
xxPayoutxx
86
127
163
234
238
351
418
452
539
740
757
859
|
xxTimexx
0:06
0:07
0:12
0:14
0:18
0:25
0:9
0:38
0:54
1:23
1:30
1:52
|
xxTotal Profitxx
86
213
376
610
848
1199
1617
2069
2608
3348
4105
4964
|
xxTotal Timexx
0:06
0:13
0:25
0:39
0:57
1:22
1:51
2:29
3:23
4:46
6:16
8:08
|

As you can see, my data suggests the best strategy is to play levels 1 through 8, then start over. That said, the point at which your curve starts to drop off depends on how good you are at memory games – if you can handle larger boards than I can without getting frazzled and spending most of the time trying to figure out where that life tile was, your curve will be different. I suggest you collect your own data for this game to determine the ideal strategy for your particular skill level.
The final profit comparison chart uses an average line for this game, based on the assumption that you’re playing levels 1 through 8 repeatedly (or whatever strategy keeps you on a mostly linear path). When I converted the time into a straight count of number of seconds so that Excel would give me sensible output numbers, it told me that the equation for that dotted trend line is:
Treasure=13.932s + 37.85 xx where s is the number of seconds.
The Strategy
As I’ve said, you want to find the point at which your productivity starts to drop off, and just restart the game at that point rather than trying to push forward. I find that it helps to break the board up a little bit, and focus on finding matches for a particular chunk rather than trying to remember the entire board. I usually use the first row or the first couple columns – go through these and try to remember what they are.
Keep repeating something to the effect of “earth, pillar, ice, clan, shadow, fire” to keep it fresh in your memory. To reduce the number of things you need to remember, try smashing pairs together. It’s easier, at least for me, to remember “Earth-Pillar, Ice-Clan, Shadow-Fire” because instead of six words, I’m trying to remember three concepts – a pillar of earth, an ice flight clan, and shadowy black fire.
As awesome as the game’s music is, it can interfere with this memorization process, so if it helps, you may want to mute the game. Go through the board looking for matches for your memorized chunk, and don’t try to remember where anything else is (though if you do happen to find something you remember the match to, by all means go ahead and get it out of the way). Once you’ve cleared the chunk, move on to another row/column and do the same thing.
[img]https://orig00.deviantart.net/ba8f/f/2018/146/4/0/tidaltrouble_by_littlefiredragon-dccml48.png[/img]
[font=Palatino Linotype][size=4]I’ll admit it – I wasn’t expecting this game to pay as well as it does. Because each round pays so little, I had initially dismissed it, but it turns out that the speed at which rounds can be completed counteracts this low per-level pay, and it keeps pace with Shock Switch quite nicely. The primary advantage of Tidal Trouble is that because each round is so quick and stands on its own, it’s a great game to use to fill small amounts of time when you can’t just sit down for a long session of Artifracture. Unfortunately that’s also its weakness – it doesn’t encourage you to keep going, so you could just play two rounds and wander off.[/size][/font]
[color=#2b62b3][font=Century Gothic][size=4][i][u]The Data[/u][/i][/size][/font][/color]
[font=Palatino Linotype][size=4]For Tidal Trouble, it seems like the payout is related to the difficulty of the puzzle, rather than anything you do. Score and speed don’t seem to matter. I collected a few data points for the sake of averaging; once again, time and payout are not necessarily from the same game, because I only have so much time between levels to jot down numbers.[/size][/font]
[columns]
[font=Palatino Linotype][size=4]
[b]Time
Payout
[color=transparent]xxxxxxxx[/color]
Time
Payout[/b]
[/size][/font]
[nextcol]
[center][font=Palatino Linotype][size=4]
0:37
240
[color=transparent]xxxxxxxx[/color]
0:22
480
[/size][/font][/center]
[nextcol]
[center][font=Palatino Linotype][size=4]
0:33
240
[color=transparent]xxxxxxxx[/color]
0:24
240
[/size][/font][/center]
[nextcol]
[center][font=Palatino Linotype][size=4]
0:30
320
[color=transparent]xxxxxxxx[/color]
0:27
240
[/size][/font][/center]
[nextcol]
[center][font=Palatino Linotype][size=4]
0:23
240
[color=transparent]xxxxxxxx[/color]
0:24
240
[/size][/font][/center]
[nextcol]
[center][font=Palatino Linotype][size=4]
0:19
320
[color=transparent]xxxxxxxx[/color]
0:34
240
[/size][/font][/center]
[nextcol]
[center][font=Palatino Linotype][size=4]
0:27
240
[color=transparent]xxxxxxxx[/color]
[/size][/font][/center]
[/columns]
[font=Palatino Linotype][size=4]So on average, a round of Tidal Trouble takes 27 seconds and pays 276 treasure. Obviously, one can’t make a true profit chart for this game, because the payout is reliant on a random factor (the chosen puzzle), so you could be lucky or unlucky. But we can chart the average. I won’t bother with a graph, but the numbers come out to about 3066.6 treasure per five minutes.[/size][/font]
[color=#2b62b3][font=Century Gothic][size=4][i][u]The Strategy[/u][/i][/size][/font][/color]
[columns]
[font=Palatino Linotype][size=4]This is a fairly simple game. Because treasure is linked to level completion and not to score, just try to finish the puzzle as fast as possible. Remember that popping a bubble destroys all the other bubbles it supports, so if the game keeps giving you bubbles you don’t need, put them somewhere where they’ll be supported by something you can easily clear.
[img]https://orig00.deviantart.net/f2fb/f/2018/146/3/6/tidal_1_by_littlefiredragon-dccml7w.png[/img]
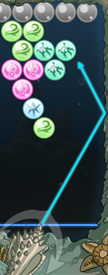
Try to aim for destroying bubbles closer to the top of the screen when possible so they’ll destroy supported bubbles for you.
Finally, don’t forget that you can bounce bubbles off the walls! It can be pretty hard to aim them this way, but with practice you can get pretty decent at it, and it’s a reliable way to hit a fairly large target area that would otherwise be obstructed.[/size][/font]
[nextcol]
[color=transparent]xxxx[/color][img]https://orig00.deviantart.net/389b/f/2018/146/7/4/tidal_2_by_littlefiredragon-dccml7k.png[/img]
[/columns]
 I’ll admit it – I wasn’t expecting this game to pay as well as it does. Because each round pays so little, I had initially dismissed it, but it turns out that the speed at which rounds can be completed counteracts this low per-level pay, and it keeps pace with Shock Switch quite nicely. The primary advantage of Tidal Trouble is that because each round is so quick and stands on its own, it’s a great game to use to fill small amounts of time when you can’t just sit down for a long session of Artifracture. Unfortunately that’s also its weakness – it doesn’t encourage you to keep going, so you could just play two rounds and wander off.
The Data
For Tidal Trouble, it seems like the payout is related to the difficulty of the puzzle, rather than anything you do. Score and speed don’t seem to matter. I collected a few data points for the sake of averaging; once again, time and payout are not necessarily from the same game, because I only have so much time between levels to jot down numbers.
Time
Payout
xxxxxxxx
Time
Payout
|
0:37
240
xxxxxxxx
0:22
480
|
0:33
240
xxxxxxxx
0:24
240
|
0:30
320
xxxxxxxx
0:27
240
|
0:23
240
xxxxxxxx
0:24
240
|
0:19
320
xxxxxxxx
0:34
240
|
0:27
240
xxxxxxxx
|
So on average, a round of Tidal Trouble takes 27 seconds and pays 276 treasure. Obviously, one can’t make a true profit chart for this game, because the payout is reliant on a random factor (the chosen puzzle), so you could be lucky or unlucky. But we can chart the average. I won’t bother with a graph, but the numbers come out to about 3066.6 treasure per five minutes.
The Strategy
This is a fairly simple game. Because treasure is linked to level completion and not to score, just try to finish the puzzle as fast as possible. Remember that popping a bubble destroys all the other bubbles it supports, so if the game keeps giving you bubbles you don’t need, put them somewhere where they’ll be supported by something you can easily clear.

Try to aim for destroying bubbles closer to the top of the screen when possible so they’ll destroy supported bubbles for you.
Finally, don’t forget that you can bounce bubbles off the walls! It can be pretty hard to aim them this way, but with practice you can get pretty decent at it, and it’s a reliable way to hit a fairly large target area that would otherwise be obstructed.
|
xxxx
|
[img]https://i.imgur.com/haXAlt9.png[/img]
[font=Palatino Linotype][size=4]Despite its large lump payouts, Shock Switch actually has a pretty poor treasure/minute ratio. On the other hand, it has a pause button, which is very nice indeed, especially if you have as short an attention span as- oh, look, a butterfly![/size][/font]
[color=#2b62b3][font=Century Gothic][size=4][i][u]The Data[/u][/i][/size][/font][/color]
[font=Palatino Linotype][size=4]Personally I prefer to play on Hard mode, so I collected a little more data there than I did for the other levels.[/size][/font]
[columns]
[center][font=Palatino Linotype][size=4][b][u]Very Easy[/u][/b][/size][/font][/center]
[columns]
[font=Palatino Linotype][size=4][b]Time
Score
Payout[/b]
[color=transparent]xxxxxx[/color]
[/size][/font]
[nextcol]
[font=Palatino Linotype][size=4][center]
3:10
17360
1447
[color=transparent]xxxxxxxx[/color]
[/center][/size][/font]
[nextcol]
[font=Palatino Linotype][size=4][center]
6:38
39860
3322
[color=transparent]xxxxxxxx[/color]
[/center][/size][/font]
[nextcol]
[font=Palatino Linotype][size=4][center]
11:18
84300
6196
[color=transparent]xxxxxxxx[/color]
[/center][/size][/font]
[nextcol]
[font=Palatino Linotype][size=4][center]
20:17
157100
11430
[color=transparent]xxxxxxxx[/color]
[/center][/size][/font]
[/columns]
[nextcol]
[center][color=transparent]xxxxx[/color][/center]
[nextcol]
[center][font=Palatino Linotype][size=4][b][u]Easy[/u][/b][/size][/font][/center]
[columns]
[font=Palatino Linotype][size=4][b]Time
Score
Payout[/b]
[color=transparent]xxxxxx[/color]
[/size][/font]
[nextcol]
[font=Palatino Linotype][size=4][center]
3:10
44040
2017
[color=transparent]xxxxxxxx[/color]
[/center][/size][/font]
[nextcol]
[font=Palatino Linotype][size=4][center]
6:19
87920
4030
[color=transparent]xxxxxxxx[/color]
[/center][/size][/font]
[nextcol]
[font=Palatino Linotype][size=4][center]
11:58
193920
8429
[color=transparent]xxxxxxxx[/color]
[/center][/size][/font]
[nextcol]
[font=Palatino Linotype][size=4][center]
18:39
274480
11660
[color=transparent]xxxxxxxx[/color]
[/center][/size][/font]
[/columns]
[/columns]
[columns]
[center][font=Palatino Linotype][size=4][b][u]Normal[/u][/b][/size][/font][/center]
[columns]
[font=Palatino Linotype][size=4][b]Time
Score
Payout[/b]
[color=transparent]xxxxxx[/color]
[/size][/font]
[nextcol]
[font=Palatino Linotype][size=4][center]
3:30
57900
1930
[color=transparent]xxxxxxxx[/color]
[/center][/size][/font]
[nextcol]
[font=Palatino Linotype][size=4][center]
6:26
120540
4018
[color=transparent]xxxxxxxx[/color]
[/center][/size][/font]
[nextcol]
[font=Palatino Linotype][size=4][center]
11:20
221440
7048
[color=transparent]xxxxxxxx[/color]
[/center][/size][/font]
[nextcol]
[font=Palatino Linotype][size=4][center]
20:08
402920
12764
[color=transparent]xxxxxxxx[/color]
[/center][/size][/font]
[/columns]
[nextcol]
[center][color=transparent]xxxxx[/color][/center]
[nextcol]
[center][font=Palatino Linotype][size=4][b][u]Very Hard[/u][/b][/size][/font][/center]
[columns]
[font=Palatino Linotype][size=4][b]Time
Score
Payout[/b]
[color=transparent]xxxxxx[/color]
[/size][/font]
[nextcol]
[font=Palatino Linotype][size=4][center]
3:09
101600
2295
[color=transparent]xxxxxxxx[/color]
[/center][/size][/font]
[nextcol]
[font=Palatino Linotype][size=4][center]
6:19
200700
4534
[color=transparent]xxxxxxxx[/color]
[/center][/size][/font]
[nextcol]
[font=Palatino Linotype][size=4][center]
9:10
280500
6347
[color=transparent]xxxxxxxx[/color]
[/center][/size][/font]
[nextcol]
[font=Palatino Linotype][size=4][center]
13:47
421500
9292
[color=transparent]xxxxxxxx[/color]
[/center][/size][/font]
[/columns]
[/columns]
[columns]
[center][font=Palatino Linotype][size=4][b][u]Hard[/u][/b][/size][/font][/center]
[columns]
[font=Palatino Linotype][size=4][b]Time
Score
Payout[/b]
[color=transparent]xxxxxx[/color]
[/size][/font]
[nextcol]
[font=Palatino Linotype][size=4][center]
0:18
2000
53
[color=transparent]xxxxxxxx[/color]
[/center][/size][/font]
[nextcol]
[font=Palatino Linotype][size=4][center]
1:13
20640
542
[color=transparent]xxxxxxxx[/color]
[/center][/size][/font]
[nextcol]
[font=Palatino Linotype][size=4][center]
3:20
65120
1706
[color=transparent]xxxxxxxx[/color]
[/center][/size][/font]
[nextcol]
[font=Palatino Linotype][size=4][center]
5:11
102560
2688
[color=transparent]xxxxxxxx[/color]
[/center][/size][/font]
[nextcol]
[font=Palatino Linotype][size=4][center]
8:14
195760
5124
[color=transparent]xxxxxxxx[/color]
[/center][/size][/font]
[nextcol]
[font=Palatino Linotype][size=4][center]
12:33
290160
7323
[color=transparent]xxxxxxxx[/color]
[/center][/size][/font]
[nextcol]
[font=Palatino Linotype][size=4][center]
19:42
478000
12251
[color=transparent]xxxxxxxx[/color]
[/center][/size][/font]
[/columns]
[/columns]
[center][img]https://orig00.deviantart.net/8fb6/f/2018/146/e/8/profit_shock_by_littlefiredragon-dccml96.png[/img][/center]
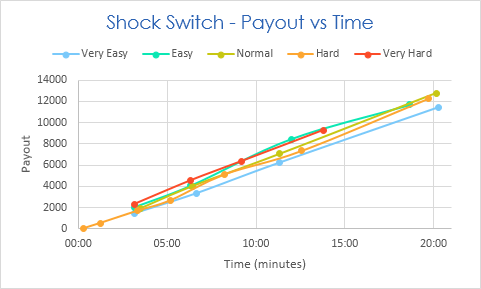
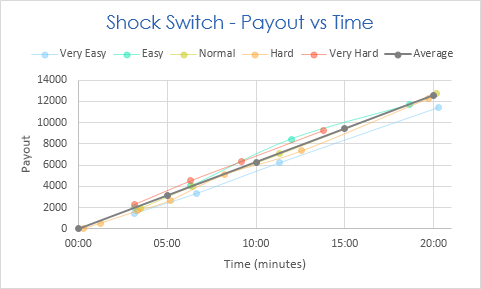
[font=Palatino Linotype][size=4]Truth be told, I’m not sure exactly how Shock Switch payout is calculated, but it doesn’t seem to matter much. The treasure to time ratio seems pretty close across all difficulties, and appears to be roughly linear. Similarly to Runestones of the Arcanist, I’m going to use an average profit line to represent this game. The Hard level data appears to run down the center of that cluster, particularly its start and end points, so I am going to use those data points to calculate it.
From 0:18 to 19:42 is a total change of 1164 seconds, and from 53 to 12251 is a change of 12198 treasure.[/size][/font]
[indent][b]12198t/1164s * 60 seconds = ~628.76 treasure per minute
~628.76 * 5 = ~3143t per five minutes[/b][/indent]
[center][img]https://orig00.deviantart.net/8439/f/2018/146/6/7/profit_shock_average_by_littlefiredragon-dccml8x.png[/img][/center]
[color=#2b62b3][font=Century Gothic][size=4][i][u]The Strategy[/u][/i][/size][/font][/color]
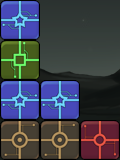
[font=Palatino Linotype][size=4]I feel like this is a particularly hard game to write a guide for, but I’ll try my best. Again, I don’t understand exactly where the money in this game comes from, so I just focus on trying to keep matching blocks as long as possible. [/font][/size]
[columns]
[img]https://orig00.deviantart.net/e93c/f/2018/146/c/4/shock_2_by_littlefiredragon-dccml8d.png[/img][color=transparent]xx[/color]
[nextcol]
[font=Palatino Linotype][size=4]Even though you can only move blocks horizontally, you can match in both directions. It’s easiest to look for horizontal matches – just look at each row and see if there are three of the same color on it.[/font][/size]
[center][img]https://orig00.deviantart.net/9cdb/f/2018/146/5/0/shock_1_by_littlefiredragon-dccml8j.png[/img][/center]
[font=Palatino Linotype][size=4]But you shouldn’t discount vertical matches either, especially since you can far more often match five in a row this way. In particular, look for opportunities to set up situations like the one shown to the left; to prevent the blocks from disappearing early, move the middle block over and try to set up two pairs above each other, then slide the middle block in between. I can't quite describe exactly how to see opportunities for this, but if you try it, I think you’ll get a feel for it.[/font][/size]
[/columns]
[columns]
[img]https://orig00.deviantart.net/05ea/f/2018/146/5/6/shock_3_by_littlefiredragon-dccml84.png[/img][color=transparent]x[/color]
[nextcol]
[font=Palatino Linotype][size=4]You should also pay particular attention to the blocks on the top and the empty spaces around them. Remember that you can use gravity to your advantage. In the situation to the left, you can push the blue block on top over twice and it’ll fall down on top of the red block to complete a row match. If the red block wasn’t there, you could push the green block over first to give the blue one something to sit on.
Similarly, in the situation shown to the right, we could get a column match by yanking the teal block out from between the green blocks.[/size][/font]
[nextcol]
[color=transparent]x[/color][img]https://orig00.deviantart.net/fb2b/f/2018/146/e/d/shock_4_by_littlefiredragon-dccml80.png[/img]
[/columns]
[font=Palatino Linotype][size=4]But you don’t want these kinds of towers to get too high, because they’ll smack into the top and end your game. If the blocks are rising pretty high, try to keep the top fairly level – if you can’t match them, just knock the blocks down into the valleys so they’re not poking up. This is especially true if you’ve got your energy bar full and ready to clear the board. Don’t use your board clear right away; instead try to get the blocks as even as possible (the ideal situation being a perfectly flat top row), and then wait until they almost hit the top to clear them – about half a block’s height is a good point to press the button.[/size][/font]
 Despite its large lump payouts, Shock Switch actually has a pretty poor treasure/minute ratio. On the other hand, it has a pause button, which is very nice indeed, especially if you have as short an attention span as- oh, look, a butterfly!
The Data
Personally I prefer to play on Hard mode, so I collected a little more data there than I did for the other levels.
|
Very Easy
Time
Score
Payout
xxxxxx
|
3:10
17360
1447
xxxxxxxx
|
6:38
39860
3322
xxxxxxxx
|
11:18
84300
6196
xxxxxxxx
|
20:17
157100
11430
xxxxxxxx
|
|
xxxxx
|
Easy
Time
Score
Payout
xxxxxx
|
3:10
44040
2017
xxxxxxxx
|
6:19
87920
4030
xxxxxxxx
|
11:58
193920
8429
xxxxxxxx
|
18:39
274480
11660
xxxxxxxx
|
|
|
Normal
Time
Score
Payout
xxxxxx
|
3:30
57900
1930
xxxxxxxx
|
6:26
120540
4018
xxxxxxxx
|
11:20
221440
7048
xxxxxxxx
|
20:08
402920
12764
xxxxxxxx
|
|
xxxxx
|
Very Hard
Time
Score
Payout
xxxxxx
|
3:09
101600
2295
xxxxxxxx
|
6:19
200700
4534
xxxxxxxx
|
9:10
280500
6347
xxxxxxxx
|
13:47
421500
9292
xxxxxxxx
|
|
|
Hard
Time
Score
Payout
xxxxxx
|
0:18
2000
53
xxxxxxxx
|
1:13
20640
542
xxxxxxxx
|
3:20
65120
1706
xxxxxxxx
|
5:11
102560
2688
xxxxxxxx
|
8:14
195760
5124
xxxxxxxx
|
12:33
290160
7323
xxxxxxxx
|
19:42
478000
12251
xxxxxxxx
|
|
Truth be told, I’m not sure exactly how Shock Switch payout is calculated, but it doesn’t seem to matter much. The treasure to time ratio seems pretty close across all difficulties, and appears to be roughly linear. Similarly to Runestones of the Arcanist, I’m going to use an average profit line to represent this game. The Hard level data appears to run down the center of that cluster, particularly its start and end points, so I am going to use those data points to calculate it.
From 0:18 to 19:42 is a total change of 1164 seconds, and from 53 to 12251 is a change of 12198 treasure.
12198t/1164s * 60 seconds = ~628.76 treasure per minute
~628.76 * 5 = ~3143t per five minutes
The Strategy
I feel like this is a particularly hard game to write a guide for, but I’ll try my best. Again, I don’t understand exactly where the money in this game comes from, so I just focus on trying to keep matching blocks as long as possible.
 xx xx
|
Even though you can only move blocks horizontally, you can match in both directions. It’s easiest to look for horizontal matches – just look at each row and see if there are three of the same color on it.
But you shouldn’t discount vertical matches either, especially since you can far more often match five in a row this way. In particular, look for opportunities to set up situations like the one shown to the left; to prevent the blocks from disappearing early, move the middle block over and try to set up two pairs above each other, then slide the middle block in between. I can't quite describe exactly how to see opportunities for this, but if you try it, I think you’ll get a feel for it.
|
 x x
|
You should also pay particular attention to the blocks on the top and the empty spaces around them. Remember that you can use gravity to your advantage. In the situation to the left, you can push the blue block on top over twice and it’ll fall down on top of the red block to complete a row match. If the red block wasn’t there, you could push the green block over first to give the blue one something to sit on.
Similarly, in the situation shown to the right, we could get a column match by yanking the teal block out from between the green blocks.
|
x
|
But you don’t want these kinds of towers to get too high, because they’ll smack into the top and end your game. If the blocks are rising pretty high, try to keep the top fairly level – if you can’t match them, just knock the blocks down into the valleys so they’re not poking up. This is especially true if you’ve got your energy bar full and ready to clear the board. Don’t use your board clear right away; instead try to get the blocks as even as possible (the ideal situation being a perfectly flat top row), and then wait until they almost hit the top to clear them – about half a block’s height is a good point to press the button.
[img]https://orig00.deviantart.net/175e/f/2018/146/f/f/jigsaw_by_littlefiredragon-dccml4x.png[/img]
[font=Palatino Linotype][size=4]Jigsaw is the least efficient game, but it may also be easiest on the brain, so perhaps that balances out. I certainly like to use it when I need something to refresh me between other games. I’m not a psychologist, though, so all I can show you with any certainty is the numbers.[/size][/font]
[color=#2b62b3][font=Century Gothic][size=4][i][u]The Data[/u][/i][/size][/font][/color]
[font=Palatino Linotype][size=4]Jigsaw is only really worth playing on Easy difficulty, in my opinion. I only gathered a few data points but I solved puzzles as efficiently as I could and always got 1510 treasure out of it, with an average time of 3:50. I still got 1510 treasure when I took my sweet time to take screenshots, so as far as I can tell, it always awards that much.[/size][/font]
[columns]
[font=Palatino Linotype][size=4]
[b]Time
Treasure[/b]
[color=transparent]xxxxxxxx[/color]
[/size][/font]
[nextcol]
[center][font=Palatino Linotype][size=4]
3:02
1510
[color=transparent]xxxxxxxx[/color]
[/size][/font][/center]
[nextcol]
[center][font=Palatino Linotype][size=4]
4:31
1510
[color=transparent]xxxxxxxx[/color]
[/size][/font][/center]
[nextcol]
[center][font=Palatino Linotype][size=4]
4:10
1510
[color=transparent]xxxxxxxx[/color]
[/size][/font][/center]
[nextcol]
[center][font=Palatino Linotype][size=4]
3:40
1510
[color=transparent]xxxxxxxx[/color]
[/size][/font][/center]
[/columns]
[font=Palatino Linotype][size=4]Because it’s a simple linear equation, I won’t bother with a graph, but it comes out to about 1969.5 treasure per five minutes.[/size][/font]
[color=#2b62b3][font=Century Gothic][size=4][i][u]The Strategy[/u][/i][/size][/font][/color]
[font=Palatino Linotype][size=4]The reason I say Jigsaw is only worth playing on Easy is that you have such limited space to work with. My strategy involves sorting out the tiles into piles. Given that the tiles will only partially stack and tend to push each other over a bit, the more tiles you have, the more difficult this gets. If you wish to play the harder difficulties, you can probably take the same approach, but I simply don’t have the patience to deal with that many tiles in such a small playing area. [/size][/font]
[columns]
[img]https://orig00.deviantart.net/2847/f/2018/146/1/4/jigsaw_1_by_littlefiredragon-dccmlal.png[/img][color=transparent]xxx[/color]
[nextcol]
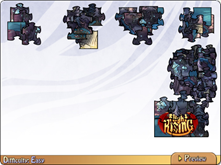
[font=Palatino Linotype][size=4]The first step is to move all the tiles into the corner, so you can have some room to sort things. You’ll want to leave space along either the top or the bottom and either the left or the right. [/size][/font]
[/columns]
[columns]
[img]https://orig00.deviantart.net/7b01/f/2018/146/9/e/jigsaw_2_by_littlefiredragon-dccmlac.png[/img][color=transparent]xxx[/color]
[nextcol]
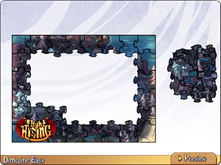
[font=Palatino Linotype][size=4]Next, sort the edge tiles out. I prefer to place these in piles across the top, and toss anything else into a pile on the side. I also find it’s easy enough to build the logo during this step, since these pieces stand out so well. The big empty rectangular space left behind after sorting is where the final puzzle will be put together.[/size][/font]
[/columns]
[columns]
[img]https://orig00.deviantart.net/454b/f/2018/146/3/e/jigsaw_3_by_littlefiredragon-dccmla6.png[/img][color=transparent]xxx[/color]
[nextcol]
[font=Palatino Linotype][size=4]Build the frame first. This will make it easier to work. Also, don’t forget the preview button in the bottom right. Click that to see what the finished puzzle should look like. As far as I can tell there’s no penalty for using this, so click it however often you need to see the finished product.[/size][/font]
[/columns]
[columns]
[img]https://orig00.deviantart.net/d8e4/f/2018/146/b/1/jigsaw_4_by_littlefiredragon-dccml9x.png[/img][color=transparent]xxx[/color]
[nextcol]
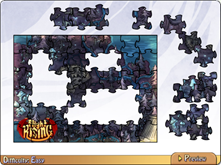
[font=Palatino Linotype][size=4]Now that you have the frame, you can work your way inward. The space that’s been cleared up by using the border and logo tiles will give you some room to spread the remaining pieces out as you work. If you can’t find where something goes right away, you can put it aside for later. You can also put together any pieces you know go together but haven’t placed into the final puzzle and leave them out there as well.[/size][/font]
[/columns]
 Jigsaw is the least efficient game, but it may also be easiest on the brain, so perhaps that balances out. I certainly like to use it when I need something to refresh me between other games. I’m not a psychologist, though, so all I can show you with any certainty is the numbers.
The Data
Jigsaw is only really worth playing on Easy difficulty, in my opinion. I only gathered a few data points but I solved puzzles as efficiently as I could and always got 1510 treasure out of it, with an average time of 3:50. I still got 1510 treasure when I took my sweet time to take screenshots, so as far as I can tell, it always awards that much.
Time
Treasure
xxxxxxxx
|
3:02
1510
xxxxxxxx
|
4:31
1510
xxxxxxxx
|
4:10
1510
xxxxxxxx
|
3:40
1510
xxxxxxxx
|
Because it’s a simple linear equation, I won’t bother with a graph, but it comes out to about 1969.5 treasure per five minutes.
The Strategy
The reason I say Jigsaw is only worth playing on Easy is that you have such limited space to work with. My strategy involves sorting out the tiles into piles. Given that the tiles will only partially stack and tend to push each other over a bit, the more tiles you have, the more difficult this gets. If you wish to play the harder difficulties, you can probably take the same approach, but I simply don’t have the patience to deal with that many tiles in such a small playing area.
 xxx xxx
|
The first step is to move all the tiles into the corner, so you can have some room to sort things. You’ll want to leave space along either the top or the bottom and either the left or the right.
|
 xxx xxx
|
Next, sort the edge tiles out. I prefer to place these in piles across the top, and toss anything else into a pile on the side. I also find it’s easy enough to build the logo during this step, since these pieces stand out so well. The big empty rectangular space left behind after sorting is where the final puzzle will be put together.
|
 xxx xxx
|
Build the frame first. This will make it easier to work. Also, don’t forget the preview button in the bottom right. Click that to see what the finished puzzle should look like. As far as I can tell there’s no penalty for using this, so click it however often you need to see the finished product.
|
 xxx xxx
|
Now that you have the frame, you can work your way inward. The space that’s been cleared up by using the border and logo tiles will give you some room to spread the remaining pieces out as you work. If you can’t find where something goes right away, you can put it aside for later. You can also put together any pieces you know go together but haven’t placed into the final puzzle and leave them out there as well.
|


