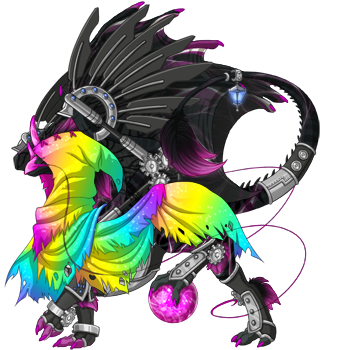
TOPIC | Espresso or Latte?
Which would you rather have?
[url=http://flightrising.com/main.php?dragon=10014298]
[img]http://flightrising.com/rendern/350/100143/10014298_350.png[/img]
[/url]
[url=http://flightrising.com/main.php?dragon=8196466]
[img]http://flightrising.com/rendern/350/81965/8196466_350.png[/img]
[/url]
Latte is soft and fluffy.
Espresso is a rebel with a fun loving side.
@Amanda
[center][size=5]
[url=http://www1.flightrising.com/forums/drs/1543646]Links List[/url]
[code][center][size=5]
[url=http://www1.flightrising.com/forums/drs/1543646]Links List[/url][/code]
[center][size=6]Links[/size]
[/center]
[center][size=5]
[url=http://flightrising.com/main.php?p=mb&board=drt&id=1101610]Dragons Off To See The World[/url]
[url=http://flightrising.com/main.php?board=drw&id=1136494&p=mb]Dragon Wish Foundation[/url]
[url=http://flightrising.com/main.php?p=mb&board=ibaz&id=1370642]Give a surprise, Get a surprise[/url]
[url=http://www1.flightrising.com/forums/drt/1226580]Nest Rentals[/url]
[quote=Gathering & Grinding For Swipp & Baldwin][center][size=5][url=http://www1.flightrising.com/forums/gde/136122]Gathering Reference Guide[/url]
[url=http://www1.flightrising.com/forums/gde/1091175]Swipp Guide[/url]
[/quote]
[quote=Coliseum Links][center][size=5][url=http://flightrising.wikia.com/wiki/Exalting_Dragons]Exaltation Payout by Level[/url]
[/quote]
[quote=Festival Related Links][center][size=5][url=http://www1.flightrising.com/forums/gde/1388514]Festival Coliseum Guide[/url]
[url=http://www1.flightrising.com/forums/gde/608964]Coliseum Element Odds[/url]
[/quote]
[url=http://flightrising.com/main.php?p=mb&board=gde&id=1304794]Apparel Guide[/url]
Personal Links
[url=http://flightrising.com/main.php?p=mb&board=drw&id=1187425]Gotta Catch'em All[/url]
[url=http://flightrising.com/main.php?board=baz&id=1168994&p=mb]Leveling Dragons Thread[/url]
Latte is soft and fluffy.
Espresso is a rebel with a fun loving side.
@Amanda
Links List
Dragons Off To See The World
Dragon Wish Foundation
Give a surprise, Get a surprise
Nest Rentals
Apparel Guide
Personal Links
Gotta Catch'em All
Leveling Dragons Thread
Espresso is a rebel with a fun loving side.
@Amanda
Links List
Code:
[center][size=5]
[url=http://www1.flightrising.com/forums/drs/1543646]Links List[/url]
Links
Dragons Off To See The World
Dragon Wish Foundation
Give a surprise, Get a surprise
Nest Rentals
Gathering & Grinding For Swipp & Baldwin wrote:
Coliseum Links wrote:
Festival Related Links wrote:
Apparel Guide
Personal Links
Gotta Catch'em All
Leveling Dragons Thread
[center][size=7]Arcane Festival 2015[/size]
Sept. 20-26, 2015
[/center]
[size=5]Waterway[/size]
[item=bluelipped thresh][item=bone fragments][item=jar of slime][item=copper ore][item=bloodscale shoulder guards][item=reflective fish scales][item=rainbow sprite][item=Fossilize][item=sand][item=Regeneration][item=Drown]
[center][size=7]Flameforger's Festival 2015[/size]
August 23-29, 2015
[/center]
[center][img]http://imageshack.us/a/img836/6779/85ww.png[/img]
I use two "Lightweight" dragons. It takes two-three Scratch or an Eliminate.
[/center]
NEW Familiars - if you get extras check the Auction House for prices and try to sell the extras right away. Prices will drop fast.
[item=Searing Jackalope][item=Extinguished Jackalope]
Save For Swipp & Baldwins Brews
[item=Herdbeast Hoof] [item=Sparrow Skull] [item=Steam Gyre] [item=Rotting Leather] [item=Fragile Antler] [item=Fossilize] [item=Drown] [item=Ruby Ring][item=White Pawn]
If you don’t want these sell them in the Auction House
[item=Eliminate] [item=Rally] [item=Berserker][item=Firebreather Cape][item=Gladewalker Cape][item=Unhatched Earth Egg][item= Unhatched Plague Egg]
*Estimated prices, check the AH before you list anything.
Eliminate = 80 gems/48000 Treasure
Rally = 65 gems/39000 Treasure
Berserker = 10 gems/6000 Treasure
Firebreather Cape = 260 gems/156000 Treasure
Gladewalker Cape = 45 gems/27000
Eggs = 200-300 gems/180000 Treasure
[center][img]http://www.flightrising.com/html5/coliseum/images/venue/forgotten_cave/_thumbnail.png[/img]
I use two "Lightweight" dragons. It takes two-three Scratch or an Eliminate.
[/center]
Save For Swipp & Baldwins Brews
[item=olive sea snake] [item=nymph] [item=copper ore] [item=nickel ore] [item=blushing pink rose] [item=runed tuft of fur] [item=ancient fungus spores] [item=Fossilize] [item=Enamor] [item=Scratch][item=Drown]
If you don’t want these sell them in the Auction House
[item=Eliminate][item=Ambush] [item=Berserker] [item=Firebreather Cape] [item=Midnight Cape][item=Runic Bat] [item=Unhatched Arcane Egg] [item=Unhatched Nature Egg] [item=Unhatched Shadow Egg] [item=Unhatched Water Egg][item=Scroll of Renaming]
*Estimated prices, check the AH before you list anything.
Eliminate = 80 gems/48000 Treasure
Ambush = 65 gems/45000 Treasure
Berserker = 10 gems/6000 Treasure
Firebreather Cape = 260 gems/156000 Treasure
Midnight Cape = 200 gems/150000 Treasure
Runic Bat = 15 gems/ 10000 Treasure
Eggs = 200-300 gems/180000 Treasure
Scroll of Renaming = 12 gems/6500 Treasure
[center][img]http://www.flightrising.com/html5/coliseum/images/venue/arena/_thumbnail.png[/img]
I use two "Lightweight" dragons. It takes two-three Scratch or an Eliminate.
[/center]
Save For Swipp & Baldwins Brews
[item=lyretail puffer] [item=sand creeper] [item=celestial horn] [item=iron ore] [item=chimera relic] [item=Battered gauntlet] [item=Brawler gauntlet] [item=Fossilize] [item=Enamor] [item=Mender's Healing Staff] [item=Meditate] [item=Regeneration] [item=Drown]
If you don’t want these sell them in the Auction House
[item=Eliminate] [item=Rally] [item= Duneglider Cape]
*Estimated prices, check the AH before you list anything.
Eliminate = 80 gems/48000 Treasure
Rally = 65 gems/39000 Treasure
Duneglider Cape = 65 gems/30000 Treasure
[center][img]http://www1.flightrising.com/static/layout/digging.jpg[/img]
[size=7]Digging[/size]
Use ALL of your Gathering turns in Fire. You have a chance at finding Festival Currency and Festival Chests.
For Swipp & Baldwins Brews
[item=Iron Ore][item=Tin Ore][item=Igneous Flow][item=smoky quartz][item=stone fertility statue] [/center]
As an added bonus you have a chance at finding
[item=Nephrite Chameleon]
[b]Baldwins Brew
[/b]Transmute and hoard as much as you can we don't know what you will need for each festival, but this gives you another way to make Festival Currency. Transmute cheap items that don't sell for much, DO NOT Transmute anything needed for [url=http://www1.flightrising.com/forums/gde/1091175]Swipp[/url].
Two point food items like the Roan Mouse for Goo, Shale (Materials) which is only worth 15 treasure for Ooze, extra Familiars you find while battling (check the Auction House before you transmute them to see if they are really worth anything first. If it's 10 gems or 3500 treasure sell it in the AH.) for Muck, Basilisk Feather Fan are worth 23 treasure for Sludge, Apparel is the hard one but if it's less then a 1000 treasure I've been transmuting it for Slime.
Lightnings Festival - just an example, each Festival will be different. [url=http://www1.flightrising.com/forums/gde/1466535]Baldwin's Bubbling Brew[/url] < see here for more information on Baldwin's Brew.
[img]https://40.media.tumblr.com/470ff41ea42f14ff568d03f7c526790e/tumblr_inline_ns4r4iyfiK1r0vr4u_540.png[/img]
Arcane Festival 2015
Sept. 20-26, 2015
Sept. 20-26, 2015
Waterway
Flameforger's Festival 2015
August 23-29, 2015
August 23-29, 2015

I use two "Lightweight" dragons. It takes two-three Scratch or an Eliminate.
Save For Swipp & Baldwins Brews
If you don’t want these sell them in the Auction House
*Estimated prices, check the AH before you list anything.
Eliminate = 80 gems/48000 Treasure
Rally = 65 gems/39000 Treasure
Berserker = 10 gems/6000 Treasure
Firebreather Cape = 260 gems/156000 Treasure
Gladewalker Cape = 45 gems/27000
Eggs = 200-300 gems/180000 Treasure
I use two "Lightweight" dragons. It takes two-three Scratch or an Eliminate.
Save For Swipp & Baldwins Brews
If you don’t want these sell them in the Auction House
*Estimated prices, check the AH before you list anything.
Eliminate = 80 gems/48000 Treasure
Ambush = 65 gems/45000 Treasure
Berserker = 10 gems/6000 Treasure
Firebreather Cape = 260 gems/156000 Treasure
Midnight Cape = 200 gems/150000 Treasure
Runic Bat = 15 gems/ 10000 Treasure
Eggs = 200-300 gems/180000 Treasure
Scroll of Renaming = 12 gems/6500 Treasure
I use two "Lightweight" dragons. It takes two-three Scratch or an Eliminate.
Save For Swipp & Baldwins Brews
If you don’t want these sell them in the Auction House
*Estimated prices, check the AH before you list anything.
Eliminate = 80 gems/48000 Treasure
Rally = 65 gems/39000 Treasure
Duneglider Cape = 65 gems/30000 Treasure

Digging
Use ALL of your Gathering turns in Fire. You have a chance at finding Festival Currency and Festival Chests.
For Swipp & Baldwins Brews
As an added bonus you have a chance at finding
Baldwins Brew
Transmute and hoard as much as you can we don't know what you will need for each festival, but this gives you another way to make Festival Currency. Transmute cheap items that don't sell for much, DO NOT Transmute anything needed for Swipp.
Two point food items like the Roan Mouse for Goo, Shale (Materials) which is only worth 15 treasure for Ooze, extra Familiars you find while battling (check the Auction House before you transmute them to see if they are really worth anything first. If it's 10 gems or 3500 treasure sell it in the AH.) for Muck, Basilisk Feather Fan are worth 23 treasure for Sludge, Apparel is the hard one but if it's less then a 1000 treasure I've been transmuting it for Slime.
Lightnings Festival - just an example, each Festival will be different. Baldwin's Bubbling Brew < see here for more information on Baldwin's Brew.
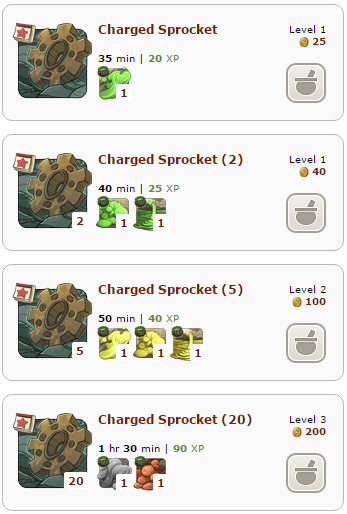
[b]How to pick an "I want to collect this" item.[/b]
First take a look at [url=http://www1.flightrising.com/forums/gde/136122]Gathering Reference Guide[/url].
You want to pick an item that isn't too plentiful, but one that isn't so rare that you wont find many at all. Try to go for a Three to Four star item.
[quote=Sonja Collects][center]
[item=Banded Snail][item=Land Snail][/center]
Also collecting all the Swipp materials and Transmutations (Goo, Ooze, Sludge...) [/quote]
[quote=Amanda Collects]
[item=Mute Swan][item=Trumpeter Swan][item=Black Swan]
[/quote]
[quote=universalmother Collects]
[item=Steppes Box Turtle][item=Snapping Turtle][item=Mud Turtle][item=Blue Bandit]
[/quote]
[quote=odie444 Collects]
[item=Blue Ring Octopus]
[/quote]
[quote=Valkyrii Collects]
[item=Crested Newt]
[/quote]
[quote=kodegar Collects]
[item=Cinnamon][item=Granny Smith Apple]
[/quote]
[quote=UmiYume]
[item=?]
[/quote]
[quote=KoryuEdelgard Collects]
[item=Brilliant Bobtail Squid][item=Dumpling Squid][item=Stubby Squid]
[/quote]
[quote=acey Collects]
[url=http://flightrising.com/main.php?p=lair&tab=userpage&id=123150]Acey[/url]
[item=Honeybee]
[/quote]
[url=https://docs.google.com/spreadsheets/d/1G85Tuc8xW3noltZuSP8kKgD7gZ0UW97NSQYmDoeKICo/edit?usp=sharing]Google doc[/url] with Swipp sends listed
How to pick an "I want to collect this" item.
First take a look at Gathering Reference Guide.
You want to pick an item that isn't too plentiful, but one that isn't so rare that you wont find many at all. Try to go for a Three to Four star item.
Also collecting all the Swipp materials and Transmutations (Goo, Ooze, Sludge...)
Google doc with Swipp sends listed
First take a look at Gathering Reference Guide.
You want to pick an item that isn't too plentiful, but one that isn't so rare that you wont find many at all. Try to go for a Three to Four star item.
Sonja Collects wrote:
Amanda Collects wrote:
universalmother Collects wrote:
odie444 Collects wrote:
Valkyrii Collects wrote:
kodegar Collects wrote:
UmiYume wrote:
KoryuEdelgard Collects wrote:
acey Collects wrote:
Google doc with Swipp sends listed
Hope this helps. Any ? just ask.
[b]Stat Points[/b]
Mire - Best Elements Arcane, Fire, Earth
[IMG]http://i98.photobucket.com/albums/l241/Melissa_Blodgett/Mire%20Dragons_zpsrnpnmm7g.png[/IMG]
Kelp Beds - Best Elements Lightning, Light, Ice
[IMG]http://i98.photobucket.com/albums/l241/Melissa_Blodgett/KBstats_zpsrz1fepde.png[/IMG]
Golem Workshop - Best Elements Wind, Nature, Fire
[img]http://www.flightrising.com/html5/coliseum/images/venue/training_fields/_thumbnail.png[/img][img]http://www.flightrising.com/html5/coliseum/images/venue/woodland_path/_thumbnail.png[/img]
You only need one "Lightweight" dragon. Everything can be Scratched.
[img]http://flightrising.com/html5/coliseum/images/venue/scorched_forest/_thumbnail.png[/img] to [img]http://www.flightrising.com/html5/coliseum/images/venue/arena/_thumbnail.png[/img]
I use two "Lightweight" dragons. Two-Three Scratch or an Eliminate.
[img]http://www.flightrising.com/html5/coliseum/images/venue/rainsong_jungle/_thumbnail.png[/img][img]http://www.flightrising.com/html5/coliseum/images/venue/boreal_wood/_thumbnail.png[/img]
At this point the "Lightweight" dragons are not strong enough to simply Eliminate some of the opponents so I use Three "Grinders".
[img]http://www.flightrising.com/html5/coliseum/images/venue/harpys_roost/_thumbnail.png[/img]
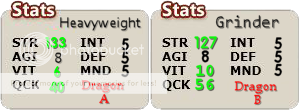
I use two "Grinders" and a "Heavyweight". The "Grinders" can Eliminate everything except the Sunspot Clouddancer, Brush Dodo, and the Hooded Dodo (they will need to be Scratched then Eliminated). The "Heavyweight" can Eliminate everything.
[u][b]Battling in the MIRE[/b][/u]
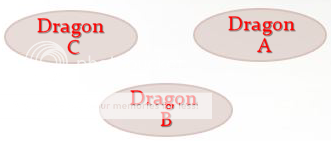
Dragon Placement - Two level 25 dragons one for slot A and one for B. Your trainee (dragon you level to 25) or exalt fodder (dragon you level to exalt for profit) goes in slot C.
[IMG]http://i98.photobucket.com/albums/l241/Melissa_Blodgett/DP1_zpsopozojpv.png[/IMG]
[b]Stones & Stats[/b]
[IMG]http://i98.photobucket.com/albums/l241/Melissa_Blodgett/BattleStones%20-%20Strength_zpstpaj1ymd.png[/IMG] [IMG]http://i98.photobucket.com/albums/l241/Melissa_Blodgett/Mire%20Dragons_zpsrnpnmm7g.png[/IMG]
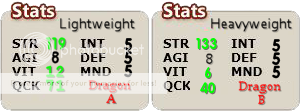
I use a "Lightweight" (Dragon A) and a "Heavyweight" (Dragon B) for the Mire.
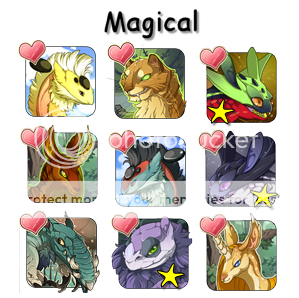
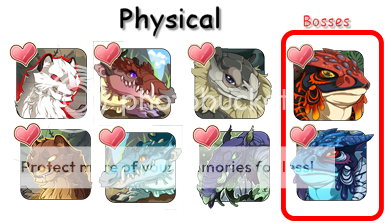
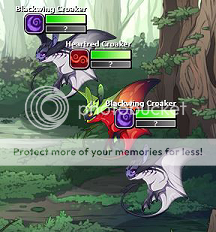
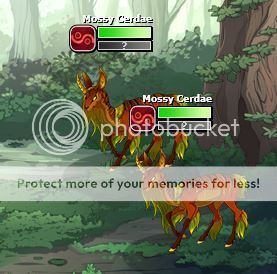
[b]Know your Enemy [/b] Some are Physical = attack right away, some are Magical = they take time to build Breath before they can attack < we like these. The magical ones I marked with yellow stars make really good "starter packs", battles that start with them allow your dragon to build breath.
[IMG]http://i98.photobucket.com/albums/l241/Melissa_Blodgett/mag_zpsueeoyt0d.png[/IMG][IMG]http://i98.photobucket.com/albums/l241/Melissa_Blodgett/Phy_zpsuyx74mlb.png[/IMG]
Good Starter Packs - Don't be afraid to try other packs to see how your dragons do. Some packs that have 2 magical and 1 physical or 1 magical and 1 physical enemy make good starter packs also.
[IMG]http://i98.photobucket.com/albums/l241/Melissa_Blodgett/sp2_zpsjpksr1su.png[/IMG][IMG]http://i98.photobucket.com/albums/l241/Melissa_Blodgett/Sp_zpszeypsxwm.jpg[/IMG]
[b]Breath & Eliminate[/b]
[IMG]http://i98.photobucket.com/albums/l241/Melissa_Blodgett/Breath_zpsx3ofll5j.png[/IMG]
At the start of a battle you will need to "Scratch" the enemy until they are gone. Once you have enough breath built up (see Regrowth in image above, it's that blue line under her health meter.) You can then use a Scratch then Eliminate.
[item=Eliminate]
All enemies (not counting Bosses) can be Scratched then Eliminated. Warning if your dragon tries to Eliminate but misses the dragon will lose breath. Then it's back to Scratch until breath is built back up again. Well worth the risk. Give it a try.
Now lets try Rally
[b]Rally is Really Great[/b]
[item=Rally]
Dragon A will Rally Dragon B. What does this do for your dragon? It gives the dragon that has been Rallied a boost of strength. You can tell when a dragon has been "Rallied" by that little yellow arm (I think it looks like a duck) see image above. A dragon that has been Rallied can use "Eliminate" without first scratching to make the enemy evaporate. Lasts for 5 turns, I think. The "Lightweight" can Rally Eliminate all opponents except the Bosses of course.
[b]Game Play[/b]
Battle One
Dragon A and B "Scratch" until enemies are gone.
Battle Two (maybe Three, depending on your starter packs)
Dragon A - uses Rally on Dragon B.
Dragon B - Eliminates Enemy one
Dragon B - Eliminates Enemy two
Dragon B - Eliminates Enemy three
Battle Three
Repeat Battle Two moves.
Don't bother using "Rally" on dragon A, in most cases it is a waste of a turn and the animation for Rally takes so long it is just quicker to use scratch and eliminate. Then why would you put a "Rally" on Dragon B if you don't use it? Simple I may use this dragon in other venues (grinding for Swipp items, and Festivals) and it may get used then. :) I never use Haste or any other stone anyway, so I may as well have a Rally in that space.
[b]Sap[/b]
Is great if you are low on Health but have some Breath to use. Sap will cause damage to the enemy returning some Health points to the dragon. Will cost your dragon some Breath to use, but helpful all the same.
[b]Shred[/b]
[item=shred]
Very useful in long drawn out battle like with the bosses. Shred will cause damage to the enemy and at the enemies next turn it loses a bit more health. Last for 3 turns I think.
[b]Dragon C
[/b]You may have noticed that Dragon C really doesn't see much action. You are right and that is a good thing. At such a low level it has no strength to compete with the enemy and it would just get in the way of the two level 25s so don't mess with the stat points and stones until it is up to level 20. At which point you can add the stones and stats and replace Dragon A with it, and get a different level 1 for Dragon C. Dump all the points you can into STR (strength) first until it reaches the desired amount, then add points to QCK (Quick), leftover points go into VIT.
If Dragon C is a dragon you are going to exalt then DO NOT add stones to it, that would be a waste of good stones. Just get it to the desired level (level 7-10 are good exalt levels) and exalt it. [url=http://flightrising.wikia.com/wiki/Exalting_Dragons]Exaltation Payout by Level[/url] <see here for payouts for leveled dragons.
Things to KEEP
[IMG]http://i98.photobucket.com/albums/l241/Melissa_Blodgett/Save_zps7qtivpkb.png[/IMG]
You can open any eggs you find, but they are worth more in the Auction House (AH) then a first gen dragon is, and that is all you get from an egg, one First Generation dragon. And the Ambush you will need for any dragon you level to 25 so hold onto them, they are very rare.
[url=http://flightrising.com/main.php?board=gde&id=1040710&p=mb]Duke's Leveling Guide (by Culex)[/url] - A more detailed guide to leveling dragons
Hope this helps. Any ? just ask.
Stat Points
Mire - Best Elements Arcane, Fire, Earth
Kelp Beds - Best Elements Lightning, Light, Ice
Golem Workshop - Best Elements Wind, Nature, Fire
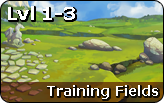

You only need one "Lightweight" dragon. Everything can be Scratched.
 to
to 
I use two "Lightweight" dragons. Two-Three Scratch or an Eliminate.


At this point the "Lightweight" dragons are not strong enough to simply Eliminate some of the opponents so I use Three "Grinders".
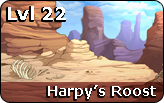
I use two "Grinders" and a "Heavyweight". The "Grinders" can Eliminate everything except the Sunspot Clouddancer, Brush Dodo, and the Hooded Dodo (they will need to be Scratched then Eliminated). The "Heavyweight" can Eliminate everything.
Battling in the MIRE
Dragon Placement - Two level 25 dragons one for slot A and one for B. Your trainee (dragon you level to 25) or exalt fodder (dragon you level to exalt for profit) goes in slot C.
Stones & Stats
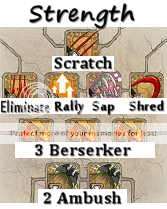

I use a "Lightweight" (Dragon A) and a "Heavyweight" (Dragon B) for the Mire.
Know your Enemy Some are Physical = attack right away, some are Magical = they take time to build Breath before they can attack < we like these. The magical ones I marked with yellow stars make really good "starter packs", battles that start with them allow your dragon to build breath.
Good Starter Packs - Don't be afraid to try other packs to see how your dragons do. Some packs that have 2 magical and 1 physical or 1 magical and 1 physical enemy make good starter packs also.
Breath & Eliminate
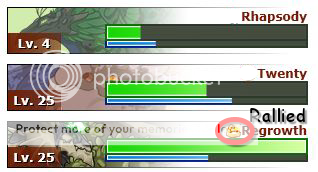
At the start of a battle you will need to "Scratch" the enemy until they are gone. Once you have enough breath built up (see Regrowth in image above, it's that blue line under her health meter.) You can then use a Scratch then Eliminate.
All enemies (not counting Bosses) can be Scratched then Eliminated. Warning if your dragon tries to Eliminate but misses the dragon will lose breath. Then it's back to Scratch until breath is built back up again. Well worth the risk. Give it a try.
Now lets try Rally
Rally is Really Great
Dragon A will Rally Dragon B. What does this do for your dragon? It gives the dragon that has been Rallied a boost of strength. You can tell when a dragon has been "Rallied" by that little yellow arm (I think it looks like a duck) see image above. A dragon that has been Rallied can use "Eliminate" without first scratching to make the enemy evaporate. Lasts for 5 turns, I think. The "Lightweight" can Rally Eliminate all opponents except the Bosses of course.
Game Play
Battle One
Dragon A and B "Scratch" until enemies are gone.
Battle Two (maybe Three, depending on your starter packs)
Dragon A - uses Rally on Dragon B.
Dragon B - Eliminates Enemy one
Dragon B - Eliminates Enemy two
Dragon B - Eliminates Enemy three
Battle Three
Repeat Battle Two moves.
Don't bother using "Rally" on dragon A, in most cases it is a waste of a turn and the animation for Rally takes so long it is just quicker to use scratch and eliminate. Then why would you put a "Rally" on Dragon B if you don't use it? Simple I may use this dragon in other venues (grinding for Swipp items, and Festivals) and it may get used then. :) I never use Haste or any other stone anyway, so I may as well have a Rally in that space.
Sap
Is great if you are low on Health but have some Breath to use. Sap will cause damage to the enemy returning some Health points to the dragon. Will cost your dragon some Breath to use, but helpful all the same.
Shred
Very useful in long drawn out battle like with the bosses. Shred will cause damage to the enemy and at the enemies next turn it loses a bit more health. Last for 3 turns I think.
Dragon C
You may have noticed that Dragon C really doesn't see much action. You are right and that is a good thing. At such a low level it has no strength to compete with the enemy and it would just get in the way of the two level 25s so don't mess with the stat points and stones until it is up to level 20. At which point you can add the stones and stats and replace Dragon A with it, and get a different level 1 for Dragon C. Dump all the points you can into STR (strength) first until it reaches the desired amount, then add points to QCK (Quick), leftover points go into VIT.
If Dragon C is a dragon you are going to exalt then DO NOT add stones to it, that would be a waste of good stones. Just get it to the desired level (level 7-10 are good exalt levels) and exalt it. Exaltation Payout by Level <see here for payouts for leveled dragons.
Things to KEEP
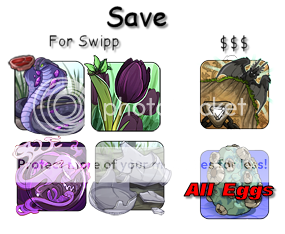
You can open any eggs you find, but they are worth more in the Auction House (AH) then a first gen dragon is, and that is all you get from an egg, one First Generation dragon. And the Ambush you will need for any dragon you level to 25 so hold onto them, they are very rare.
Duke's Leveling Guide (by Culex) - A more detailed guide to leveling dragons
Stat Points
Mire - Best Elements Arcane, Fire, Earth

Kelp Beds - Best Elements Lightning, Light, Ice

Golem Workshop - Best Elements Wind, Nature, Fire


You only need one "Lightweight" dragon. Everything can be Scratched.
 to
to 
I use two "Lightweight" dragons. Two-Three Scratch or an Eliminate.


At this point the "Lightweight" dragons are not strong enough to simply Eliminate some of the opponents so I use Three "Grinders".

I use two "Grinders" and a "Heavyweight". The "Grinders" can Eliminate everything except the Sunspot Clouddancer, Brush Dodo, and the Hooded Dodo (they will need to be Scratched then Eliminated). The "Heavyweight" can Eliminate everything.
Battling in the MIRE
Dragon Placement - Two level 25 dragons one for slot A and one for B. Your trainee (dragon you level to 25) or exalt fodder (dragon you level to exalt for profit) goes in slot C.

Stones & Stats


I use a "Lightweight" (Dragon A) and a "Heavyweight" (Dragon B) for the Mire.
Know your Enemy Some are Physical = attack right away, some are Magical = they take time to build Breath before they can attack < we like these. The magical ones I marked with yellow stars make really good "starter packs", battles that start with them allow your dragon to build breath.


Good Starter Packs - Don't be afraid to try other packs to see how your dragons do. Some packs that have 2 magical and 1 physical or 1 magical and 1 physical enemy make good starter packs also.


Breath & Eliminate

At the start of a battle you will need to "Scratch" the enemy until they are gone. Once you have enough breath built up (see Regrowth in image above, it's that blue line under her health meter.) You can then use a Scratch then Eliminate.
All enemies (not counting Bosses) can be Scratched then Eliminated. Warning if your dragon tries to Eliminate but misses the dragon will lose breath. Then it's back to Scratch until breath is built back up again. Well worth the risk. Give it a try.
Now lets try Rally
Rally is Really Great
Dragon A will Rally Dragon B. What does this do for your dragon? It gives the dragon that has been Rallied a boost of strength. You can tell when a dragon has been "Rallied" by that little yellow arm (I think it looks like a duck) see image above. A dragon that has been Rallied can use "Eliminate" without first scratching to make the enemy evaporate. Lasts for 5 turns, I think. The "Lightweight" can Rally Eliminate all opponents except the Bosses of course.
Game Play
Battle One
Dragon A and B "Scratch" until enemies are gone.
Battle Two (maybe Three, depending on your starter packs)
Dragon A - uses Rally on Dragon B.
Dragon B - Eliminates Enemy one
Dragon B - Eliminates Enemy two
Dragon B - Eliminates Enemy three
Battle Three
Repeat Battle Two moves.
Don't bother using "Rally" on dragon A, in most cases it is a waste of a turn and the animation for Rally takes so long it is just quicker to use scratch and eliminate. Then why would you put a "Rally" on Dragon B if you don't use it? Simple I may use this dragon in other venues (grinding for Swipp items, and Festivals) and it may get used then. :) I never use Haste or any other stone anyway, so I may as well have a Rally in that space.
Sap
Is great if you are low on Health but have some Breath to use. Sap will cause damage to the enemy returning some Health points to the dragon. Will cost your dragon some Breath to use, but helpful all the same.
Shred
Very useful in long drawn out battle like with the bosses. Shred will cause damage to the enemy and at the enemies next turn it loses a bit more health. Last for 3 turns I think.
Dragon C
You may have noticed that Dragon C really doesn't see much action. You are right and that is a good thing. At such a low level it has no strength to compete with the enemy and it would just get in the way of the two level 25s so don't mess with the stat points and stones until it is up to level 20. At which point you can add the stones and stats and replace Dragon A with it, and get a different level 1 for Dragon C. Dump all the points you can into STR (strength) first until it reaches the desired amount, then add points to QCK (Quick), leftover points go into VIT.
If Dragon C is a dragon you are going to exalt then DO NOT add stones to it, that would be a waste of good stones. Just get it to the desired level (level 7-10 are good exalt levels) and exalt it. Exaltation Payout by Level <see here for payouts for leveled dragons.
Things to KEEP

You can open any eggs you find, but they are worth more in the Auction House (AH) then a first gen dragon is, and that is all you get from an egg, one First Generation dragon. And the Ambush you will need for any dragon you level to 25 so hold onto them, they are very rare.
Duke's Leveling Guide (by Culex) - A more detailed guide to leveling dragons
Dragon Breeding
I like to mix my dragon breeds because you have a higher chance of getting more eggs from a nest. And mixing breeds is the ONLY way you get a five egg nest. However I also like to keep in mind the breeding cooldown so I will only breed Plentiful dragons with another Plentiful dragon, that way both the male and the female will be ready to breed (RTB) at the same time. That way I don't end up with two males that are RTB but no female to breed them with. So I have a Fae/Mirror pair and an Imperial/Nocturne pair also a Guardian/Tundra pair and so on.
Genes do not affect the number of eggs a nest will produce, however some Genes are Plentiful and others are Rare. If you mate a dragon with Tiger and one with Iridescent the offspring will most likely have the Tiger gene. Check the Breeding Rarity Comparisons post for more information. Even if I don't care for a particular gene I try to have at least one dragon in my lair with that gene because I might get lucky and have Fodder that will match the Exalt Bonus for a particular day. You can find the Exalt Bonuses on the Home page, right hand side, about half way down, this updates each day shortly after Roll-over (2:30 am for us).
Plentiful
Subject to a 15 day breeding cooldown.
•Fae Dragons
•Guardian Dragons
•Mirror Dragons
•Tundra Dragons
Common
Subject to a 20 day breeding cooldown.
•Pearlcatcher Dragons
•Ridgeback Dragons
•Snapper Dragons
•Spiral Dragons
Uncommon
Subject to a 25 day breeding cooldown.
•Skydancer Dragons
Limited
Subject to a 30 day breeding cooldown.
•Imperial Dragons
•Nocturne Dragons
Rare
Subject to a 35 day breeding cooldown.
•Coatl Dragons
•Wildclaw Dragons
Here is that breeding plan I was telling you about.
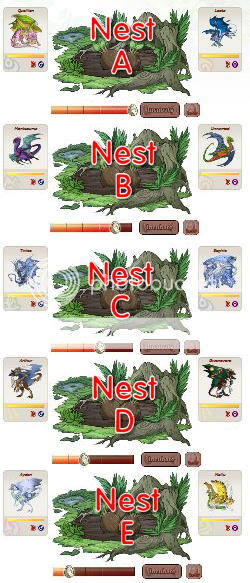
Day 1 - Put pair on Nest A, don't forget to incubate.
Day 2 - Put pair on Nest B, Incubate Nests A & B
Day 3 - Put pair on Nest C, Incubate Nests A, B & C
and so one, eventually you will be hatching Nest A and putting a pair on Nest E every day. I do this so I have a steady supply of dragons to level and exalt and I don't fill up my lair and have to wait 5-6 days before I can clear out space. (Mostly a problem when I first started and lair space was skimpy). Not to mention making time to level dragons between work and other activities.
Lair Expansions
Lair Expansion Costs - 5% discount and 1% discount
Page 1
(R3) 11 - 15 = 5,000 (4,750 - 4,950)
Page 2
16 - 20 = 15,000 (14,250 - 14,850)
21 - 25 = 30,000 (28,500 - 29,700)
26 - 30 = 45,000 (42,750 - 44,550)
Page 3
31 - 35 = 65,000 (61,750 - 64,350)
36 - 40 = 90,000 (85,500 - 89,100)
41 - 45 = 115,000 (109,250 - 113,850)
Page 4
46 - 50 = 150,000 (142,500 - 148,500)
51 - 55 = 185,000 (175,750 - 183,150)
56 - 60 = 215,000 (204,250 - 212,850)
Page 5
61 - 65 = 245,000 (232,750 - 242,550)
66 - 70 = 295,000 (280,250 - 292,050)
71 - 75 = 350,000 (332,500 - 346,500)
Page 6
76 - 80 = 400,000 (380,000 - 396,000)
81 - 85 = 475,000 (451,250 - 470,250)
86 - 90 = 550,000 (522,500 - 544,500)
Page 7
91 - 95 = 650,000 (617,500 - 643,500)
96 - 100 = 800,000 (760,000 - 792,000)
101 - 105 = 975,000 (926,250 - 965,250)
Page 8
106 - 110 = 1,075,000 (1,021,250 - 1,064,250)
111 - 115 = 1,075,000 (1,021,250 - 1,064,250)
116 - 120 = 1,100,000 (1,045,000 - 1,089,000)
Page 9
121 - 125 = 1,020,000 (969,000 - 1,009,800)
126 - 130: 1,120,000 (1,064,000 - 1,108,800)
131 - 135: 1,125,000 (1,068,750 - 1,113,750)
Page 10
136 - 140: 1,125,000 (1,068,750 - 1,113,750)
141 - 145: 1,125,000 (1,068,750 - 1,113,750)
146 - 150: 1,150,000 (1,092,500 - 1,138,500)
Page 11
151 - 155: 1,150,000 (1,092,500 - 1,138,500)
156 - 160: 1,150,000 (1,092,500 - 1,138,500)
161 - 165: 1,175,000 (1,116,250 - 1,163,250)
Page 12
166 - 170: 1,175,000 (1,116,250 - 1,163,250)
171 - 175: 1,175,000 (1,116,250 - 1,163,250)
Nest Expansions
Nest 3 - 25,000
Nest 4 - 100,000
Nest 5 - 250,000
I like to mix my dragon breeds because you have a higher chance of getting more eggs from a nest. And mixing breeds is the ONLY way you get a five egg nest. However I also like to keep in mind the breeding cooldown so I will only breed Plentiful dragons with another Plentiful dragon, that way both the male and the female will be ready to breed (RTB) at the same time. That way I don't end up with two males that are RTB but no female to breed them with. So I have a Fae/Mirror pair and an Imperial/Nocturne pair also a Guardian/Tundra pair and so on.
Genes do not affect the number of eggs a nest will produce, however some Genes are Plentiful and others are Rare. If you mate a dragon with Tiger and one with Iridescent the offspring will most likely have the Tiger gene. Check the Breeding Rarity Comparisons post for more information. Even if I don't care for a particular gene I try to have at least one dragon in my lair with that gene because I might get lucky and have Fodder that will match the Exalt Bonus for a particular day. You can find the Exalt Bonuses on the Home page, right hand side, about half way down, this updates each day shortly after Roll-over (2:30 am for us).
Plentiful
Subject to a 15 day breeding cooldown.
•Fae Dragons
•Guardian Dragons
•Mirror Dragons
•Tundra Dragons
Common
Subject to a 20 day breeding cooldown.
•Pearlcatcher Dragons
•Ridgeback Dragons
•Snapper Dragons
•Spiral Dragons
Uncommon
Subject to a 25 day breeding cooldown.
•Skydancer Dragons
Limited
Subject to a 30 day breeding cooldown.
•Imperial Dragons
•Nocturne Dragons
Rare
Subject to a 35 day breeding cooldown.
•Coatl Dragons
•Wildclaw Dragons
Here is that breeding plan I was telling you about.

Day 1 - Put pair on Nest A, don't forget to incubate.
Day 2 - Put pair on Nest B, Incubate Nests A & B
Day 3 - Put pair on Nest C, Incubate Nests A, B & C
and so one, eventually you will be hatching Nest A and putting a pair on Nest E every day. I do this so I have a steady supply of dragons to level and exalt and I don't fill up my lair and have to wait 5-6 days before I can clear out space. (Mostly a problem when I first started and lair space was skimpy). Not to mention making time to level dragons between work and other activities.
Lair Expansions
Lair Expansion Costs - 5% discount and 1% discount
Page 1
(R3) 11 - 15 = 5,000 (4,750 - 4,950)
Page 2
16 - 20 = 15,000 (14,250 - 14,850)
21 - 25 = 30,000 (28,500 - 29,700)
26 - 30 = 45,000 (42,750 - 44,550)
Page 3
31 - 35 = 65,000 (61,750 - 64,350)
36 - 40 = 90,000 (85,500 - 89,100)
41 - 45 = 115,000 (109,250 - 113,850)
Page 4
46 - 50 = 150,000 (142,500 - 148,500)
51 - 55 = 185,000 (175,750 - 183,150)
56 - 60 = 215,000 (204,250 - 212,850)
Page 5
61 - 65 = 245,000 (232,750 - 242,550)
66 - 70 = 295,000 (280,250 - 292,050)
71 - 75 = 350,000 (332,500 - 346,500)
Page 6
76 - 80 = 400,000 (380,000 - 396,000)
81 - 85 = 475,000 (451,250 - 470,250)
86 - 90 = 550,000 (522,500 - 544,500)
Page 7
91 - 95 = 650,000 (617,500 - 643,500)
96 - 100 = 800,000 (760,000 - 792,000)
101 - 105 = 975,000 (926,250 - 965,250)
Page 8
106 - 110 = 1,075,000 (1,021,250 - 1,064,250)
111 - 115 = 1,075,000 (1,021,250 - 1,064,250)
116 - 120 = 1,100,000 (1,045,000 - 1,089,000)
Page 9
121 - 125 = 1,020,000 (969,000 - 1,009,800)
126 - 130: 1,120,000 (1,064,000 - 1,108,800)
131 - 135: 1,125,000 (1,068,750 - 1,113,750)
Page 10
136 - 140: 1,125,000 (1,068,750 - 1,113,750)
141 - 145: 1,125,000 (1,068,750 - 1,113,750)
146 - 150: 1,150,000 (1,092,500 - 1,138,500)
Page 11
151 - 155: 1,150,000 (1,092,500 - 1,138,500)
156 - 160: 1,150,000 (1,092,500 - 1,138,500)
161 - 165: 1,175,000 (1,116,250 - 1,163,250)
Page 12
166 - 170: 1,175,000 (1,116,250 - 1,163,250)
171 - 175: 1,175,000 (1,116,250 - 1,163,250)
Nest Expansions
Nest 3 - 25,000
Nest 4 - 100,000
Nest 5 - 250,000
Dragon Breeding
I like to mix my dragon breeds because you have a higher chance of getting more eggs from a nest. And mixing breeds is the ONLY way you get a five egg nest. However I also like to keep in mind the breeding cooldown so I will only breed Plentiful dragons with another Plentiful dragon, that way both the male and the female will be ready to breed (RTB) at the same time. That way I don't end up with two males that are RTB but no female to breed them with. So I have a Fae/Mirror pair and an Imperial/Nocturne pair also a Guardian/Tundra pair and so on.
Genes do not affect the number of eggs a nest will produce, however some Genes are Plentiful and others are Rare. If you mate a dragon with Tiger and one with Iridescent the offspring will most likely have the Tiger gene. Check the Breeding Rarity Comparisons post for more information. Even if I don't care for a particular gene I try to have at least one dragon in my lair with that gene because I might get lucky and have Fodder that will match the Exalt Bonus for a particular day. You can find the Exalt Bonuses on the Home page, right hand side, about half way down, this updates each day shortly after Roll-over (2:30 am for us).
Plentiful
Subject to a 15 day breeding cooldown.
•Fae Dragons
•Guardian Dragons
•Mirror Dragons
•Tundra Dragons
Common
Subject to a 20 day breeding cooldown.
•Pearlcatcher Dragons
•Ridgeback Dragons
•Snapper Dragons
•Spiral Dragons
Uncommon
Subject to a 25 day breeding cooldown.
•Skydancer Dragons
Limited
Subject to a 30 day breeding cooldown.
•Imperial Dragons
•Nocturne Dragons
Rare
Subject to a 35 day breeding cooldown.
•Coatl Dragons
•Wildclaw Dragons
Here is that breeding plan I was telling you about.

Day 1 - Put pair on Nest A, don't forget to incubate.
Day 2 - Put pair on Nest B, Incubate Nests A & B
Day 3 - Put pair on Nest C, Incubate Nests A, B & C
and so one, eventually you will be hatching Nest A and putting a pair on Nest E every day. I do this so I have a steady supply of dragons to level and exalt and I don't fill up my lair and have to wait 5-6 days before I can clear out space. (Mostly a problem when I first started and lair space was skimpy). Not to mention making time to level dragons between work and other activities.
Lair Expansions
Lair Expansion Costs - 5% discount and 1% discount
Page 1
(R3) 11 - 15 = 5,000 (4,750 - 4,950)
Page 2
16 - 20 = 15,000 (14,250 - 14,850)
21 - 25 = 30,000 (28,500 - 29,700)
26 - 30 = 45,000 (42,750 - 44,550)
Page 3
31 - 35 = 65,000 (61,750 - 64,350)
36 - 40 = 90,000 (85,500 - 89,100)
41 - 45 = 115,000 (109,250 - 113,850)
Page 4
46 - 50 = 150,000 (142,500 - 148,500)
51 - 55 = 185,000 (175,750 - 183,150)
56 - 60 = 215,000 (204,250 - 212,850)
Page 5
61 - 65 = 245,000 (232,750 - 242,550)
66 - 70 = 295,000 (280,250 - 292,050)
71 - 75 = 350,000 (332,500 - 346,500)
Page 6
76 - 80 = 400,000 (380,000 - 396,000)
81 - 85 = 475,000 (451,250 - 470,250)
86 - 90 = 550,000 (522,500 - 544,500)
Page 7
91 - 95 = 650,000 (617,500 - 643,500)
96 - 100 = 800,000 (760,000 - 792,000)
101 - 105 = 975,000 (926,250 - 965,250)
Page 8
106 - 110 = 1,075,000 (1,021,250 - 1,064,250)
111 - 115 = 1,075,000 (1,021,250 - 1,064,250)
116 - 120 = 1,100,000 (1,045,000 - 1,089,000)
Page 9
121 - 125 = 1,020,000 (969,000 - 1,009,800)
126 - 130: 1,120,000 (1,064,000 - 1,108,800)
131 - 135: 1,125,000 (1,068,750 - 1,113,750)
Page 10
136 - 140: 1,125,000 (1,068,750 - 1,113,750)
141 - 145: 1,125,000 (1,068,750 - 1,113,750)
146 - 150: 1,150,000 (1,092,500 - 1,138,500)
Page 11
151 - 155: 1,150,000 (1,092,500 - 1,138,500)
156 - 160: 1,150,000 (1,092,500 - 1,138,500)
161 - 165: 1,175,000 (1,116,250 - 1,163,250)
Page 12
166 - 170: 1,175,000 (1,116,250 - 1,163,250)
171 - 175: 1,175,000 (1,116,250 - 1,163,250)
Nest Expansions
Nest 3 - 25,000
Nest 4 - 100,000
Nest 5 - 250,000
I like to mix my dragon breeds because you have a higher chance of getting more eggs from a nest. And mixing breeds is the ONLY way you get a five egg nest. However I also like to keep in mind the breeding cooldown so I will only breed Plentiful dragons with another Plentiful dragon, that way both the male and the female will be ready to breed (RTB) at the same time. That way I don't end up with two males that are RTB but no female to breed them with. So I have a Fae/Mirror pair and an Imperial/Nocturne pair also a Guardian/Tundra pair and so on.
Genes do not affect the number of eggs a nest will produce, however some Genes are Plentiful and others are Rare. If you mate a dragon with Tiger and one with Iridescent the offspring will most likely have the Tiger gene. Check the Breeding Rarity Comparisons post for more information. Even if I don't care for a particular gene I try to have at least one dragon in my lair with that gene because I might get lucky and have Fodder that will match the Exalt Bonus for a particular day. You can find the Exalt Bonuses on the Home page, right hand side, about half way down, this updates each day shortly after Roll-over (2:30 am for us).
Plentiful
Subject to a 15 day breeding cooldown.
•Fae Dragons
•Guardian Dragons
•Mirror Dragons
•Tundra Dragons
Common
Subject to a 20 day breeding cooldown.
•Pearlcatcher Dragons
•Ridgeback Dragons
•Snapper Dragons
•Spiral Dragons
Uncommon
Subject to a 25 day breeding cooldown.
•Skydancer Dragons
Limited
Subject to a 30 day breeding cooldown.
•Imperial Dragons
•Nocturne Dragons
Rare
Subject to a 35 day breeding cooldown.
•Coatl Dragons
•Wildclaw Dragons
Here is that breeding plan I was telling you about.

Day 1 - Put pair on Nest A, don't forget to incubate.
Day 2 - Put pair on Nest B, Incubate Nests A & B
Day 3 - Put pair on Nest C, Incubate Nests A, B & C
and so one, eventually you will be hatching Nest A and putting a pair on Nest E every day. I do this so I have a steady supply of dragons to level and exalt and I don't fill up my lair and have to wait 5-6 days before I can clear out space. (Mostly a problem when I first started and lair space was skimpy). Not to mention making time to level dragons between work and other activities.
Lair Expansions
Lair Expansion Costs - 5% discount and 1% discount
Page 1
(R3) 11 - 15 = 5,000 (4,750 - 4,950)
Page 2
16 - 20 = 15,000 (14,250 - 14,850)
21 - 25 = 30,000 (28,500 - 29,700)
26 - 30 = 45,000 (42,750 - 44,550)
Page 3
31 - 35 = 65,000 (61,750 - 64,350)
36 - 40 = 90,000 (85,500 - 89,100)
41 - 45 = 115,000 (109,250 - 113,850)
Page 4
46 - 50 = 150,000 (142,500 - 148,500)
51 - 55 = 185,000 (175,750 - 183,150)
56 - 60 = 215,000 (204,250 - 212,850)
Page 5
61 - 65 = 245,000 (232,750 - 242,550)
66 - 70 = 295,000 (280,250 - 292,050)
71 - 75 = 350,000 (332,500 - 346,500)
Page 6
76 - 80 = 400,000 (380,000 - 396,000)
81 - 85 = 475,000 (451,250 - 470,250)
86 - 90 = 550,000 (522,500 - 544,500)
Page 7
91 - 95 = 650,000 (617,500 - 643,500)
96 - 100 = 800,000 (760,000 - 792,000)
101 - 105 = 975,000 (926,250 - 965,250)
Page 8
106 - 110 = 1,075,000 (1,021,250 - 1,064,250)
111 - 115 = 1,075,000 (1,021,250 - 1,064,250)
116 - 120 = 1,100,000 (1,045,000 - 1,089,000)
Page 9
121 - 125 = 1,020,000 (969,000 - 1,009,800)
126 - 130: 1,120,000 (1,064,000 - 1,108,800)
131 - 135: 1,125,000 (1,068,750 - 1,113,750)
Page 10
136 - 140: 1,125,000 (1,068,750 - 1,113,750)
141 - 145: 1,125,000 (1,068,750 - 1,113,750)
146 - 150: 1,150,000 (1,092,500 - 1,138,500)
Page 11
151 - 155: 1,150,000 (1,092,500 - 1,138,500)
156 - 160: 1,150,000 (1,092,500 - 1,138,500)
161 - 165: 1,175,000 (1,116,250 - 1,163,250)
Page 12
166 - 170: 1,175,000 (1,116,250 - 1,163,250)
171 - 175: 1,175,000 (1,116,250 - 1,163,250)
Nest Expansions
Nest 3 - 25,000
Nest 4 - 100,000
Nest 5 - 250,000
Treasure to Gem conversion
600 treasure = 1 Gem

Food Prices = 25 treasure per point
Stack of 99 x 4 food points = 396 x 25 = 9900 Treasure (I've been able to sell my stacks of 99/4 point food items for 10000 treasure or 15 gems. Usually in one day listings)
Treasure/Gems
2 pt. = 6000/10
3 pt. = 10000/15
4 pt. = 15000/20
5 pt. = 18000/25
Anything higher then 5 food points is usually a collectors item and you should check the AH for current pricing. Oh and don't forget that Swipp/Baldwin's Brew food items will be worth even more.
@Valkyrii
@kodegar
@UmiYume
@Cheyko
With all the "Grinding" we are doing this week I am sure that there will be food to spare. Don't forget to Convert enough for your dragons but you might want to list some for sale this week. Not everyone can use the Coli like we can and they use there Gathering turns in Digging so they will spend treasure/gems on food rather then let there dragons go hungry. Check the other posts as some of them have been updated. And as always if you have questions or need help please let me know.
600 treasure = 1 Gem

Food Prices = 25 treasure per point
Stack of 99 x 4 food points = 396 x 25 = 9900 Treasure (I've been able to sell my stacks of 99/4 point food items for 10000 treasure or 15 gems. Usually in one day listings)
Treasure/Gems
2 pt. = 6000/10
3 pt. = 10000/15
4 pt. = 15000/20
5 pt. = 18000/25
Anything higher then 5 food points is usually a collectors item and you should check the AH for current pricing. Oh and don't forget that Swipp/Baldwin's Brew food items will be worth even more.
@Valkyrii
@kodegar
@UmiYume
@Cheyko
With all the "Grinding" we are doing this week I am sure that there will be food to spare. Don't forget to Convert enough for your dragons but you might want to list some for sale this week. Not everyone can use the Coli like we can and they use there Gathering turns in Digging so they will spend treasure/gems on food rather then let there dragons go hungry. Check the other posts as some of them have been updated. And as always if you have questions or need help please let me know.
Treasure to Gem conversion
600 treasure = 1 Gem

Food Prices = 25 treasure per point
Stack of 99 x 4 food points = 396 x 25 = 9900 Treasure (I've been able to sell my stacks of 99/4 point food items for 10000 treasure or 15 gems. Usually in one day listings)
Treasure/Gems
2 pt. = 6000/10
3 pt. = 10000/15
4 pt. = 15000/20
5 pt. = 18000/25
Anything higher then 5 food points is usually a collectors item and you should check the AH for current pricing. Oh and don't forget that Swipp/Baldwin's Brew food items will be worth even more.
@Valkyrii
@kodegar
@UmiYume
@Cheyko
With all the "Grinding" we are doing this week I am sure that there will be food to spare. Don't forget to Convert enough for your dragons but you might want to list some for sale this week. Not everyone can use the Coli like we can and they use there Gathering turns in Digging so they will spend treasure/gems on food rather then let there dragons go hungry. Check the other posts as some of them have been updated. And as always if you have questions or need help please let me know.
600 treasure = 1 Gem

Food Prices = 25 treasure per point
Stack of 99 x 4 food points = 396 x 25 = 9900 Treasure (I've been able to sell my stacks of 99/4 point food items for 10000 treasure or 15 gems. Usually in one day listings)
Treasure/Gems
2 pt. = 6000/10
3 pt. = 10000/15
4 pt. = 15000/20
5 pt. = 18000/25
Anything higher then 5 food points is usually a collectors item and you should check the AH for current pricing. Oh and don't forget that Swipp/Baldwin's Brew food items will be worth even more.
@Valkyrii
@kodegar
@UmiYume
@Cheyko
With all the "Grinding" we are doing this week I am sure that there will be food to spare. Don't forget to Convert enough for your dragons but you might want to list some for sale this week. Not everyone can use the Coli like we can and they use there Gathering turns in Digging so they will spend treasure/gems on food rather then let there dragons go hungry. Check the other posts as some of them have been updated. And as always if you have questions or need help please let me know.


