


Haematoxylin
(#32641032)
Level 25 Wildclaw


Familiar
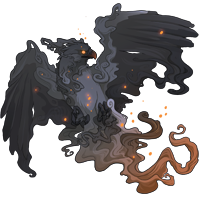
Smoke Gyre


Click or tap to view this dragon in Predict Morphology.
Energy: 0/50
This dragon’s natural inborn element is Water.
Female Wildclaw
This dragon is on a Coliseum team.


Expand the dragon details section.
Collapse the dragon details section.
Personal Style
Apparel


Skin
Scene
Measurements
Length
6.72 m
Wingspan
6.87 m
Weight
599.6 kg
Genetics
Iris
Clown
Clown
Twilight
Shimmer
Shimmer
Storm
Thylacine
Thylacine
Hatchday
Breed
Eye Type
Level 25 Wildclaw
Max Level


STR
135
AGI
8
DEF
5
QCK
31
INT
5
VIT
8
MND
5
Lineage
Parents
Offspring
Biography

Adoptable by TomSwifty
Ruins Meditate Monk
This trainer is statted and stoned so that you can easily train two dragons in the Ghostlight Ruins. She can one-shot kill any non-boss enemy with a rallied eliminate.
Using this trainer
- It does not matter where you put her in the team order, as long as the fodder you are training does not have an Ambush equipped. If you are training dragons that have equipped an Ambush or two, I recommend putting the trainer in the first (leftmost) position, though this build is not optimal for training fodder above about level 6.
- Choosing a starting pack will be easier with time, but enemy packs with at least one caster and no more than one contuser (enemy types are broken down below) are good, though you can easily start with a 4 enemy pack as long as you kill any contusers at the first opportunity. Meditate, then haste the trainer, rally the trainer, and defend; this should give you enough breath to start eliminating and have run out the meditate debuff.
- If your starting pack is all casters, mediate twice and then do the haste/rally/defend cycle so that you have extra breath for when something dodges.
- Subsequent packs are generally simpler. Haste and rally your trainer and start taking out enemies in your preferred order.
- When you have extra breath you can use sap to gain back a little bit of health to keep going.
- When too many enemies dodge and you don't have enough breath to eliminate, reload and start over. You can recover by doing a meditate/haste/rally/defend cycle if you have a just one enemy up, especially if it's a caster, but restarting is usually just as fast.
- Don't haste the fodder. This will happen anyway, by accident, at some point, and it will throw off the order entirely and I'm sorry.
Ruins enemies - simplified kill order
As you fight in any venue, you will learn how you prefer to handle different packs and which enemy you want to kill first, but my memory is terrible and the best I can usually do is go in the order of contusers, melee, and casters. More detailed order lists can be found in the original build guides. That being said, the speed of the trainer and setup for these fights means that kill order is not terribly important.
- Contusers - Longneck Medium
Getting hit with a contuse is cause for reloading the coli unless you have only the Longneck alive and can do a mediate/haste/rally/defend cycle until the debuff has cleared, but by that point the Longneck has probably contused you again. - Melee - Greybeak Reaper, Tengu Caller, Nightmare, Carrioncorn, Wendigo, Pronghorn Stomper, Infestation Hound, Wraith Hound, Shatterbone Vulture, Tatterwing Carcass
While some of these can cast spells as well, they do melee to build breath. Ghostlight has mostly melee enemies, which is why anticipate tank builds are also popular for this venue - Casters - Lux Spectre, Aer Phantom, Somber Spirit, Otherworldly Aura, Longneck Scholar
Make no mistake, the casters can really mess you up, but as they have to meditate to build breath, it usually takes them a few turns. Be warned that some of them can debuff your trainer as well to either miss turns or have a higher miss chance. - Bosses -Disoriented Spirit, Malevolent Spirit
Thankfully, these only show up alone, but I don't think it's possible for this trainer to take them down. If you have full breath and life on your trainer and get very lucky with the boss not dodging your hits, you will not do enough damage to kill it and will have to spend a lot of time recovering breath. While it may be possible to tackle the boss if you are leveling other dragons that have stats and battle stones, this is not something I have ever tried, and it makes sense to reload the coli instead.
Screenshot of current stats and stones

Forum post build originates from.

Click or tap a food type to individually feed this dragon only. The other dragons in your lair will not have their energy replenished.
This dragon doesn't eat Insects.
Feed this dragon Meat.
This dragon doesn't eat Seafood.
This dragon doesn't eat Plants.
You can share this dragon on the forums by either copying the browser URL manually, or using bbcode!

Exalting Haematoxylin to the service of the Stormcatcher will remove them from your lair forever. They will leave behind a small sum of riches that they have accumulated. This action is irreversible.
Do you wish to continue?
- Names must be longer than 2 characters.
- Names must be no longer than 16 characters.
- Names can only contain letters.
- Names must be no longer than 16 characters.
- Names can only contain letters.