[center][url=https://www.facebook.com/CorgiButtCosplay][img]http://i1179.photobucket.com/albums/x400/isosDuke/11054525_835559533194693_198678961572102404_n_zpsmj7dz2mm.jpg[/img][/url][/center]
Welcome to Corgi Butts Cosplay! As you can see, I'm Duke, the founder of CorgiButt Cosplay.
Fun name, right? Not random though, I promise. You see, I have a corgi, his name is Braden and he's my baby. He LOVES helping with everything I do, even if I don't think I need the help. Pinning a dress? He'll sit on it. Measuring fabric? He'll try to find a toy that may or may not be hidden under it. He'll sleep and lay on what I'm working on, the best partner! So, in honor of him always wanting to help, I thought up Corgi Butts Cosplay.
In the future, I plan on selling costumes, props, commissions... I want to bring fantasy and imagination to the real world.
This will be my third year cosplaying and making cosplays, oddly enough all are related to dragons somehow so it only seemed fitting to share the progress here!
In the following posts, I'll be updating them with my cosplay plans as well as the progress being made on them. So, feel free to stick around and chat! I would love to talk to anyone interested (I love critism too, gotta grow in all aspects!).
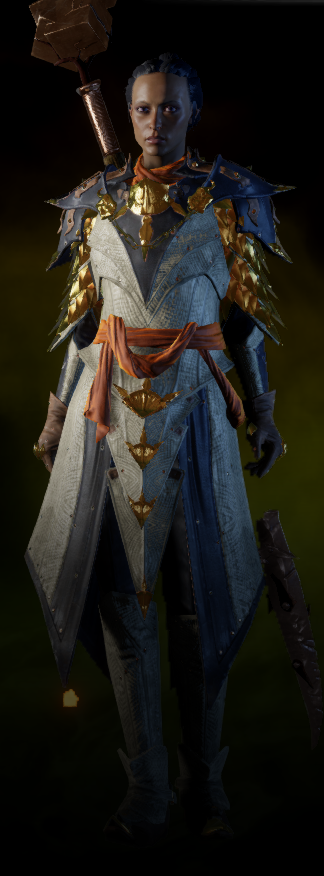
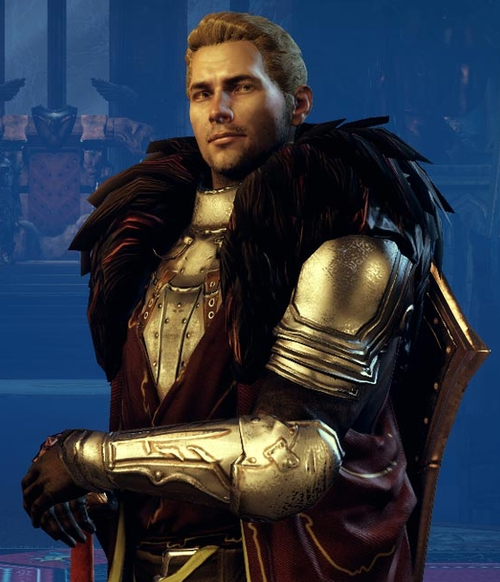
[b]2015 Plans: [/b] Lady Inquisitor and Commander Cullen from Dragon Age Inquisition
Mega Rayquaza from Pokemon
Welcome to Corgi Butts Cosplay! As you can see, I'm Duke, the founder of CorgiButt Cosplay.
Fun name, right? Not random though, I promise. You see, I have a corgi, his name is Braden and he's my baby. He LOVES helping with everything I do, even if I don't think I need the help. Pinning a dress? He'll sit on it. Measuring fabric? He'll try to find a toy that may or may not be hidden under it. He'll sleep and lay on what I'm working on, the best partner! So, in honor of him always wanting to help, I thought up Corgi Butts Cosplay.
In the future, I plan on selling costumes, props, commissions... I want to bring fantasy and imagination to the real world.
This will be my third year cosplaying and making cosplays, oddly enough all are related to dragons somehow so it only seemed fitting to share the progress here!
In the following posts, I'll be updating them with my cosplay plans as well as the progress being made on them. So, feel free to stick around and chat! I would love to talk to anyone interested (I love critism too, gotta grow in all aspects!).
2015 Plans: Lady Inquisitor and Commander Cullen from Dragon Age Inquisition
Mega Rayquaza from Pokemon
[center][b]Flames of Inquisition Armor[/b]
[img]http://img2.wikia.nocookie.net/__cb20150129013057/dragonage/images/1/17/Femquisitor_Light_Armor_ofthe_Dragon.png[/img][/center]
[quote=Random Thoughts/Notes][list]
[*] To be updated[/list][/quote]
[quote=Items Needed/Used][LIST]
[*] Leather working items and supplies
[*] Fabric - maybe just use spandex that I currently have?
[*] Plastic details (will be made from originally sculpted items)[/list][/quote]
[center][b]Staff of the Dragon[/b]
[img]http://img3.wikia.nocookie.net/__cb20150102163955/dragonage/images/a/a6/StaffoftheDragon.png[/img][/center]
[quote=Current Progress][list]
[*] Dragon perching base formed
[*] Wiring for wing formed, 1/2 boning of the wings shaped
[*] To be started over due to poor attempt at casting which ruined the original sculpted wing
[/list][/quote]
[quote=Random Thoughts/Notes][list]
[*] Parts noted as 'Plastic' will initially be sculpted by myself using Super Sculpey and then cast in plastic. This is to assist in durability and reduce weight.
[*] I refer to the parts holding the tooth and dragon as candle stick holders. The 'candle stick holders' will be the portion that connects the tooth/dragon to the body (wooden part) or the staff.
[*] Staff will be able to come apart in sections. Tooth, dragon and body of the staff.[/list][/quote]
[quote=Items Needed/Used][LIST]
[*] Body of Staff - PVC (will update with size once I have a full piece of the pipe that has it, the pipe is left over from a previous cosplay)
[*] Dragon Candle Stick - 1" PVC pipe and Plastic Dragon
[*] Tooth Candle Stick - Spray foam, Smooth-On Habitat and Plastic[/list][/quote]
[quote=Stage 1 - Sculpting][list]
[*] Try to find clear image of dragon on staff. I have found that both through online reference images and in game, you cannot zoom in on the dragon very far leaving many details a mystery. Through different views, I have noticed that the dragon is perching on the staff.
[*] Find unobscured image of dragon and print out, scale to final piece.
[*] [b]Currently[/b] using image to create a wire base to support the sculpted dragon.
[*] Cast individual parts. Pieces will be cast in a matter that allows them to easily be connected to one another once all done.
[*] Test casting with cold casting with plastic. Attempt on smaller pieces (obviously).
[*] Put final dragon together and paint (if needed).
[*] Use dragon to create the rest of the Dragon Candle Stick Holder. Candle Stick Holder should be long enough to slide into staff body and secured into place.
[*] Cast or Cold cast. Paint if needed.
[*] Attached dragon to candle stick.[/list][/quote]
Flames of Inquisition Armor

Random Thoughts/Notes wrote:
Items Needed/Used wrote:
- Leather working items and supplies
- Fabric - maybe just use spandex that I currently have?
- Plastic details (will be made from originally sculpted items)
Staff of the Dragon

Current Progress wrote:
- Dragon perching base formed
- Wiring for wing formed, 1/2 boning of the wings shaped
- To be started over due to poor attempt at casting which ruined the original sculpted wing
Random Thoughts/Notes wrote:
- Parts noted as 'Plastic' will initially be sculpted by myself using Super Sculpey and then cast in plastic. This is to assist in durability and reduce weight.
- I refer to the parts holding the tooth and dragon as candle stick holders. The 'candle stick holders' will be the portion that connects the tooth/dragon to the body (wooden part) or the staff.
- Staff will be able to come apart in sections. Tooth, dragon and body of the staff.
Items Needed/Used wrote:
- Body of Staff - PVC (will update with size once I have a full piece of the pipe that has it, the pipe is left over from a previous cosplay)
- Dragon Candle Stick - 1" PVC pipe and Plastic Dragon
- Tooth Candle Stick - Spray foam, Smooth-On Habitat and Plastic
Stage 1 - Sculpting wrote:
- Try to find clear image of dragon on staff. I have found that both through online reference images and in game, you cannot zoom in on the dragon very far leaving many details a mystery. Through different views, I have noticed that the dragon is perching on the staff.
- Find unobscured image of dragon and print out, scale to final piece.
- Currently using image to create a wire base to support the sculpted dragon.
- Cast individual parts. Pieces will be cast in a matter that allows them to easily be connected to one another once all done.
- Test casting with cold casting with plastic. Attempt on smaller pieces (obviously).
- Put final dragon together and paint (if needed).
- Use dragon to create the rest of the Dragon Candle Stick Holder. Candle Stick Holder should be long enough to slide into staff body and secured into place.
- Cast or Cold cast. Paint if needed.
- Attached dragon to candle stick.
[center][b]Commander Cullen[/b]
[img]http://img2.wikia.nocookie.net/__cb20141109121858/dragonage/images/a/a5/CullenOfficial.png[/img][/center]
[quote=Current Progress][list]
[*] [url=http://www.joann.com/sew-classics-microsuede/xprd757799.html#prefn1=content&prefn2=refinementColor&prefv2=Reds&prefv1=100%25+Polyester&start=1]Cloak/cape fabric[/url] purchased and washed! Color is Tango Red.
[*] EVA foam was purchased from [url=http://www.harborfreight.com/anti-fatigue-foam-mat-set-4-pc-61607.html]Harbor Freight[/url]
[*] Will be purchasing white mircosuede to try and dye to the yellow color for the cloak/cape
[/list][/quote]
[quote=Random Thoughts/Notes][list]
[*] To be edited[/list][/quote]
[quote=Items Needed/Used][LIST]
[*] White microsuede
[*] Fabric/leather to wrap around sword
[*] Buckles for belt and breastplate
[*] Fabric for 'mane'
[*] Fabric for cloth belts
[*] Boots
[*] Fabric for pants and top (will act as a barrier between flesh and armor but still needs to be light and breathable due to heavy crowds indoors)[/list][/quote]
[quote=Stage 1 - Designing][list]
[*] To be edited
[list][/quote]
[quote=Stage 2 - Cutting and sewing][list]
[*] Cape fabric staged for cutting and sewing! Eventually at least... This design is fun!
[*] Breastplate is cut out and being molded. Straps will be used for the half plate design to help it keep form
[list][/quote]
Commander Cullen

Current Progress wrote:
- Cloak/cape fabric purchased and washed! Color is Tango Red.
- EVA foam was purchased from Harbor Freight
- Will be purchasing white mircosuede to try and dye to the yellow color for the cloak/cape
Random Thoughts/Notes wrote:
Items Needed/Used wrote:
- White microsuede
- Fabric/leather to wrap around sword
- Buckles for belt and breastplate
- Fabric for 'mane'
- Fabric for cloth belts
- Boots
- Fabric for pants and top (will act as a barrier between flesh and armor but still needs to be light and breathable due to heavy crowds indoors)
Stage 1 - Designing wrote:
Stage 2 - Cutting and sewing wrote:
- Cape fabric staged for cutting and sewing! Eventually at least... This design is fun!
- Breastplate is cut out and being molded. Straps will be used for the half plate design to help it keep form
[center][b]Mega Rayquaza[/b]
[img]http://i57.tinypic.com/wilrhd.jpg[/img][/center]
[quote=Current Progress Photos][list]
[*] [url=https://scontent-ord1-1.xx.fbcdn.net/hphotos-xaf1/t31.0-8/10317566_10155787972195002_2782554280944256041_o.jpg]Right kimono sleeve[/url]
[*] [url=https://scontent-ord1-1.xx.fbcdn.net/hphotos-xfa1/v/t1.0-9/11667466_842058495878130_6864800978522324797_n.jpg?oh=439cf39fff6d5a6be42fcc9312799b06&oe=560FD5A1]Kimono and skirt, complete![/url]
[/list][/quote]
[quote=Current Progress][list]
[*] Kimono and skirt are complete
[*] Obi in design phase
[*] Train ready for painting
[*] Leggings/tights to be designed
[*] Half orbs to be sculpted
[/list][/quote]
[quote=Random Thoughts/Notes][list]
[*] There is about 48 feet of ribbon on the costume!
[*] Costume will be a short kimono with a longer train (does not drag on the ground)
[*] [s]Wig will represent the lower face fin of Rayquaza[/s] Consort hairstyle
[*] Fan[s]/ribbon?[/s]
[*] Figure out how to do ribbons on Rayquaza
[*] Stuff to light up?! - dad to help with any items that are to light up[/list][/quote]
[quote=Items Needed/Used][LIST]
[*] Wig and foam for back hair style
[*] Figure out what to do for sandals
[*] Figure out how to handle fans[/list][/quote]
[quote=Stage 1 - Designing][list]
[*] Kimono - images to be added
[*] Hair - image to be added
[*] Makeup - still up for debate
[*] [url=https://www.pinkyparadise.com/Vassen-Lollipop-Red-p/f9-lollipop-red.htm]Contacts[/url]
[list][/quote]
[quote=Stage 2 - Cutting and sewing][list]
[*] Kimono fabric staged for cutting and sewing!
[*] July 09, 2015 - Kimono and skirt are complete, only minor changes if any will happen to them at this point
[*] Obi is under design, wig mostly designed, train ready for painting and attachment to kimono
[list][/quote]
Mega Rayquaza

Current Progress Photos wrote:
Current Progress wrote:
- Kimono and skirt are complete
- Obi in design phase
- Train ready for painting
- Leggings/tights to be designed
- Half orbs to be sculpted
Random Thoughts/Notes wrote:
- There is about 48 feet of ribbon on the costume!
- Costume will be a short kimono with a longer train (does not drag on the ground)
Wig will represent the lower face fin of Rayquaza Consort hairstyle- Fan
/ribbon?
- Figure out how to do ribbons on Rayquaza
- Stuff to light up?! - dad to help with any items that are to light up
Items Needed/Used wrote:
- Wig and foam for back hair style
- Figure out what to do for sandals
- Figure out how to handle fans
Stage 1 - Designing wrote:
- Kimono - images to be added
- Hair - image to be added
- Makeup - still up for debate
- Contacts
Stage 2 - Cutting and sewing wrote:
- Kimono fabric staged for cutting and sewing!
- July 09, 2015 - Kimono and skirt are complete, only minor changes if any will happen to them at this point
- Obi is under design, wig mostly designed, train ready for painting and attachment to kimono
@
Stitched
Thank you! I have big plans for that one! It's going to be a gijinka and at some point, I'll get my sketches of it up.
@
Stitched
Thank you! I have big plans for that one! It's going to be a gijinka and at some point, I'll get my sketches of it up.


