Back

Forum Games

Play word and forum games here.
TOPIC | Rockbreaker's Recipe Contest-CLOSED!
1 2 ... 3 4 5 6 7 ... 14 15
[b]Entrant Name:[/b] Hathwall [b]Name of Entry:[/b] 'Mint-Fix Mocha' [b]Recipe and Description:[/b] Coffee (1 cup) 1 peppermint candy cane milk (or milk substitute) hot chocolate mix whipped topping Start things off by brewing yourself some coffee via your favourite method, be it percolator, Keurig, or other. While the coffee is busy, take the candy cane and snap it so the hook and straight portions are separated. Set aside the straight piece. Place the hook half into a snack baggy and crush it into small pieces--it should be visually around the texture of sand. Place the pieces into the bottom of your trusty coffee mug along with your preferred amount of hot chocolate mix. Once the coffee is done, pour enough into your mug to fill it about 1/4 of the way and stir until the hot chocolate dissolves. Fill to 3/4 with coffee, add milk (or substitute) to your preference, and top with whipped topping. Place straight piece of candy cane into the mug as an edible stirring stick and garnish. [b]Picture of Finished Product (with name/ID included):[/b] [img]https://38.media.tumblr.com/e2087878c94ff929672a52fbc7844b5c/tumblr_nfiis35tOQ1tk2xa1o1_1280.jpg[/img]
Entrant Name: Hathwall
Name of Entry: 'Mint-Fix Mocha'
Recipe and Description:
Coffee (1 cup)
1 peppermint candy cane
milk (or milk substitute)
hot chocolate mix
whipped topping

Start things off by brewing yourself some coffee via your favourite method, be it percolator, Keurig, or other. While the coffee is busy, take the candy cane and snap it so the hook and straight portions are separated. Set aside the straight piece. Place the hook half into a snack baggy and crush it into small pieces--it should be visually around the texture of sand. Place the pieces into the bottom of your trusty coffee mug along with your preferred amount of hot chocolate mix.

Once the coffee is done, pour enough into your mug to fill it about 1/4 of the way and stir until the hot chocolate dissolves. Fill to 3/4 with coffee, add milk (or substitute) to your preference, and top with whipped topping. Place straight piece of candy cane into the mug as an edible stirring stick and garnish.
Picture of Finished Product (with name/ID included):
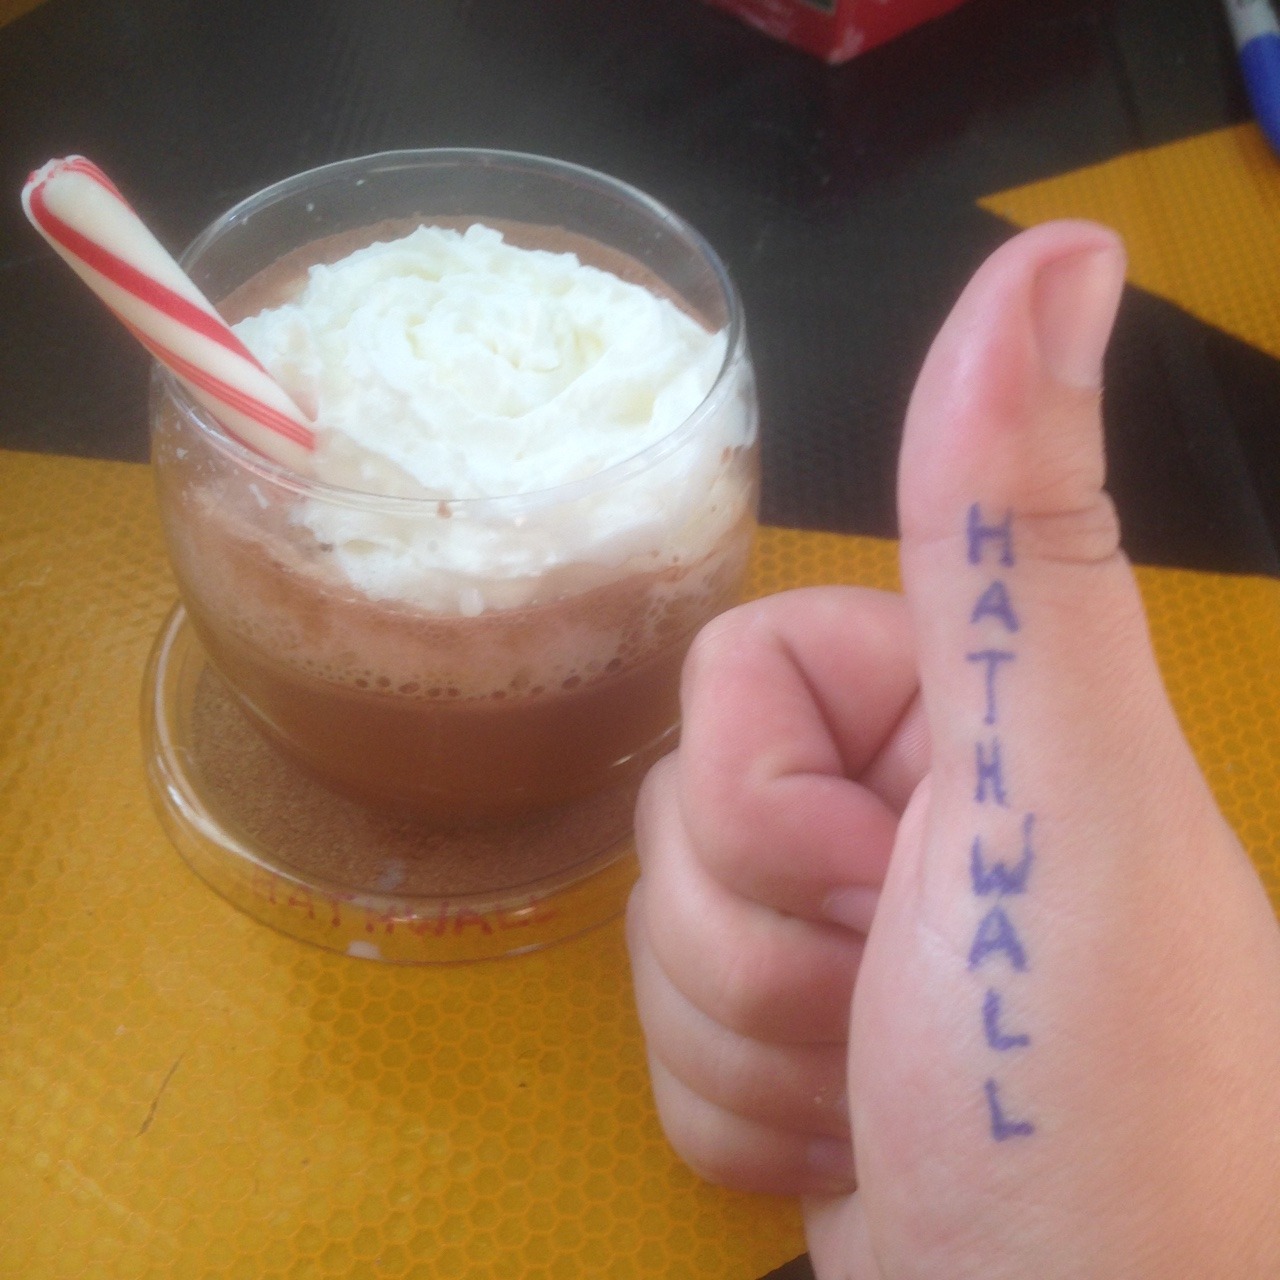
tumblr_nfiis35tOQ1tk2xa1o1_1280.jpg
0lzCAaw.pngAeQTtS7.png
@Hathwall Both those recipes look great (I'm totally going to make myself some of that mint mocha this winter) but unfortunately you can only enter one in the contest. Please let me know which one you'd rather use as your entry and I'll add it to our recipe spreadsheet. [quote=Rules and Logistics] [LIST] [*]This contest is open to all flights! [*]The contest will run through November 29. Judging, and People’s Choice, will follow. [*][b]Each person may enter one dish in the contest, choose wisely![/b] [/quote]
@Hathwall Both those recipes look great (I'm totally going to make myself some of that mint mocha this winter) but unfortunately you can only enter one in the contest. Please let me know which one you'd rather use as your entry and I'll add it to our recipe spreadsheet.

Quote:
  • This contest is open to all flights!
  • The contest will run through November 29. Judging, and People’s Choice, will follow.
  • Each person may enter one dish in the contest, choose wisely!
vSxK3u9.png
Mmmm I love to cook! Hope this recipe tastes as good to others as it does to me! [b]Entrant Name: clanguardian[/b] [b]Name of Entry: "Fruit of the Earth" Fresh Tomato Pizza[/b] [b]Recipe and Description:[/b] [LIST] [*] [b]One package of pizza dough[/b] (use your favorite - frozen, fresh, from a mix, or from scratch! I love Trader Joe's pre-made crust. Just make sure it's at room temperature. [*] [b]1-2 pints fresh tomatoes, sliced. [/b]Having a variety of colors, shapes, and sizes is great. It also means you'll get a variety of flavors! Heirloom varieties are best if you can find them. [*] [b]2 cups shredded mozzarella cheese[/b] [*] [b]1/8-1/4 cup Parmesan and/or Romano cheeses, grated[/b] [*] [b]1 handful of chopped mixed fresh herbs, or 1 tbsp. dried herbs.[/b] I prefer a blend of parsley, basil, oregano, and thyme. [*] [b]1/4 c cornmeal[/b] [*] [b]Sea salt[/b] [*] [b]Pepper flakes[/b] (if you like it spicy!) [/LIST] To assemble your pizza, first slice your tomatoes into thin rounds. Sprinkle with one or two pinches of sea salt to help extract liquid from the tomatoes, and bring out the flavor. Set aside while you work on your crust. [img]http://i161.photobucket.com/albums/t223/drakeducaine/P1390359640x480_zps0804b352.jpg[/img] Preheat the oven to 425 degrees Fahrenheit. Put your pizza stone/baking tray in the oven to let it heat up too. Dust a clean work surface with cornmeal. I prefer using cornmeal to flour as it adds crunch to the crust, and doesn't burn as easily. Roll your pizza dough in the cornmeal to prevent it from sticking to your work surface. Stretch the dough, either by hand, or using a rolling pin, into the desired shape and size. Once your oven comes to temperature, take the pizza stone/baking sheet out, and sprinkle it with a coat of cornmeal (again, to prevent the pizza dough from sticking). Place a rolling pin or a free arm in the middle of your shaped pizza dough, then lift and drape half of it over your pin/arm. This will make it much easier to move than trying to pick up the whole round! Place and fold out your pizza dough onto the stone/pan (careful, it's hot!), and bake for 4-7 minutes, until the crust just begins to puff up. Keep an eye on it, you don't want to walk away from the oven until the pizza is finished. Once the crust is partially baked, remove it and begin to assemble your toppings. Spread the tomatoes out evenly, leaving as much room as you'd like around the edge for a crust. Top with as much of the herbs as you like, followed by as much of the Parmesan/Romano cheese as you'd like. Then, top with as much of the mozzarella cheese as you'd like. [img]http://i161.photobucket.com/albums/t223/drakeducaine/P1390361640x480_zps5d3b083c.jpg[/img] Bake for another 5-10 minutes, until the cheese melts and bubbles, and the crust gets browned and crispy. Again, keep an eye on it so it doesn't get overdone! Allow the pizza to cool for a few minutes after removing it from the oven so the cheese doesn't run when you slice it. If you like pepper flakes, sprinkle them on. Dish it out and enjoy! [b]Picture of Finished Product (name and ID are in metadata):[/b] [img]http://i161.photobucket.com/albums/t223/drakeducaine/P1390362640x480_zps439b5b29.jpg[/img]
Mmmm I love to cook! Hope this recipe tastes as good to others as it does to me!

Entrant Name: clanguardian
Name of Entry: "Fruit of the Earth" Fresh Tomato Pizza
Recipe and Description:
  • One package of pizza dough (use your favorite - frozen, fresh, from a mix, or from scratch! I love Trader Joe's pre-made crust. Just make sure it's at room temperature.
  • 1-2 pints fresh tomatoes, sliced. Having a variety of colors, shapes, and sizes is great. It also means you'll get a variety of flavors! Heirloom varieties are best if you can find them.
  • 2 cups shredded mozzarella cheese
  • 1/8-1/4 cup Parmesan and/or Romano cheeses, grated
  • 1 handful of chopped mixed fresh herbs, or 1 tbsp. dried herbs. I prefer a blend of parsley, basil, oregano, and thyme.
  • 1/4 c cornmeal
  • Sea salt
  • Pepper flakes (if you like it spicy!)

To assemble your pizza, first slice your tomatoes into thin rounds. Sprinkle with one or two pinches of sea salt to help extract liquid from the tomatoes, and bring out the flavor. Set aside while you work on your crust.
P1390359640x480_zps0804b352.jpg

Preheat the oven to 425 degrees Fahrenheit. Put your pizza stone/baking tray in the oven to let it heat up too.

Dust a clean work surface with cornmeal. I prefer using cornmeal to flour as it adds crunch to the crust, and doesn't burn as easily. Roll your pizza dough in the cornmeal to prevent it from sticking to your work surface. Stretch the dough, either by hand, or using a rolling pin, into the desired shape and size.

Once your oven comes to temperature, take the pizza stone/baking sheet out, and sprinkle it with a coat of cornmeal (again, to prevent the pizza dough from sticking). Place a rolling pin or a free arm in the middle of your shaped pizza dough, then lift and drape half of it over your pin/arm. This will make it much easier to move than trying to pick up the whole round! Place and fold out your pizza dough onto the stone/pan (careful, it's hot!), and bake for 4-7 minutes, until the crust just begins to puff up. Keep an eye on it, you don't want to walk away from the oven until the pizza is finished.

Once the crust is partially baked, remove it and begin to assemble your toppings. Spread the tomatoes out evenly, leaving as much room as you'd like around the edge for a crust. Top with as much of the herbs as you like, followed by as much of the Parmesan/Romano cheese as you'd like. Then, top with as much of the mozzarella cheese as you'd like.
P1390361640x480_zps5d3b083c.jpg

Bake for another 5-10 minutes, until the cheese melts and bubbles, and the crust gets browned and crispy. Again, keep an eye on it so it doesn't get overdone! Allow the pizza to cool for a few minutes after removing it from the oven so the cheese doesn't run when you slice it. If you like pepper flakes, sprinkle them on. Dish it out and enjoy!

Picture of Finished Product (name and ID are in metadata):
P1390362640x480_zps439b5b29.jpg
@SullenEarth
whOOPS I didn't see that...let's go with the mocha recipe and I'll delete the other one
@SullenEarth
whOOPS I didn't see that...let's go with the mocha recipe and I'll delete the other one
0lzCAaw.pngAeQTtS7.png
@Hathwall Sounds good!
vSxK3u9.png
@SullenEarth Well... um... this didn't turn out as beautiful (or FR-like heh) as I'd hoped but still very tasty and easy to make! I must also give credit to my earth-friend @Keera who taught me the core of this recipe. ;D I watched her make it once and went off of memory for my part, plus adaptations! It's still really simple and easy to do. Without further ado I present my adaptation of oreo balls - Earth Eggs! [b]Entrant Name:[/b] BlueTrillium (id 32180) [b]Name of Entry:[/b] Earth Eggs [b]Recipe and Description:[/b] [list][*][b]One standard-sized package of Oreos.[/b] - Any flavor you like. Experiment! I personally used peanut butter ones for this batch as it seemed more 'earthy' to have the brown filling. xD But I'm seriously tempted to make a peppermint batch come Christmas! I don't really recommend the double- or mega-stuffed ones, as the extra filling seems to clog up the blender. But if you don't mind dealing with that, go for it. Imitation Oreos are fine too as long as the package size is about the same. [*][b]One standard (8oz) brick of cream cheese.[/b] - I used the 1/3 fat one. [*][b]About half a standard package of almond bark.[/b] - I used white/vanilla almond bark for these.[/list] First, set the brick of cream cheese aside to warm up to room temp. We want it to be softened when we use it later. Then powder/crumbify all the Oreos in a blender or food processor. Depending on the size of yours, this might take a few rounds. Pour the powdered cookies into a large bowl. Hopefully your cream cheese is softened by now. If not, hold it (wrapped) in your hands for a bit to warm it. Then unwrap it and drop it into the Oreo powder. (At this point I take a knife or fork and 'cut' the squishy cream cheese block into the powder to get it started. Seems to help keep things together easier.) Using a cake beater/mixer, blend the cream cheese into the oreo powder until it becomes a thick dough. Grab a baking sheet and lay some wax paper on top of it. Make sure your hands are clean of course, and then pluck up a bit of dough and roll it into a ball (or in this case, an egg-shape) in your hands, then place it on the wax paper. Generally these should be pretty small balls/eggs, not really any bigger than the first joint of your thumb. Once the baking sheet is full, slide it into your fridge (usually I've got space on top of the other stuff, in the small area below the next shelf, heh). You'll probably still have dough left, go ahead and repeat the steps to use up the rest on a second baking sheet and refrigerate that as well. Keera says to refrigerate the eggs/balls for about 2 hours. I believe her. I didn't and it made the next steps a bit more difficult for me. xD Go play video games for a while. Maybe some coli? Done refrigerating? Let's continue! Drop some chunks of almond bark into a microwave-safe container to melt. I used a large pyrex measuring cup. Heat it in the microwave for about a minute and a half and then try stirring it to see if it's melted. Continue as needed until it is liquified. Pull your baking sheets of eggs out of the fridge and grab a toothpick. Spear an egg with the toothpick and dip it into the liquid almond bark to coat most of it (not all, or it'll probably get stuck in the almond bark and be hard to get back out). Place the coated egg back on the cookie sheet and repeat this with all the eggs. I attempted to make my eggs look like earth eggs by scoring them with the toothpick before dipping them, but due to my lack of refrigeration, the eggs kept falling off of the toothpick into the almond bark. v_v This made the coating too thick to see the cool ridges I put in. Scoring the eggs after the almond bark was already on them didn't look as nice imo. Oh well. [b]For an extra final touch[/b] I mixed a bit of cocoa powder with powdered sugar (probably also could've used hot chocolate mix) and sprinkled it overtop the eggs for that earthy look. xD Voila! Your earth eggs are done. Refrigerate them if you're not going to eat them right away - with that cream cheese in there they need it. Makes about 4 dozen earth eggs. [b]Picture of Finished Product:[/b] [img]http://i698.photobucket.com/albums/vv347/BlueTrillium_BACC/EarthEggs4_small_zps999f817e.jpg[/IMG] [img]http://i698.photobucket.com/albums/vv347/BlueTrillium_BACC/EarthEggs5_small_zps313f2e6c.jpg[/img] *edit2* pics fixed!
@SullenEarth

Well... um... this didn't turn out as beautiful (or FR-like heh) as I'd hoped but still very tasty and easy to make! I must also give credit to my earth-friend @Keera who taught me the core of this recipe. ;D I watched her make it once and went off of memory for my part, plus adaptations! It's still really simple and easy to do.

Without further ado I present my adaptation of oreo balls - Earth Eggs!

Entrant Name: BlueTrillium (id 32180)
Name of Entry: Earth Eggs
Recipe and Description:
  • One standard-sized package of Oreos. - Any flavor you like. Experiment! I personally used peanut butter ones for this batch as it seemed more 'earthy' to have the brown filling. xD But I'm seriously tempted to make a peppermint batch come Christmas! I don't really recommend the double- or mega-stuffed ones, as the extra filling seems to clog up the blender. But if you don't mind dealing with that, go for it. Imitation Oreos are fine too as long as the package size is about the same.
  • One standard (8oz) brick of cream cheese. - I used the 1/3 fat one.
  • About half a standard package of almond bark. - I used white/vanilla almond bark for these.

First, set the brick of cream cheese aside to warm up to room temp. We want it to be softened when we use it later. Then powder/crumbify all the Oreos in a blender or food processor. Depending on the size of yours, this might take a few rounds. Pour the powdered cookies into a large bowl.

Hopefully your cream cheese is softened by now. If not, hold it (wrapped) in your hands for a bit to warm it. Then unwrap it and drop it into the Oreo powder. (At this point I take a knife or fork and 'cut' the squishy cream cheese block into the powder to get it started. Seems to help keep things together easier.) Using a cake beater/mixer, blend the cream cheese into the oreo powder until it becomes a thick dough.

Grab a baking sheet and lay some wax paper on top of it.

Make sure your hands are clean of course, and then pluck up a bit of dough and roll it into a ball (or in this case, an egg-shape) in your hands, then place it on the wax paper. Generally these should be pretty small balls/eggs, not really any bigger than the first joint of your thumb.

Once the baking sheet is full, slide it into your fridge (usually I've got space on top of the other stuff, in the small area below the next shelf, heh).

You'll probably still have dough left, go ahead and repeat the steps to use up the rest on a second baking sheet and refrigerate that as well.

Keera says to refrigerate the eggs/balls for about 2 hours. I believe her. I didn't and it made the next steps a bit more difficult for me. xD Go play video games for a while. Maybe some coli?

Done refrigerating? Let's continue!

Drop some chunks of almond bark into a microwave-safe container to melt. I used a large pyrex measuring cup. Heat it in the microwave for about a minute and a half and then try stirring it to see if it's melted. Continue as needed until it is liquified.

Pull your baking sheets of eggs out of the fridge and grab a toothpick. Spear an egg with the toothpick and dip it into the liquid almond bark to coat most of it (not all, or it'll probably get stuck in the almond bark and be hard to get back out). Place the coated egg back on the cookie sheet and repeat this with all the eggs.

I attempted to make my eggs look like earth eggs by scoring them with the toothpick before dipping them, but due to my lack of refrigeration, the eggs kept falling off of the toothpick into the almond bark. v_v This made the coating too thick to see the cool ridges I put in. Scoring the eggs after the almond bark was already on them didn't look as nice imo. Oh well.

For an extra final touch I mixed a bit of cocoa powder with powdered sugar (probably also could've used hot chocolate mix) and sprinkled it overtop the eggs for that earthy look. xD

Voila! Your earth eggs are done. Refrigerate them if you're not going to eat them right away - with that cream cheese in there they need it.

Makes about 4 dozen earth eggs.

Picture of Finished Product:
EarthEggs4_small_zps999f817e.jpg
EarthEggs5_small_zps313f2e6c.jpg

*edit2* pics fixed!
Come to the dork side. Do not make me de-story you. Image © Diaktoros
DriftAwayBanner_zpsd03e0e45.jpg tumblr_om7wmtaZKm1w2diclo1_100.png
DNOE36T.png
(water-only links)
Everyone's recipes look amazing! Looks like I'm gonna have to go shopping soon!

@yueppi
Everyone's recipes look amazing! Looks like I'm gonna have to go shopping soon!

@yueppi
Hhhh I'm back....
I definitely need to enter this. I enjoyed the Plague one so much (and it's so great to see other flights hosting cooking contests! I was afraid for a while that I was the only one who'd ever want to make more of them.)

I just need to decide what to make. If I enter with an entree, I know what I'll make, but if it's a dessert I'm not sure...

Pinging myself so I'll be able to get back here easily @Shellhead
all of these look amaaaaaazing! i'm going grocery shopping this morning, gonna have to restrain myself from buying ingredients to make every single one of these.
@SullenEarth

Just a question I didn't see an answer to, is a recipe only entered in one category? If something is a main dish and an earthy inspired dish is it considered for both?
@SullenEarth

Just a question I didn't see an answer to, is a recipe only entered in one category? If something is a main dish and an earthy inspired dish is it considered for both?
sZRxyrd.png
1 2 ... 3 4 5 6 7 ... 14 15